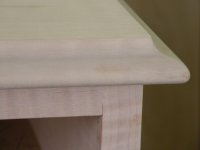
An Out Standing Chest

The top has a thumb mold cut on the two sides and the front edge. The top is screwed up! Screwed up through the top front and back rail on both left and right sides and in center from the front of the chest. I don't want anyone who will work on this piece in the future to have to take the back off to get to the screws to remove the top. The holes are large enough to allow a little movement seasonally. I will also drill holes through the center rail on the left and right side. Countersinking all the holes. I will even slightly countersink the top of the holes so shavings from the drill won't get between the top and case while screwing down the top. When screwing the top I will have the chest flipped upside down and clamped to my bench. This way when my screws which go in at an angle will not shift the top as you tighten them down. There will be plenty of time to screw thing up later. Again each section just sets on the one under it.
 

Attachments

  • thumb mold.JPG
    thumb mold.JPG
    140.6 KB · Views: 114
I feel compelled to notice that this is, I believe, the first five page thread in the history of this forum. So thanks again Jeff and keep up the good work.
And open up another pedestal table class.

Howard Steier
 
My vote too for a very interesting topic. We look forward to a few photos of the completed pieces . Thanks again, Jeff
 
My question to everyone is could you build this chest from my postings and then the subsequent questions? If there are no other questions, like drawer sizes or other internal construction alternatives like dust dividers or blocking of the drawer bottoms so there is more of a bearing surface or overhang of the top over the back for a chair rail or,(?) with a dozen other  questions, then I will post a finished picture of both cherry and maple chests when the lifting handles(which have been back ordered) arrive and then are installed. I do appreciate all letting me post these rants.
 
Jeff,

In your Feb. 21 posting, you mentioned that pieces built in the Shenandoah Valley would be more robust/heavier. Were you referring to just furniture in general, or are there examples of these portable chests from the area?
 
Jeff,
Now that you've mentioned it (and since this piece has made my build list) I would be interested in the drawer sizes.  If it's not too much trouble I would also like to know your source for the hardware and model numbers if it isn't too much trouble.  Oh, and would you by any chance happen to have a dimensioned sketch of the foot profile?  That would be helpful.

I've enjoyed this thread very much and appreciate you taking the time to do this.  You do a very good job with your photographs.

Regards,
-Chuck
 
I have submitted this chest to our quality control department. I bet you that the Chinese imports don't get this kind of scrutiny. We spare no expense to make sure we deliver the best piece possible. Can you say that about your pieces? Please note our waste inspector to the left. She keeps an eye on our scraps.
 

Attachments

  • Final inspection or pasture prime.JPG
    Final inspection or pasture prime.JPG
    151.7 KB · Views: 217
Jeff,

Didn't realize you were ISO certified.

Thanks for the thread. Really enjoyed reading along.

Stephen


Jeff,
Your inspector's name must be Angus. Do they use the 4 foot rule (if it looks good from 4 feet away it passes)? If it looks like it will last for heifer and heifer (the period of time a bull wants to live), it is good a enough. What do they say to the customers? "Hand over the Mooola" !
good job,
Mike
 
Mike, Her name is actually Angie. Bertha checks our scraps.
Chuck, Here is the foot pattern. The original had a bracket OGee foot. Although this straight bracket foot is a Charleston foot also.
 

Attachments

  • Foot pattern.JPG
    Foot pattern.JPG
    156.2 KB · Views: 89
Here is another picture and drawer measurements from the bottom to the top.
10 5/8 x 38
9 5/16 x38
7 7/8 x 36 3/8
6 7/16 x 36 3/8
4 5/16 x 34 3/4
3 7/16 x 17 left and right top drawers
 

Attachments

  • Driveway moment.JPG
    Driveway moment.JPG
    157 KB · Views: 320
Jeff,
The piece looks lovely.  Maybe you'll share your finishing secrets??

Thanks for the additional info - I'm anxious to start this project - been out of the shop for too many months.  I should have enough cherry on hand for this build except the height of that bottom drawer front is going to be a problem.

About the foot profile, I think the flat bracket foot is more appropriate for this piece.

Thanks again and there many be a few more questions along the way.

-Chuck

BTW  Any country boy knows that cows are fairly easy to please.  The sheep are the real critiques.
 
The finish is easy. It's water, sand paper, aniline dye, same piece of sand paper, oil, filler for color(not needed on cherry or maple to fill grain), shellac, same piece of sand paper again, lacquer (what better than a nice coat of plastic to keep our customers from calling back with a finish problem, no news is good news), steel wool, wax, and brass.
Almost all of our 27 inspectors left today during one of our workshops. What better time for a revolt. Found them about a mile and a half from the farm lounging by a pond near the Opequeon Creek. The grass is always greener on the other side of the fence. I don't think they liked the comment about the sheep. I was not aware they had the internet.
 
Jeff L Headley said:
The finish is easy. It's water, sand paper, aniline dye, same piece of sand paper, oil, filler for color(not needed on cherry or maple to fill grain), shellac, same piece of sand paper again, lacquer (what better than a nice coat of plastic to keep our customers from calling back with a finish problem, no news is good news), steel wool, wax, and brass.

Jeff - I wouldn't look too askance at laquer.  It's quite true that it's just as inauthentic as polyurethane, but at least it's by definition a spirit varnish, which was widely used during the period judging from contemporary publications.  One observation that I've made quite recently is that well-cured shellac, that was mixed fresh from flakes, is extraordinarily hard and water resistant.

I'm a geek, so I couldn't resist testing the resistance of this shellac coating to various liquids.  I tested 1) tap water for 18 hours, 2) Soda (in the form of mountain dew) for 18 hours, 3) tomato juice for 15 hours, beer (a concentrated import stout) for 12 hours, and finally, wine for 12 hours.  The particular board was cherry with 3 1.5lb. coats on it.  After leaving the liquids on the board for the specified amount of time, I wiped the board off with a damp washcloth.  In all cases, there was no visible ring or other damage.

Continuing along this theme, I intentionally tried my best to damage the surface.  The only items that I tried that did actually damage the finish was a very hot coffee cup fresh out of the microwave, and Bacardi 151 rum left for 3 hours.  The hot coffee cup, btw, did far more damage than the rum.
 
Jeff,
Sorry to hear about the trouble with the inspectors, but at least we now know that they are cyberly competant.  We may have to start speaking in code.

-Chuck
 
I appreciate the shellac advice and am interested in your findings. I agree shellac is a great finish. I do think that the intoduction of heat  to a shellac surface with the prior mentions substances could change the outcome to a shellaced surface. I do know from many finish restorations that water and shellac not agree with each other. Although most do include heat. Of course alcohol cuts shellac. Was your test piece straight from the applied shellac surface or was anything done to the shellaced surface. I am not questioning I am just asking. I am curious what the temperature was. Heat is bad. Especially with Mountain Dew. Yahoo
John, I should have mentioned the grit was 220 finishing paper. The aluminum oxide doesn't ware out enough to be used again immediately after staining. Watch your corner edges. Our original finishing process actualluy used 240 paper but you can't find that grit any more.
 
"Was your test piece straight from the applied shellac surface or was anything done to the shellaced surface. I am not questioning I am just asking. I am curious what the temperature was. Heat is bad. Especially with Mountain Dew. Yahoo"

Jeff - the shellaced surface was native as it was when it cured (i.e. - not waxed).  The specific type of shellac was the Tools for Working Wood "improved" high quality shellac flakes - dewaxed blonde.  I noticed a significant difference not only in how fast the flakes dissolved, but also the hardness of the finished surface over some shellac that I'd been using that was considerably slower to go into solution.

In the case of the heat experiment, the temperature of the coffee cup would've been about 150 degrees farenheit - certainly hot to hold in the hand, but not so hot as to be unreasonable as test of every-day use.  I did, however, repeat the same thing (the hot coffee cup) on polyurethane for the customer that was choosing between finishes - the same coffee cup badly blistered the poly.
 
Back
Top