You are using an out of date browser. It may not display this or other websites correctly.
You should upgrade or use an alternative browser.
You should upgrade or use an alternative browser.
An Out Standing Chest
- Thread starter Jeff L Headley
- Start date
Hi Jeff.
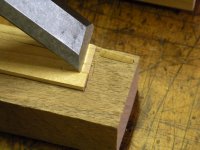
Why not take the thickness of the "cog bead" directly with a marking guage and then scribe a line? Isn't it easier to plane to a scribed line?
Do you plane the rabbett for the bead or do you make the rabbett with a router?
And how about the sides? What technique do you use to achieve the cross grain rabbett?
Howard Steier
Jeff L Headley
Well-known member
Hello Howard, Happy Spring
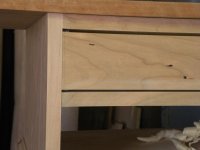
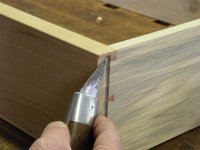
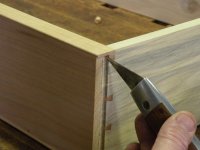
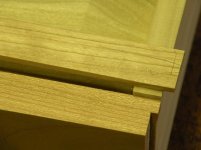
The reason I mark the beading with a pencil in the manner I do is that if I have a slight difference in the fit of the drawer front this method will let me fit the bead to the case and not the drawer front which is what a cutting gauge would do. I will remove the waste top and bottom with a planer and then hand fit with my hand plane to the line. This a not a critical fit that requires a knife line like say a dovetail. After the glue sets up I will remove the drawer and cut the side notch usually with a router. The top and bottom bead cover the drawer completely the side pieces will go back about 3/8" as to not cover up the dovetails.
The reason I mark the beading with a pencil in the manner I do is that if I have a slight difference in the fit of the drawer front this method will let me fit the bead to the case and not the drawer front which is what a cutting gauge would do. I will remove the waste top and bottom with a planer and then hand fit with my hand plane to the line. This a not a critical fit that requires a knife line like say a dovetail. After the glue sets up I will remove the drawer and cut the side notch usually with a router. The top and bottom bead cover the drawer completely the side pieces will go back about 3/8" as to not cover up the dovetails.
Jeff L Headley
Well-known member
I do the same thing. The glue up I mean is the drawer case not the bead. After the drawer sets up I will take the drawer out then cut the sides for the beading. Then apply all four pieces of beading mitering the joint where they intersect.
Jeff L Headley
Well-known member
Jeff L Headley
Well-known member
Jeff L Headley
Well-known member
Jeff L Headley
Well-known member
Jeff L Headley
Well-known member
Jeff L Headley
Well-known member
Jeff L Headley
Well-known member
Jeff L Headley
Well-known member
If there are no other questions( which I had hope there would be more of) on this project what might be a project of interest for next winter? Thanks for everyone's participation.
Very nice demo and thanks.
I do have a comment and question
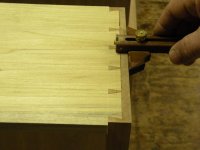
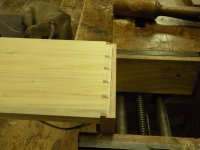
The times that I have made cockbeads, I would make rabbett on the side of the drawer fall short of the dovetails. I can see the advantage of cutting the rabbett into the tails; more bearing/glue surface for the bead.
Do you ever make the side bead pieces full thickness, i.e. completely cover the dovetail? This of course hides the joinery which can be a plus or minus depending on one's skills at cutting dovetails. However it makes mitering the beads slightly easier.
Howard Steier
I do have a comment and question
The times that I have made cockbeads, I would make rabbett on the side of the drawer fall short of the dovetails. I can see the advantage of cutting the rabbett into the tails; more bearing/glue surface for the bead.
Do you ever make the side bead pieces full thickness, i.e. completely cover the dovetail? This of course hides the joinery which can be a plus or minus depending on one's skills at cutting dovetails. However it makes mitering the beads slightly easier.
Howard Steier
jim vojcek
Well-known member
Jeff, I also enjoy your construction information, most helpfull. Would you consider the Townsend 3 shell blockfront? Or the chest you show in FWW #211, the Quarter column article.
Jim Vojcek
Jim Vojcek
Jeff L Headley
Well-known member
Howard, I would agree it would be easier just to cover the sides with the same width beading, but after putting all the work in cutting the dovetails it is a real shame to cover them up and then just tell everyone they are dovetailed. I have yet to see an old one with the side dovetails cover up. I am still waiting.
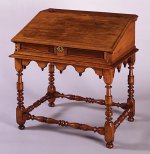
I like the idea of a desk on frame(very attractive desk). I am wondering how to cover carving over the internet with just photos. You need hands on for carvings. Thanks everone for following this exercises. Jeff Headley
I like the idea of a desk on frame(very attractive desk). I am wondering how to cover carving over the internet with just photos. You need hands on for carvings. Thanks everone for following this exercises. Jeff Headley
G
gvforster
Guest
I hope we are not finished yet. I still waiting to see the top and how its applied and the back boards in place.
Jeff L Headley
Well-known member
Share: