You are using an out of date browser. It may not display this or other websites correctly.
You should upgrade or use an alternative browser.
You should upgrade or use an alternative browser.
An Out Standing Chest
- Thread starter Jeff L Headley
- Start date
Jeff L Headley
Well-known member
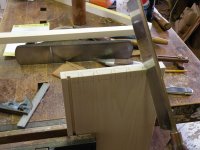
John, Thanks for the interest. The base mold is made from a strip of primary wood glued on the front of secondary wood. The cost of the time gluing up is questionable for the cherry chest but the curly maple chest it is worth the time plus it eats up narrow scrap pieces. We glued up two pieces around 42" for each chest. One for the front and one for the two sides. I will also need a piece about 14" long the same thickness, out of secondary wood, for the back foot. After cutting the mold I will cut a 45 degree angle on one end of one piece ( the nicest piece) and lay it on the bottom of the front edge with the case turned upside down on saw horses and let it overhang the case by a shy 1/8". I will then cut a 45 on both ends of the other piece of mold for my sides and check my angle. If it doesn't need adjusting (which it quite often will) I will then mark the other side and cut a 45 on the marked side and then adjust the angle to fit. Cut the side pieces in half. Glue and clamp the front piece of molding down. Then go to lunch. Have a greasy burger or a salad. Come back and fill the wood stove. Remove the clamps. Please remember we use Elmer's white glue. Clean up any squeeze out around the 45. Check to see that the sides still fit properly. Then cut the sides to fit width wise. Drill two hole (slightly smaller than 1/4" in the middle and towards the back of the side mold. Glue both side and front 45s and then about 3" back. Don't go wild with the glue. Keep it away from the outer edge. Squeeze out can be a problem. Most of your glue will squeeze out. I will set my case on saw horses and clamp the mold down to keep it from wandering. Then screw back half in the two holes and then go feed the cows. I will let this sit glued up over night.
jim vojcek
Well-known member
Jeff, it looks like cross grain construction was used on the bracket feet in conjunction with the reinforcement piece behind them. Is that correct? Have you found that having a dovetail on only one side of a sliding dovetail is ok or is that period style? The chest truly looks outstanding!
Jim Vojcek
Jim Vojcek
Jeff,
A question and a comment.
Question;
Do you use white glue for the glue blocks and post on the feet? If so, do you clamp, nail or just rub them on?
Comment:
A little known but well documented fact is that greasy hamburgers were a major cause of premature mortality in 18th century cabinetmakers.
Howard Steier
jim vojcek
Well-known member
Howard,I thought it was a bad salad!
Jim Vojcek
Jim Vojcek
John McAlister
Well-known member
Jeff, and all the other contributors, this has been a great class in furniture making! I hope all who have read and followed this thread realize what a great opportunity this has been; how fortunate we all are to be able to click on to the forum and gain some priceless knowledge from some of the best in the field. And priceless is indeed the right word. I sure have learned a lot. My thanks to everybody.
Among other things, how else would we have ever known the chief cause of premature mortality among the 18th century cabinet makers!! Howard you get A+ on that one.
Seriously, this whole thing is a prime example of what the forum can do, we're lucky to have access to it. John McAlister
Among other things, how else would we have ever known the chief cause of premature mortality among the 18th century cabinet makers!! Howard you get A+ on that one.
Seriously, this whole thing is a prime example of what the forum can do, we're lucky to have access to it. John McAlister
Jeff L Headley
Well-known member
Jim, Howard, and John: Thanks for following this it's fun to discuss period construction we use today. We all need to do all we can to help promote our industry.
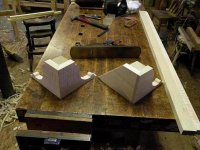
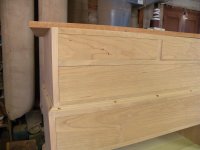
We used cross grain vertical glue blocks for the bracket feet but used quartersawn primary pieces to reduce shrinkage. Yes Howard they are just rubbed on along with the horizontal blocks. They do last a long time. I have only had one foot returned for repair and that was when our client moved out west and the tractor trailer truck jack knifed. We had to repair a broken foot and some of the broken (literally) pediment on a desk and bookcase we made. They were lucky. I will run the vertical glue block all the way to the base under the mold and then cut the glue block about an 1/8" shy of the bottom of the foot and then add a three prong glide which is what the chest rests upon. So the primary wood is just a facade. Or you could block up the feet (as pictured). This blocking is extremely susceptible to moisture and is a lot of extra work. Who will pay me for this extra work that might or might not extend the life of this chest. I have seen plenty with vertical blocking that are still holding today.
I think you asked a second question as far as sliding dovetails and rail construction. Half dovetail are quite common when your dovetailed rails are not exposed. Why add the work of dovetailing both edges, top and bottom, if you are going to cover them up with a 1/4" strip unlike many new england pieces where the dovetailed rails are exposed.
It is supposed to snow again so that means more quality time in the shop in between all the shoveling and trying to keep warm and my wife's to do lists.
Attachments

jim vojcek
Well-known member
Jeff, I never thought one could use only half a dovetail! Thanks for the input. Now I wonder how many other things I'm doing unnecessarily. I saw in FWW #211 your article on " How to Add Quarter Columns to Your Furniture". One of the sketches shows a half dovetail. I thought it was a mistake.
I'm sorry about that. By the way, it is a very nice article. Thanks for answering all the questions.
Jim Vojcek
I'm sorry about that. By the way, it is a very nice article. Thanks for answering all the questions.
Jim Vojcek
Jeff L Headley
Well-known member
Jeff L Headley
Well-known member
Jeff L Headley
Well-known member
Jeff L Headley
Well-known member
Jeff L Headley said:Dovetail marker
How long has your dovetail marker been around?
G
gvforster
Guest
Jeff,
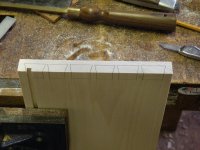
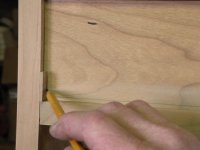
It appears you are marking out drawer dovetails via dovetail marker vs. using drawer sides dovetails as template. In general, do you mark out intersecting dovetails "independently" , relying on accurate measurements to ensure the pieces go together
It appears you are marking out drawer dovetails via dovetail marker vs. using drawer sides dovetails as template. In general, do you mark out intersecting dovetails "independently" , relying on accurate measurements to ensure the pieces go together
P
pearle
Guest
It looks like you are using a relatively large number (say, 6) tails of a relatively small size. Over the years I've evolved to using a smaller number (say, 2 or 3) of larger tails. I do like to use fairly small pins (1/8" x 1/4" or so) as yours appear to be. Is there a period or regional preference for one style over the other?
Preston Earle
Preston Earle
Jeff L Headley
Well-known member
My dovetail marker is about 30 years old. Steve Hamilton made the one pictured for me.
I lay out my pins from my drawer sides tails to fit that side (I have a reason for this).
A good dovetail only fits once. Or at least that is what I've been told. Maybe someday I will make a good dovetail
A general rule for pin spacing is however far a tail reaches add that plus half again between pins.
Jeff L Headley
Well-known member
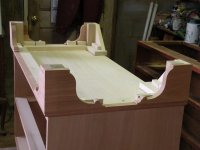
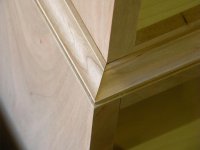
The waist mold get glued across the front. Then the side pieces of the mold gets glued at the miter and then about 3" back from the front and then tacked in the center and at the back so the sides can move. Finish will wick under and hold the molding slightly until I'm dead
Attachments
Jeff L Headley
Well-known member
Jeff L Headley
Well-known member
Share: