You are using an out of date browser. It may not display this or other websites correctly.
You should upgrade or use an alternative browser.
You should upgrade or use an alternative browser.
Worm holes in Butternut
- Thread starter Tom M
- Start date
Tom M
Well-known member
Sorry for so long since the last post. I had some last minute Christmas gifts to make and then decided to finish another project that I've worked on and off for four years.
One project was a small display case for my son which was designed to fit into an Ikea (ugh) cabinet he has for his entertaiment center. I used a piece of poplar which was hard as a rock and painted it black to match the Ikea (ugh). It came out nice but the cost for the glass and shipping across country made it a rather expensive project! In hind site I really should have used plywood for the case and some of that hot melt glue veneer for the exposed part. It would have been much lighter and easier to work. The only thing you see if the front as the cabinet is 12.5x12.5 and the cubby hole is 13x13...
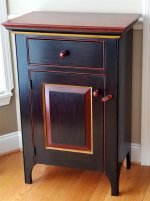
I started a variation of a pie safe for our kitchen back at the end of 2015. The only glued-up board is the drawer bottom. All but the top was beautiful clear white pine. I think the top might have been red pine. Earlier this year I glued-up the door and made the drawer. Then lastly I made the moldings. The top's molding were carved or scraped. I finished it with milk paint and shellac. For the color we decided on Barn Red with a base of black. Black and mustard would be used on some of the moldings.
I really enjoyed the painting process. After applying the black undercoat I started painting the top red. I stopped at this point because I thought the combination of the red top with the black cabinet looked good. So I ended up painting the rest of the cabinet red (so it would show through under the black), and then black again. I used the mustard color sparingly as my wife did not like it. However after sanding and rubbing out the finish followed by some shellac she loved it (happy wife is my goal.) I then turned the knobs, which was the first time I've used my lathe in years (excellent video by Phil Lowe: https://www.youtube.com/watch?v=TyV85eQEWQE&list=PLVKzAyot6NChVgy3HHugHxN1mBRJS6c7u&index=6&t=0s.) I used hand made iron hinges from Horton Brass. I moved it to the kitchen this past weekend.
And that brings me back to the Stepback Hutch. After cleaning up my shop I laid out all of the face frame mortise and tenons. I then spent some time fine tuning my mortise machine and tenoning jigs. Next up will be a lot of machining!
One project was a small display case for my son which was designed to fit into an Ikea (ugh) cabinet he has for his entertaiment center. I used a piece of poplar which was hard as a rock and painted it black to match the Ikea (ugh). It came out nice but the cost for the glass and shipping across country made it a rather expensive project! In hind site I really should have used plywood for the case and some of that hot melt glue veneer for the exposed part. It would have been much lighter and easier to work. The only thing you see if the front as the cabinet is 12.5x12.5 and the cubby hole is 13x13...
I started a variation of a pie safe for our kitchen back at the end of 2015. The only glued-up board is the drawer bottom. All but the top was beautiful clear white pine. I think the top might have been red pine. Earlier this year I glued-up the door and made the drawer. Then lastly I made the moldings. The top's molding were carved or scraped. I finished it with milk paint and shellac. For the color we decided on Barn Red with a base of black. Black and mustard would be used on some of the moldings.
I really enjoyed the painting process. After applying the black undercoat I started painting the top red. I stopped at this point because I thought the combination of the red top with the black cabinet looked good. So I ended up painting the rest of the cabinet red (so it would show through under the black), and then black again. I used the mustard color sparingly as my wife did not like it. However after sanding and rubbing out the finish followed by some shellac she loved it (happy wife is my goal.) I then turned the knobs, which was the first time I've used my lathe in years (excellent video by Phil Lowe: https://www.youtube.com/watch?v=TyV85eQEWQE&list=PLVKzAyot6NChVgy3HHugHxN1mBRJS6c7u&index=6&t=0s.) I used hand made iron hinges from Horton Brass. I moved it to the kitchen this past weekend.
And that brings me back to the Stepback Hutch. After cleaning up my shop I laid out all of the face frame mortise and tenons. I then spent some time fine tuning my mortise machine and tenoning jigs. Next up will be a lot of machining!
Attachments
Tom M
Well-known member
I bought a used Delta benchtop mortiser several years ago and have only used it once a couple years ago for doors in our master bathroom cabinets. I’ve chopped mortises before on several chairs, a sofa, and a couple case pieces, but I sure don’t get pleasure from it. Before starting this project, I got out the machine and played around a little before mortising the face frames. I found out two things that were important. The first was I needed to clamp the wider boards to the fence. Hand pressure wasn’t enough to keep things from moving. This greatly increased the time (clamp/unclamp for each plunge) but gave much more consistent results. The second thing was tuning up the chisel. This reduced the force required and kept the chisel from clogging. I followed most of the tips from a FWW video (https://www.finewoodworking.com/2006/06/15/sharpen-a-mortiser-bit).
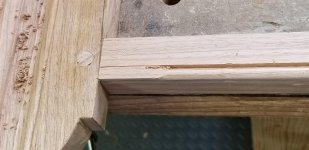
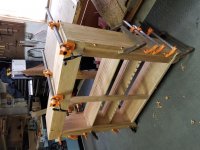
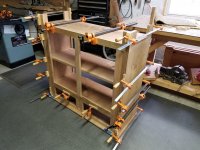
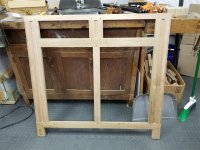
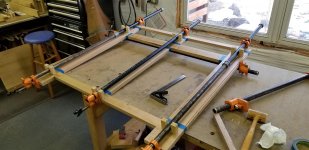
With the mortise machine tuned up and the tenon jig set just right I was able to make quick work of the machining. I decided to start with the upper cabinet. I had left the stiles wider on the outside edge for flush trimming to the cabinet, but because of the side bead I needed to fit them before assembling the face frame. I ended up clamping the face frame in the best position possible, and then pegged the top rail to the cabinet. This allowed me to dissemble the face frame and trim the sides. Once glued-up I could relocate it with the pegs. Before gluing the face frame, I drilled holes for pegs. I did the glue up yesterday afternoon. That is a pretty big glue surface – all around the cabinet, and then gluing and hammer home fifteen pegs. Of course, the glue was already gelling before I had set the face frame on the cabinet. (It was 21 degrees out and my shop was 63.) I ended up having to use a lot of clamps to try and pull the face frame tight. I’m not sure how well this worked, but “it is what it is” (which is what our mold engineer used to say when the parts didn’t meet the drawing!)
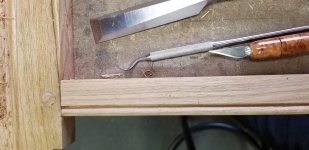
After getting all of this done, I realized I forgot to run a side bead on the lower rail. Luckily, my LN 66 beader had the same size cutter. I was able to scrape the bead up to about 2 inches from each end. I used a bench chisel and dental pick and some fine sandpaper to complete the bead.
Someone previously asked about my workbenches. The one seen in the picture of the completed face frame came from an old childhood friend of my fathers. The oak toolbox (Union) was my dad’s when he was an apprentice at Kodak in the 1950s. The “leather” Gerstner was my Great Grandfather’s (who died the year before I was born.) When I got it after my dad passed away, I found tools (Starrett and Brown & Sharpe) which had my Great-Great Grandfather’s name etched on them. Pretty cool!
With the mortise machine tuned up and the tenon jig set just right I was able to make quick work of the machining. I decided to start with the upper cabinet. I had left the stiles wider on the outside edge for flush trimming to the cabinet, but because of the side bead I needed to fit them before assembling the face frame. I ended up clamping the face frame in the best position possible, and then pegged the top rail to the cabinet. This allowed me to dissemble the face frame and trim the sides. Once glued-up I could relocate it with the pegs. Before gluing the face frame, I drilled holes for pegs. I did the glue up yesterday afternoon. That is a pretty big glue surface – all around the cabinet, and then gluing and hammer home fifteen pegs. Of course, the glue was already gelling before I had set the face frame on the cabinet. (It was 21 degrees out and my shop was 63.) I ended up having to use a lot of clamps to try and pull the face frame tight. I’m not sure how well this worked, but “it is what it is” (which is what our mold engineer used to say when the parts didn’t meet the drawing!)
After getting all of this done, I realized I forgot to run a side bead on the lower rail. Luckily, my LN 66 beader had the same size cutter. I was able to scrape the bead up to about 2 inches from each end. I used a bench chisel and dental pick and some fine sandpaper to complete the bead.
Someone previously asked about my workbenches. The one seen in the picture of the completed face frame came from an old childhood friend of my fathers. The oak toolbox (Union) was my dad’s when he was an apprentice at Kodak in the 1950s. The “leather” Gerstner was my Great Grandfather’s (who died the year before I was born.) When I got it after my dad passed away, I found tools (Starrett and Brown & Sharpe) which had my Great-Great Grandfather’s name etched on them. Pretty cool!
Attachments
-
 2020-02-13 17.16.52 (Large).jpg216.2 KB · Views: 14
 -
 2020-02-14 17.18.24 (Large).jpg205.6 KB · Views: 13
 -
 2020-02-19 13.58.57 (Large).jpg279.3 KB · Views: 19
 -
 2020-02-19 11.26.23 (Large).jpg255.4 KB · Views: 21
 -
 2020-02-19 11.31.58 (Large).jpg320 KB · Views: 21
 -
 2020-02-19 14.38.02 (Large).jpg215.2 KB · Views: 19
 -
 2020-02-20 07.25.12 (Large).jpg225.7 KB · Views: 21
")
Tom M
Well-known member
When attaching the upper face frame, I glued and pegged it in place. This took some time and the glue gelled quick. For the lower face frame, I clamped it, and after the glue set, I drilled and pegged it. This worked much better as I was able to get glue squeeze out along most of the edge
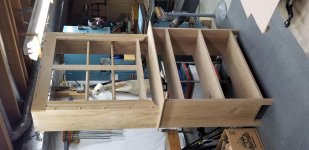
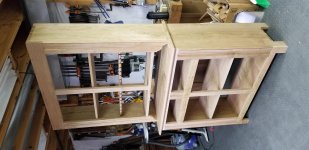
Once I trimmed the pegs and carved the bead detail into them, I set the top cabinet on the lower cabinet – very exciting! I think the next step is prep boards for the backs.
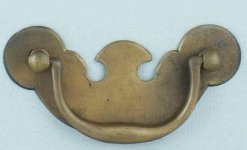
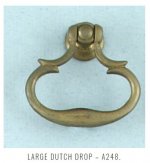
On Gene’s hutch he has 3/8” offset doors and used rat tail hinges which get mortised into the side of the door. The only part of the hinge you see is the “tail”. For the doors he used brass pulls with a latch. He used the same pulls for the drawers. For the drawers I prefer the early style pull and plate that Bess Naylor used on the step-backs she built.
I think I want to see more of the blacksmith door hinges that you get with an inset mounted door. I found one source I liked (http://www.sevenpinesforge.com/products/rat-tail-hinge/). If I do inset doors, I’ll add side beads to the stiles to add a little detail. I was concerned at first that having inset doors would require me to do inset drawers as well but then I noticed several projects which have inset doors with lipped drawers. One was Gene’s last project – a Kas he built for a class at Olde Mill. Gene passed away before the Kas was completed and painted (Bess at Olde Mill did the finishing). I was visiting Gene’s wife when Bess delivered it, and I was able to assist in assembling it. It wasn’t until this past fall that I was able to locate the blacksmith hardware and mount the door. There you go – inset door and lipped drawer!
After completing my painted cabinet for the kitchen I’m thinking I may just turn similar knobs for the doors and drawers and use wood latches for the doors. It would certainly be cheaper, but the brass might look nicer. Any opinions?
Pictures:
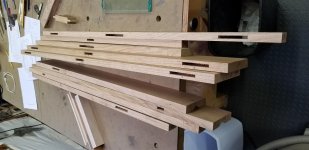
1) Face frame glue-up
2) Face frame assembled and tenon pegged
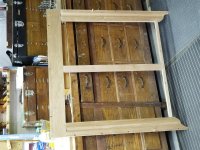
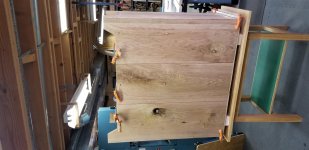
3) Face Frame glued and clamped to cabinet
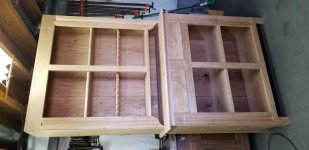
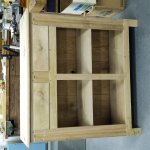
4) Upper and Lower cabinets
5) Gene’s door and drawer pulls
6) Bess’s drawer pulls
7) Gene’s Kas
Once I trimmed the pegs and carved the bead detail into them, I set the top cabinet on the lower cabinet – very exciting! I think the next step is prep boards for the backs.
On Gene’s hutch he has 3/8” offset doors and used rat tail hinges which get mortised into the side of the door. The only part of the hinge you see is the “tail”. For the doors he used brass pulls with a latch. He used the same pulls for the drawers. For the drawers I prefer the early style pull and plate that Bess Naylor used on the step-backs she built.
I think I want to see more of the blacksmith door hinges that you get with an inset mounted door. I found one source I liked (http://www.sevenpinesforge.com/products/rat-tail-hinge/). If I do inset doors, I’ll add side beads to the stiles to add a little detail. I was concerned at first that having inset doors would require me to do inset drawers as well but then I noticed several projects which have inset doors with lipped drawers. One was Gene’s last project – a Kas he built for a class at Olde Mill. Gene passed away before the Kas was completed and painted (Bess at Olde Mill did the finishing). I was visiting Gene’s wife when Bess delivered it, and I was able to assist in assembling it. It wasn’t until this past fall that I was able to locate the blacksmith hardware and mount the door. There you go – inset door and lipped drawer!
After completing my painted cabinet for the kitchen I’m thinking I may just turn similar knobs for the doors and drawers and use wood latches for the doors. It would certainly be cheaper, but the brass might look nicer. Any opinions?
Pictures:
1) Face frame glue-up
2) Face frame assembled and tenon pegged
3) Face Frame glued and clamped to cabinet
4) Upper and Lower cabinets
5) Gene’s door and drawer pulls
6) Bess’s drawer pulls
7) Gene’s Kas
Attachments
-
 2019-09-21 17.18.20.jpg2 MB · Views: 21
 -
 a61.jpg57.9 KB · Views: 7
 -
 a248.jpg28.1 KB · Views: 6
 -
 2020-02-26 10.17.58 (Large).jpg234 KB · Views: 14
 -
 2020-02-25 12.31.54 (Large).jpg228.2 KB · Views: 12
 -
 2020-02-25 08.48.44 (Large).jpg233.3 KB · Views: 11
 -
 2020-02-24 10.28.38 (Large).jpg268.2 KB · Views: 11
Tom M
Well-known member
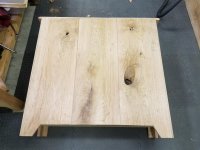
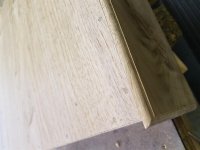
I pulled out the remaining four wide boards which were left for the backs. I was able to layout the boards such that I could use three nice clear pieces for the back of the top, and three boards (with a 1 ½” piece glued to one board) with some big knots holes (and some wonderful crotch regions – that will never be seen). After planing to 7/8”, and then hand planing and cutting the tongue and groove on bottom backs I realize the rebates I cut were ¾” deep (I remember doing that for a reason – meaning not 7/8” deep - but I don’t remember why!) I took them down to ¾” and hand planed them again.
For the bottom boards I used a Greenfield 7/8 T&G plane (the style with two blades). I had sharpened this previously but never used it on a project. On the first couple of boards I had a difficult time cutting the tongues because the inside kept jamming with chips. After playing around I found it worked much better if I used short strokes so that the shavings would break apart. I switched to my Stanley 48 plane for the upper boards. This worked so much better, and now the nice wooden plane with two blades and wedges will probably sit on a shelf from now on.
On the front side of the upper back boards I planed an astragal using a nice plane a friend gave me several years ago. He had modified it specifically for cutting astragals on tongue and groove boards. My wife questioned why I was adding this detail to the inside of the cabinet. I told her because it was very easy, I have the plane, and because I wanted to!
I decided to hold off on attaching the backs to the cabinets until after I have the drawers fitted. It just seems this will be easier if I have access from the back.
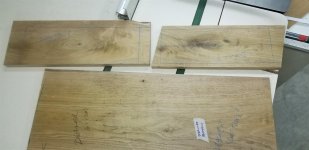
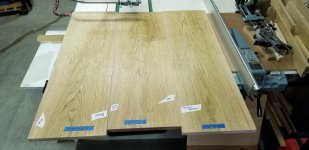
Yesterday I made decisions on what pieces to use for the drawer fronts. I previously had marked four potential pieces – all with oval knots in the center where the pull will go. I rough cut these and then went though my remaining smaller boards to get wood for the sides and backs of the drawers. I already had a 14+” wide board long enough to get the drawer bottoms without glue-up.
Gene’s step back was done in pine and painted. The original he had (upper) was walnut. Mine is butternut. I decided to just use butternut because I had enough of it. Therefore, the lower shelves, the backs, and the drawer parts will all be butternut. I’m not sure this would have been done 250 years ago, but then again if they had a butternut tree, and didn’t have pine they might have done the same thing.
Pictures
1) Upper back boards
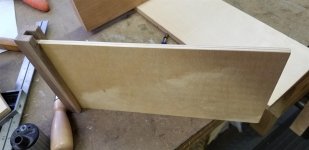
2) Lower backs fitted
3) Greenfield Tongue and Groove plane
4) Stanley 48
5) Drawer fronts and drawer bottom boards
I was really hoping writing this "blog" would get more traffic on the Forum. Doesn't appear to be working...
For the bottom boards I used a Greenfield 7/8 T&G plane (the style with two blades). I had sharpened this previously but never used it on a project. On the first couple of boards I had a difficult time cutting the tongues because the inside kept jamming with chips. After playing around I found it worked much better if I used short strokes so that the shavings would break apart. I switched to my Stanley 48 plane for the upper boards. This worked so much better, and now the nice wooden plane with two blades and wedges will probably sit on a shelf from now on.
On the front side of the upper back boards I planed an astragal using a nice plane a friend gave me several years ago. He had modified it specifically for cutting astragals on tongue and groove boards. My wife questioned why I was adding this detail to the inside of the cabinet. I told her because it was very easy, I have the plane, and because I wanted to!
I decided to hold off on attaching the backs to the cabinets until after I have the drawers fitted. It just seems this will be easier if I have access from the back.
Yesterday I made decisions on what pieces to use for the drawer fronts. I previously had marked four potential pieces – all with oval knots in the center where the pull will go. I rough cut these and then went though my remaining smaller boards to get wood for the sides and backs of the drawers. I already had a 14+” wide board long enough to get the drawer bottoms without glue-up.
Gene’s step back was done in pine and painted. The original he had (upper) was walnut. Mine is butternut. I decided to just use butternut because I had enough of it. Therefore, the lower shelves, the backs, and the drawer parts will all be butternut. I’m not sure this would have been done 250 years ago, but then again if they had a butternut tree, and didn’t have pine they might have done the same thing.
Pictures
1) Upper back boards
2) Lower backs fitted
3) Greenfield Tongue and Groove plane
4) Stanley 48
5) Drawer fronts and drawer bottom boards
I was really hoping writing this "blog" would get more traffic on the Forum. Doesn't appear to be working...
Attachments

Tom M
Well-known member
It's been two weeks since my last post. No replys!
I have so many more stories and pictures to share, but I set the rule at the beginning: New post only after a reply!
Think what you are all missing - drawer construction, back assembly, making and installing the moldings!
I have so many more stories and pictures to share, but I set the rule at the beginning: New post only after a reply!
Think what you are all missing - drawer construction, back assembly, making and installing the moldings!
ttalma
Well-known member
Sorry I have't been on the forum much! I'll do better, I promise!
I'd come over and look but....
I like the drawer fronts using the knots that would look neat around the pulls. I've seen grain painted furniture doing this, but never the actual wood.
I don't really think like that, I'm not very artistic, and I like straight grain, so that is what I always look for. I would have thrown the knots in the burn box.
Making the back is always satisfying to me. I feel like that's the point where it all comes together! I use my 45 for doing the tongue and groove. I might have to get one of those plane, mostly because I don't have one!
Tom M
Well-known member
With the back boards fitted, but not installed, I moved on to the drawers.
After sizing the drawer fronts, I realized the hollowed knot region on the backside of one of the boards ended up being located right where the pins would be cut. I replaced it with my 3rd choice and oriented them such that it almost looks like continuous grain.
I roughed formed the ovolo molding on the drawer front using a block plane, rabbet plane, and scraper. Next, I cut the rabbet at the top and side of the drawer front on the table saw and cleaned-up with my rabbet plane. This is a “German” style drawer with the bottom trenailed, so I held off on the bottom rabbet until I had planed the bottom board.
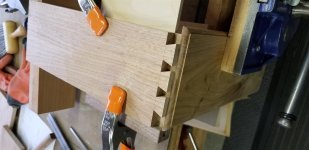
I cut the tails on the sides first and then the half-blind pins. A couple years ago I came across a simple jig that helps greatly for laying out dovetails. I think it was from a Fine Woodworking e-mail I received. Just a scrap piece of plywood and a small scrap of wood! This simple jig makes layout so much easier by making alignment a breeze.
I laid out the pins on both backs. After cutting the first set I found out I had laid the pins out on the wrong side of the board. I found a nice replacement piece in my cut-off pile. But by the time I had planed the bow out of the board it was too thin. For the third try I wanted to keep the same planer set-up for the final thickness, and so pulled out my old Ryobi AP-10 for the initial planing and finished with a final pass through my bigger planer. Oh, and then I realized I had changed the bigger planer to the thinner thickness. So now I had one back with the pins flipped, and two backs which were too thin! But the fourth one came out nice! I put all the drawer parts in the kitchen oven to heat them up before glue-up. This worked great.
I then thickness planed the bottom board and cut the rabbet in the drawer fronts. I used white oak for the trenails because I was concerned 1/8” square butternut pegs might crush. Drawers complete!
Leaving the backs off made installation of the drawer guides much easier. I was able to clamp the guides from the back which made drawer fitting simple. I planed the side of the guides to get just the right clearance. The guides are held with some glue – mainly at the front.
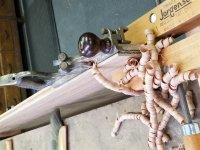
Next up was installing the back boards. I used 3/8” pegs and glue. I clamped the boards in position and pre-drilled the peg holes. Glue-up was easy!
Coming up next time: moldings. But first pictures:
1) CAD picture of drawer
2) Dovetail allignment jig
3) Dovetail layout
4) Drawer parts
5) Trenails
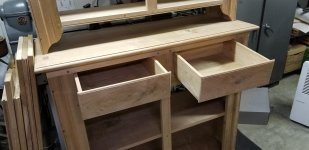
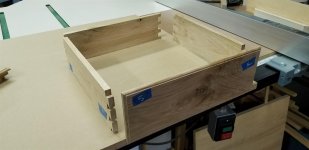
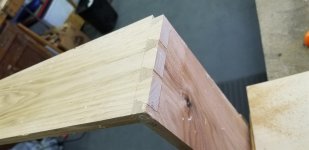
6 & 7) Drawers done
8) Back glued and pegged
9) Moldings next
After sizing the drawer fronts, I realized the hollowed knot region on the backside of one of the boards ended up being located right where the pins would be cut. I replaced it with my 3rd choice and oriented them such that it almost looks like continuous grain.
I roughed formed the ovolo molding on the drawer front using a block plane, rabbet plane, and scraper. Next, I cut the rabbet at the top and side of the drawer front on the table saw and cleaned-up with my rabbet plane. This is a “German” style drawer with the bottom trenailed, so I held off on the bottom rabbet until I had planed the bottom board.
I cut the tails on the sides first and then the half-blind pins. A couple years ago I came across a simple jig that helps greatly for laying out dovetails. I think it was from a Fine Woodworking e-mail I received. Just a scrap piece of plywood and a small scrap of wood! This simple jig makes layout so much easier by making alignment a breeze.
I laid out the pins on both backs. After cutting the first set I found out I had laid the pins out on the wrong side of the board. I found a nice replacement piece in my cut-off pile. But by the time I had planed the bow out of the board it was too thin. For the third try I wanted to keep the same planer set-up for the final thickness, and so pulled out my old Ryobi AP-10 for the initial planing and finished with a final pass through my bigger planer. Oh, and then I realized I had changed the bigger planer to the thinner thickness. So now I had one back with the pins flipped, and two backs which were too thin! But the fourth one came out nice! I put all the drawer parts in the kitchen oven to heat them up before glue-up. This worked great.
I then thickness planed the bottom board and cut the rabbet in the drawer fronts. I used white oak for the trenails because I was concerned 1/8” square butternut pegs might crush. Drawers complete!
Leaving the backs off made installation of the drawer guides much easier. I was able to clamp the guides from the back which made drawer fitting simple. I planed the side of the guides to get just the right clearance. The guides are held with some glue – mainly at the front.
Next up was installing the back boards. I used 3/8” pegs and glue. I clamped the boards in position and pre-drilled the peg holes. Glue-up was easy!
Coming up next time: moldings. But first pictures:
1) CAD picture of drawer
2) Dovetail allignment jig
3) Dovetail layout
4) Drawer parts
5) Trenails
6 & 7) Drawers done
8) Back glued and pegged
9) Moldings next
Tom M
Well-known member
I tried three times to post the pictures for the previous post and each time it crashed. Thankfully I've been doing the writing in Word as this has happened before. So let's try posting three at a time.
1) CAD picture of drawer
2) Dovetail allignment jig
3) Dovetail layout
1) CAD picture of drawer
2) Dovetail allignment jig
3) Dovetail layout
Attachments

Tom M
Well-known member
Let's see if the rest will post:
4) Drawer parts
5) Trenails
6 & 7) Drawers done
8) Back glued and pegged
9) Moldings next
4) Drawer parts
5) Trenails
6 & 7) Drawers done
8) Back glued and pegged
9) Moldings next
Attachments
-
 2020-03-15 13.57.39 (Large).jpg214.9 KB · Views: 25
 -
 2020-03-13 11.40.38 (Large).jpg213.3 KB · Views: 18
 -
 2020-03-12 21.13.10 (Large).jpg147.7 KB · Views: 18
 -
 2020-03-12 09.33.16 (Large).jpg185.9 KB · Views: 21
 -
 2020-04-03 13.36.38 (Large).jpg130 KB · Views: 20
 -
 2020-03-10 19.59.22 (Large).jpg155.8 KB · Views: 22
Tom M
Well-known member
For the tails, I layout the spacing on the end grain with a knife and mark the base line with a knife. For small boards like these I position the board at the dovetail angle and cut on the vertical. I do half the cuts from one side, then flip the board for the other half. This way I can always register my fingernail in the knife line and cut on the waste side. I never mark the dovetail angle - just by eye. For the tails the "waste side" really doesn't matter, but I do it that way to be consistent for when I cut the pins. I then chisel out the waste. That's it, nothing special...
However, I will share this. Last summer I read a blog by Chris Schwarz about dovetail cutting and have since adopted this method with great results. It really made a difference in getting the cuts straight and perpendicular to the face of the board. Start with a shallow cut on the end grain to guide the saw. Then start to tip the saw so it is mainly cutting on the facing side until it's at the baseline - in effect the cut will be from the baseline on the face to the top edge of the back. This forms a kerf which controls the saw when tipping in the other direction to cut the back side. I like to make all of the shallow end grain cuts first. I will mark a pencil line on the face of the board when cutting the pins as a guide.
https://www.popularwoodworking.com/editors-blog/dovetailing-trick-beginners/
Attachments
ttalma
Well-known member
Looking great. I really like the knots in the drawer fronts. I like the dovetail alignment jig as well. I'll have to try that. I've use a method Jeff Headley taught, to stick a small piece of a drawer bottom in the drawer groove, and that works well also, but sometimes is hard to get to stay in place while setting everything up.
Why did you heat the drawer parts up? I've never heard of doing this, and I always use hot hide glue, and don't really see how it helps. When gluing up I do the following,
1. Get clamps, glue, drawer, and everything ready
2. Assemble drawer dry
3. Remove one side
4. Slather glue on the pegs and tails
5. press side in to place
6. repeat for other side
7. Slide bottom in
8. Clamp together, (And square if necessary, but drawer bottom normally does that).
Tom M
Well-known member
Tim,
The German style drawers have no bottom groove, so Jeff's method wouldn't work. I've done drawers with the bottom groove and used the bottom as an alignment guide - works great as well. However, the FWW jig can work on pretty much any dovetail. Another thing I do is prep the boards the same width (even though the sides are not as wide as the front, and the back is not as wide as the sides.) I feel this makes layout easier. I’ll rip to final width after dry assembling the drawer.
I put the drawer parts in the oven to warm them to keep the glue from gelling so fast. Not really required for the drawers as they went together fast, but I did it anyway. A lot less clamp force is required to pull the joints tight.
Now on to the moldings.
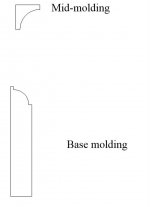
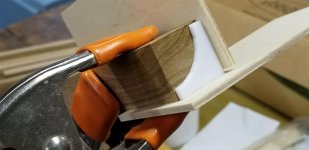
The first molding I made was the cove molding for under the top of the bottom cabinet. This required 1" square wood. For layout, I 3D printed templates (my son gave me a 3D printer for Christmas, and I’ve found a lot of uses for it in the shop – templates, chisel guards, knobs, hinge samples, etc.) They worked great, and I think I’ll be printing templates in the future! I made a couple rips on the table saw to remove the center of the cove, and then a round (#10 I think) to form the cove. I finished with a scraper I ground. This was an easy molding, and a good one to start off with to build my confidence.
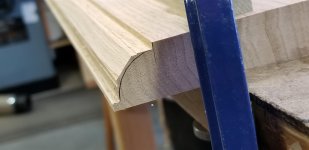
The next molding was for the base skirt. For this one I made two table saw cuts to start the fillets, and then I used a 45° bit at the router table to remove most of remaining wood. A mix of a rabbet plane and hollow plane followed by a cabinet scraper finish the job. I then spent some time cutting out the bracket feet detail. For the long internal rip cut on the front I used the table saw. The straight sections on the sides were too short to do on the table saw, so I rough cut them on the bandsaw and used a wide chisel to complete.
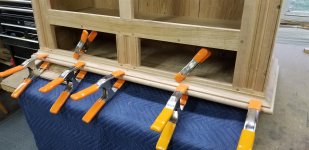
I cut the miters on my chop saw and used a wide pairing chisel (freshly sharpened) to adjust. My installation method is as follows: I cut the side pieces miters (keeping the boards long) and then one of the front miters. After positioning one side and the front I drilled a 1/8” hole in the middle of the front molding. I use a drill bit or transfer punch in this hole to lock the position of the front piece so I can scribe the side of the cabinet on it. I make the scribe line using a block plane blade with a block of wood attached with carpet tape as a handle!
For the skirt molding I clamped a straight edge to the cabinet as a reference for the top surface of the molding. I then glued the front and sides using clamps. The moldings couldn’t shift during glue-up due to the pinned hole. After removing the clamps, I then drilled holes for the 3/8” pegs (one which eliminates the 1/8” hole. All the pegs later had to be carved to the molding profile – not hard to do in the soft Butternut.
Next, I’ll discuss the upper moldings.
The German style drawers have no bottom groove, so Jeff's method wouldn't work. I've done drawers with the bottom groove and used the bottom as an alignment guide - works great as well. However, the FWW jig can work on pretty much any dovetail. Another thing I do is prep the boards the same width (even though the sides are not as wide as the front, and the back is not as wide as the sides.) I feel this makes layout easier. I’ll rip to final width after dry assembling the drawer.
I put the drawer parts in the oven to warm them to keep the glue from gelling so fast. Not really required for the drawers as they went together fast, but I did it anyway. A lot less clamp force is required to pull the joints tight.
Now on to the moldings.
The first molding I made was the cove molding for under the top of the bottom cabinet. This required 1" square wood. For layout, I 3D printed templates (my son gave me a 3D printer for Christmas, and I’ve found a lot of uses for it in the shop – templates, chisel guards, knobs, hinge samples, etc.) They worked great, and I think I’ll be printing templates in the future! I made a couple rips on the table saw to remove the center of the cove, and then a round (#10 I think) to form the cove. I finished with a scraper I ground. This was an easy molding, and a good one to start off with to build my confidence.
The next molding was for the base skirt. For this one I made two table saw cuts to start the fillets, and then I used a 45° bit at the router table to remove most of remaining wood. A mix of a rabbet plane and hollow plane followed by a cabinet scraper finish the job. I then spent some time cutting out the bracket feet detail. For the long internal rip cut on the front I used the table saw. The straight sections on the sides were too short to do on the table saw, so I rough cut them on the bandsaw and used a wide chisel to complete.
I cut the miters on my chop saw and used a wide pairing chisel (freshly sharpened) to adjust. My installation method is as follows: I cut the side pieces miters (keeping the boards long) and then one of the front miters. After positioning one side and the front I drilled a 1/8” hole in the middle of the front molding. I use a drill bit or transfer punch in this hole to lock the position of the front piece so I can scribe the side of the cabinet on it. I make the scribe line using a block plane blade with a block of wood attached with carpet tape as a handle!
For the skirt molding I clamped a straight edge to the cabinet as a reference for the top surface of the molding. I then glued the front and sides using clamps. The moldings couldn’t shift during glue-up due to the pinned hole. After removing the clamps, I then drilled holes for the 3/8” pegs (one which eliminates the 1/8” hole. All the pegs later had to be carved to the molding profile – not hard to do in the soft Butternut.
Next, I’ll discuss the upper moldings.
Share: