veneer repair

hermv2000

Well-known member
I've been asked to repair a ca. 1790 5 drawer chest.

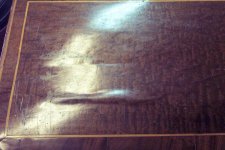
The top is mahogany veneer over an as yet unknown substrate.  The veneer in an area of about 8X10 inches has lifted and buckled quite badly and needs to be put back down.  The veneer does not appear to be broken, just a very large blister obviously caused by differences in movement between the substrate and the veneer.  It appears to be about 1/16 to 3/32 inches thick.

Does anyone have any advice on how this should be approached?

I don't expect the finish to survive but it's not the original finish anyway.

Thanks for any advice.  I will try to cross post this in the veneering section.

Herman
 
Hi Herman      Is the lifting veneer on the edge or in the middle of the top? Is the veneer brittle or can it be pushed down without cracking?    Randy
 
The lifting is away from the edges and doesn't come closer than about 6 inches from the edge.  As well the edges are cross banded with the same veneer separated from the main panel by a 1/4 wide strip of maple.

I now have the piece in my shop and notice considerable cupping in the substrate which looks to be walnut.  Strangely, for the age of the piece,  the substrate is two boards edge glued and each has cupped, so I'll see if I can remove the top to try to flatten the cupping before I begin.

Herman
 
Herman    Because of the age of the piece, you my not want to fix the substrate. It was common to have boards glued-up under veneer.  With the banding intact,it maybe quicker to fix only the damaged part.  Is there anyway you can post a picture, there are a couple ways this can be done and I would like to make sure I'm giving you the best way.  Are the two boards stable {still stuck together}? And what is the condition of the finish? If there is anything left, we might be able to save that also.    Randy
 
Thanks Randy. 

The 2 boards are still together.  I pulled off the edge moulding on one side and the sides are dovetailed into the top.

I'm attaching a picture of the problem area.  The finish is damaged in a few places to I will likely need to retouch those.  Also looking more closely at the wood I think it is figured walnut, not mahogany.

Note that the buckled area is smaller than I originally estimated.  It's about 2 inches by 10 inches and pushed upwards into a V shape, kind of like mountain folding.

Herman
 

Attachments

  • Untitled 2.jpg
    Untitled 2.jpg
    88.4 KB · Views: 49
Herman   
Pictures really are worth a thousand words.  Because there is a good amount of finish left on the surface, I am going to assume that the veneer is brittle.  Also because of the grain pattern were not going to put a slit in the veneer, but put small pin holes.  Your using pin holes for a place to inject hide glue.(preferably the glue is hot)  I use small dental syringe to inject the glue into these pin holes.  If you are using a steel needle on the syringe you can just push the syringe in at an angle (not straight up and down)  into the veneer around the perimeter of the bubble.  You don't want to inject to much glue, but enough to make sure all points are covered.  The small pin holes can easily be patched later.  If you were to slice the veneer to create an opening for the glue, when you go to press the veneer back down you will find the bubble as expanded too much to fit back properly and would overlap itself.  You should use hot glue to help the veneers become plyable before you press them.  You will notice a few minutes after injecting the glue that veneers are not as brittle.  You will need to set up a clamping system(I like to use a small piece of acrylic with a board on top) to apply pressure to the bubble.  Start at one end and work your way across and if the veneer seems like it is going to crack stop and come from the other direction.  As the underside of the veneer becomes saturated with glue it will become more plyable.  As you are clamping you will also work the excess glue out of the opposite side pin holes.  Take your time clamping, you should have 15 - 20 minutes open time on the glue.  If you hurry you will crack the veneers.  As the excess glue is squeezed out use a damp cloth to remove the glue. After working your way across the entire bubble, remove the acrylic press clean the surface with a damp cloth, and reclamp the entire bubble for overnight drying.  If your clamps don't reach into your damage area, you will need to make a bridge to put pressure where you need it.  One note, make sure you have your clamping process ready before you start this process, you won't have time at the end to experiment.  Let me know how this goes for you, and if you like I can also tell you how to bring the finish back.  e-mail me if you have any questions.  Randy
 
I'm following with interest. I've done a little veneer repair (not a professional) and find that hot hide glue, even when dilute gels too quickly to use successfully in a syringe. I've used cold hide glue with success. Cold hide glue (Franklin's) has essentially the same adhesive properties as hot glue (study I've read, done for a Master's thesis at Winterthur) but won't quickly gel. It has it's own problems in a syringe. It is very viscous.
You will need a fairly large bore needle but the glue injector needles and syringes you can get from craft suppliers should be large enough. If you warm the cold glue (double boiler) it will be less viscous and easier to inject. If you have doubts about cold hide glue try glueing a scrap of veneer to a substrate. Spread some cold glue on the substrate, lay the veneer on, cover with a piece of waxed paper, add a clamping block and clamp for 24 hours.

Howard  Steier
 
Hi Howard
You are exactly right, you can use Franklin's hide glue and when I am on the road, that is what I use.  I usually do not have a lot of time when I reply to the forum and sometimes I tend to leave out some of the options available.  It is difficult to describe some procedures that may have taken years to perfect.  I have a small double boiler that I use and the Franklin glue will heat up nicely in it.  On the road I use a dental syringe, it has a plastic curved end on it.  But in the shop I use a veterinarian syringe, it has a stainless steel body with a large bore needle.  Beaded hide glue goes through it quite well.  I understand that most people who do not do alot of this type of work would not have the toys that I have accumulated over the years to make the job easier on the other hand this procedure is withing everyone's grasp, you just have to the will to try.  Some of these types of repairs can even be done using Franklin's glue cold, but in Herman's case because of the type of bubble and the  thickness of finish I think that hot glue would be best to help plasticise the veneer.  Because I am not able to test the plyability myself I want to make sure that he does not end up with a shattered mess, which some old brittle veneers have a tendency to do.  Sorry for the confusion, but thanks for pointing that out, as I told Herman there are several ways to do this.  Thanks for the input Randy
 
I have had good success in the past with drilling the holes from below, through the substrate rather than the veneer, no holes to fill. Use a positive stop on the drill bit not a piece of tape. Hot thin hide glue in a syringe. If you make 2 holes, one at each end you can squirt glue in until it comes out the other hole, again hot and thin glue, then clamp as Randy describes. When you clamp the excess glue comes back out of the holes underneath so the excess is not a problem unless you wait too long.
 
Mike

That might be OK with stuff you build, but would not be considered acceptable when repairing valuable Antiques.  It is also difficult to control the splinters when the bit goes through the other side, leaving chips under the veneer that would not allow the veneer to lay flat.  The small holes in the veneer would be easier to hide or repair, than trying to explain drill holes placed in the bottom of an Antique piece.  When dealing with historical pieces and from a Conservator's view point less is better.  Randy
 
I should clarify [holes].    If you use a needle or something small and sharp, and insert it at a sharp angle, in the direction of the grain,you will create a small hole but also a small flap that will cover most of the hole if not all.    It should be easy to hide. Randy
 
I am pleased to say that your technique worked, Randy.

Before injecting the glue I preheated the surface with an infrared heat lamp.  I used liquid hide glue but also heated that to 140 degrees which made it flow more easily.

The veneer is now flat and I can proceed with replacing a missing triangle area on one of the drawers.

Thanks again,

Herman
 
Randy- Nice explanation on that veneer repair. It's not easy to make it clear and remember to describe all the info.
I know it's after the fact, but the old-school Italian cabinetmaker I worked for used to heat up the block that is clamped down on the repair. This would make sure the hot hide glue was liquid for a while and let it penetrate before setting up. Also, we'd keep the syringe in the glue pot water to warm it up.-Al
 
Thanks Al      I do put the syringe in the pot upside down, with an air bubble in it so it doesn't leak all over. I also forgot to mention that I sometimes use small blocks of steel[5-15lbs.] to hold veneer when gluing.    Herman    I'm glad it worked out.    Randy
 
Back
Top