Thomas Elfe Double Chest

briyon

Well-known member
Hi,

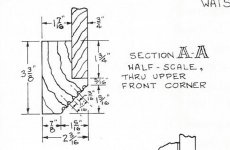
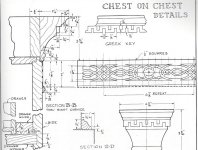
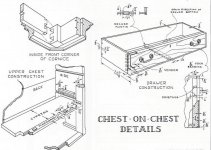
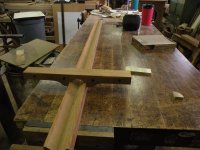
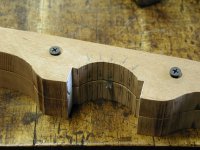
I am planning on building the Charleston double chest on the front of the Samuel Humphrey book and had a couple of questions.  I think there are a few folks on the forum that have built this chest.  I saw some discussions on applying the fretwork.  My question is regarding the corners of the top chest where the fluting is done.  I know that larger pieces of mahogany are added to the sides and then chamferred.  I am just not sure how big the pieces are and how they are attached to the case sides and top.  Are they simply edge glued to the sides and dovetailed into the top?  If anyone has any photos of the construction and the process of chamfering the corners I would appreciate it?  Or an explanation of how it is done?  I did see a photo on another forum of Ben Hobbs or Calivin (can't remember) chamfering the corner with a draw knife.

Any help you can provide is greatly appreciated.

Thanks,

Brian
 
Ok I think I figured out the construction of the front corners.  I must of missed it the first time I went through the drawings in the book.  Here is the detail of the corner.  I have another question about the corner.  From the Calvin, Ben Hobbs build I noticed they put this corner on as a square piece and then shaped it on the case and added the stop flutes.  I am wondering if this could be done before you attach this piece to construct the case?  I am just thinking it would be easier to cut the angle and add the fluting before it is attached to the case.  Trying to think of the cons of doing it this way.  Alignment issues might be one.

Also, I cannot tell, from the drawings how the top front is done.  In particular how the backing board at the top (the board that the fretwork goes over) is attached to the top of the case.  The drawings give a side view but I can't figure out where it describes a front view.  I have attached the portion of the drawing that I think pertains to this but again I can't see anything regarding the front of the case.

Finally, It shows the drawer spacer in another drawing but doesn't give any dimensions.  Does it look like from this picture the spacer goes completely from front to back?  I have only used a mortised frame in the past on the limited number of cases I have done.

Thanks, Brian
 

Attachments

  • Front Corner.jpg
    Front Corner.jpg
    80.9 KB · Views: 52
  • Case and Fretwork.jpg
    Case and Fretwork.jpg
    207.9 KB · Views: 69
Had to add my last attachment in a separate post.

Brian
 

Attachments

  • Drawers 2.jpg
    Drawers 2.jpg
    112.6 KB · Views: 70
Brian,

It has been quite a few years but I will be happy to talk through whatever we did on our double chests.  Actually Dad (Ben) built 2, my brother Matt, and Don Harris, and I built one each.  Here are a couple of comments.

- We added the chamfered columns just like the drawing showed and Dad cut his chamfer with a table saw as far as he could.  I was not so bold and I did use a drawknife and smoothed with a handplane, didn't take long at all.  We then clamped triangular blocks to use as a guide to run router/scratch stock for the flutes.  I'm sure it could be done beforehand but flushing up with the sides and front could potentially change the dimensions, so be careful with your alignment, especially at the carved lambs tongue at the bottom.
- In looking at the double chest in Williamsburg the sides went all the way up , there was no separate cornice structure, but the Wmsbg piece may not be contructed the same way.  We ran our sides all the way up and glued the fretwork on crossgrain.  I think the drawn method is probably superior but I haven't had any cracking (yet) of the fretwork.
- I built all my drawer dividers and dustboards just like the drawing showed, the stopped dados in the sides and in the chamfered corner posts were pretty tedious.  I'm pretty sure dad changed this to mortise and tenon on his 2nd version, a much more typical detail.
- I think we ran the dust boards short of the back of the case by an inch or two, but I couldn't find any photos to confirm.
- Hard to remember but I'm pretty sure the top board behind the fretwork was mortised and tenoned to the chamfered column posts, and glued to the top of the case (and probably screwed also, as this is hidden beneath the crown molding.

Let me know if you have any more questions, I can do my best.  I'm sure there are many here who can answer these as well, and probably better!

Cal

 
Thanks Calvin, Your responses make sense. I see what you mean about getting the corner flush with the side.  I will probably glue them up square and do what you did. In terms of the fluting I was thinking of the same thing.  Probably because I read your comments on the Fine Woodworking forum.  I also re-read the article by Jeff Headley, "How to Add Quarter Columns to Your Furniture". I was thinking of making a variation of the scratch stock he uses in that article.

I am sure I will have more questions.  Thanks for the offer to help in the future.

Brian
 
Brian,
I've built one of these chests and have a series of construction photographs and a full size set of plans that I drew up. I'd be happy to share them with you.
Ronnie
 
Wow thanks Ronnie.  I would definitely love see the photos and drawings.  I am a fellow Peach State member.
 
I am at odds to reply. I am familiar with many Charleston pieces. Although not seeing this piece internally I am hesitant to respond. Are you set on your drawings. May I add a picture or two.
Not to harp on our desk from the Shenandoah Valley ( Beautiful and Historic ) but here is a photo of the construction used in the Valley. Stiles (actually just nailed into end grain of the rails on the original, pictured are screwed) then fluted piece added afterwards glued to stile and case side.
 

Attachments

  • Stile and rail (drawer blade) joinery.JPG
    Stile and rail (drawer blade) joinery.JPG
    242.2 KB · Views: 63
Hear is a scraper jig. It just holds a convex and concave scraper used for both fluting and beading. You could also add a fine line scraper.
 

Attachments

  • Fluting scraper.JPG
    Fluting scraper.JPG
    243.3 KB · Views: 68
After seeing Jeff's scraper jig several years ago I made one and it works great.

Dennis Bork
Antiquity Period Designs, Ltd.
 
Hear is a scraper jig. It just holds a convex and concave scraper used for both fluting and beading. You could also add a fine line scraper. The scraper blade was made from a card scraper we had cut into sections. The scraper blade is extended way beyond where it actually should be for viewing. The scraper handle should be made to fit your corner, curved, flat or whatever. Start with the center, then the outer, flip over handle and do the other side, then divide and conquer.
 

Attachments

  • Scraper with blade.JPG
    Scraper with blade.JPG
    216.3 KB · Views: 43
Jeff, is the scraper positioned by eye, and how do you determine how far it should
project? Is it held in place by friction alone?  I can't seem to find my copy of your FWW article so apologies if these questions are answered there.  I'm building a chest of drawers based on a different example in the Elfe book, and contemplating how to do the fluting/beading.
 
Brian, I hope this helps. Between yourself and Cal, Ronnie and all of SAPFM we should be able to help with this project. How far along are you on this chest on chest?
I wood add a capitol and base. A separate piece above the fluting and a separate piece below will make life easier.
 
Mark, The scraper should be set so shavings can be easily removed after one or two passes. If it projects to far then chatter (wash boarding) will occur.
 
Brian, with your drawing's case construction. Rails (drawer blades) are set in a dovetail from the front. Dust dividers (drawer supports) are slid in from the back in a dado or rabbit (not a flea bitten varmint ) and then glued to the back side of the rail ( drawer blade)
Fret work was sawn out from a heavier piece, sliced, and then applied.
Please send us pictures. We will live vicariously through you with this project.
 
Brian,
Give me a day or two to get the drawings copied and burn a DVD for you. It is most important that you have the lazy eight fretwork in hand before starting the chest! The center of the pattern must fall on the centerline of the chest and on the center line of the mitered case sides. The dimensions of the case work off the fretwork not the other way around.  I have a pattern for my chest dimensions that I'll include with the drawings. It is very difficult to build the case and then size the lazy eight fretwork to fit. I cut my fretwork from a solid 9/16" thick mahogany board and then sliced off 1/8" pieces on the band saw very carefully with a sharp fine tooth blade-Had not a single break. 9/16 was about the limit my fret saw would cut without the blade bending in the cut.
Ronnie
 
Jeff,

It definitely helps. I am really in the research and planning phase at this point.  I have the lumber on because I have been hoarding mahagony for a few years. My friends and I would take a yearly road trip to Irion Lumber and I have been stocking up on Mahogany for about 5 or 6 years.  All the help from you, Ronnie and others will definitely speed up the planning phase.  I am always amazed by the generosity of the real craftsmen on here.  Sharing your knowledge with us amateurs.  I really do appreciate it and I know others do as well.

Thanks,

Brian
 
Back
Top