Tea Table Molding Attachment Method?

awleonard

Well-known member
I'm in a bit of a pickle.  I'm building a try topped tea table.  I made the top molding in two pieces similar to what Norm Vandall did on his table in his book.  I made my molding with a different profile, but same idea.  Anyway, now I'm trying to figure out the best way to attach it.  What I have is one piece that attaches to the sides of the table and will be flush with the top.  Then, the large cove with the curved outside profile will sit on top of the molding (attached to the first molding, not the top).  Hard to explain this in words.  What I'm trying to  figure out is what is the best way to attach the molding?  Glue alone doesn't seem to be a great solutiion because the molding needs a little persuasion to stay where I want it.  One article used brads from a gun and claimed that they mimic flat cut nails.  I experimented with a small brad nailer (23g) and it makes pretty small holes, but still they are holes.  Anyway, thought I'd ask and see what others have done.  Thanks for the help. 

Tony

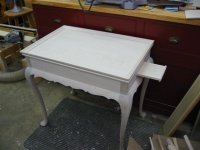
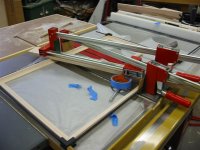
This is a picture of the moldings in progress...
 

Attachments

  • IMG_3739 (Small).JPG
    IMG_3739 (Small).JPG
    26.8 KB · Views: 74
I have made many of these tray top tea tables and this is what I have done.

I cut a rabbit into the top edge of the base aprons and top of the leg posts. Then cut a rabbit along all four edges of the top such that the top will sit flush with the top of the apron.  The top is made a little smaller than the opening between the apron rabbit to allow for expansion and contraction.  The top is secured from the underside with bottons so that it will float. 

Now the large cove can be glued and nailed to the top edge of the rabbit on all four sides (but not into the top).  Glue and nail the other molding to the apron side.  Note - it is best to stain and finish the top before you apply the cove molding.  This way you will not see an unstained line when the top shrinks.

Dennis Bork
Antiquity Period Designs, Ltd.
 
Thanks for the quik reply!  Well, that's real similar to what I am doing.  My small molding actually forms the rabbet.  What kind of nails do you use?  I've not used many nails, but I realize that in some cases...

Tony
 
I was working on the top cove this weekend.  Got everything cut to size.  Decided to glue the miters with liquid hide glue and figured that would hold good enough until I glued the frame top the table.  When I removed the clamps, the corners just broke.  I was wondering if the miters were too smooth and I maybe burnished the grain such that the glue wouldn't take?  I tried cleaning and re-gluing.  That didn't work either.  Out of frustration, I tried epoxy.  Believe it or not, that didn't stick either!  I guess I need a fresh cut.  My problem is that the molding is already a hair shorter than planned.  So, I guess I'm going to make a couple of new pieces.  I'll use the original long sides for my short sides and use the two new pieces for long sides.  Arrrggghh!  I hate miters! 

Anybody have any tricks for making good and accurate miter cuts on moldings like this?

Thanks,

Tony
 

Attachments

  • IMG_3765 (Small).JPG
    IMG_3765 (Small).JPG
    40.3 KB · Views: 77
Tony
  When I work on a miter joint, I have very good results with a shooting board.  Is it possible your miter joints failed because the pieces were too short?
Jim Vojcek
 
When a miter is a hair to short I sometimes plane a bit off the inside face of the moldings making the miters slightly longer. Mike
 
Mitre cutting aid -

I use one of the old heavy sliding blade choppers often used by picture framers to touch up mitred ends.

They are so precise that you can cut the molding slightly over length, and then pare down the length to an exact fit in a series of lightly shaved cuts as thin as a piece of paper.

One trick is that rather than working to a measured dimension, you are changing the relative length of a piece that can often be trial fitted in place, and this really helps get the last sliver.

Now that I have one, I cannot imagine doing mitred mouldings any other way.

I recently used it to fit in place cockbeading on a set of huntboard doors and drawers. I was able to glue two opposing sides, and then come back and shave the remaining two that go between them  very precisely.

Karl
 
Tony,
Were you using Hot hide glue or one of the unheated liquid hide glues? I seem to recall (from wayyyy back) that the latter has a particularly short shelf life and wonder if that contributed to the failed joint and the second attempt. The epoxy may have failed because it pulled off residue of the liquid hide glue.

Regarding alternative miter processes, this should be unnecessary and quadruples the work but you could glue one joint and then trim the other ends only when the joint is successful. At least you have a second chance with two of the joints. Maybe you'll find the glue is bad and you wont have to do this.
John
 
Well, upon further investigation, the other miters that held weren't very good either.  When I took the clamps off (I was using a picture frame clamp), I found the miters had opened up on the bottom.  I was only looking at the tops of the joints, so I assumed (oops) that I had a decent joint.  I have a Lion knock off trimmer.  I like it ok, but it sometimes will pull the work piece if you aren't careful.  And these coves don't have a flat area on the back, so they tend to roll.  That makes me wonder about maybe assembling the frame before doing the final shaping, but that would be difficult and I'd probably tear the frame apart while working the profile.  Not aure what I'm going to do.  I may build a TS sled or maybe try the compound miter saw.  Typically, I just cut them on the tablesaw and then trim them to fit using the miter trimmer.  But because these are not flat on the outside, that is hard to do.  I was watching a video on Tommy McDonald's site (sometimes painful to watch, but I have learned a few things) and he uses a miter saw.  I was playing aorund a bit last night and added a nice flat piece of mdf to the fence on my miter saw and when I placed the molding against it, I got a very good feeling that it was firm and square.  I must admit that I have cut some very good miters on that saw in the past.  It is a Hitachi 10" slider.  Anyway, thanks for the help and the tips.  First thing is to make new coves, then I'll start testing techniques.  I'm not much of a carver, but I'd rather have a go at a Newport shell than make miters!  I'll probably glaze the piece and leave a bit in the corners to hide my ugly miters in the end anyway!  Ha! 

Tony

This is the glueup.  The clamps in the middle were for weight.  Bad thing about the picture frame clamps is you can't see the rest of the joint.  Also, because the outside is not flat, I think they actually rolled the pieces up a little. 
 

Attachments

  • IMG_3762 (Small).JPG
    IMG_3762 (Small).JPG
    54.1 KB · Views: 79
Tony, My suggestion to glue individual corners assumed you were using individual corner clamps like I usually use so ignore that suggestion. I'm not sure about using the center clamp for a weight. Any pressure in the middle would draw the joint in. Use some spacers in the molding profile to "Square it up" so it clamps better.

I tuned up an old Lion Trimmer once that was not quite square. There was a lot of play in the boring where the connecting rod ties the top frame to the base. I loosened the nuts on the rod, then retightened them while a square was held tightly to the blade and base. It seemed to square up and stay that way but it's long gone from my shop so I don't know how well it held up.
John
 
Well, I'm in the middle of round two!  I took a break and we hit the beach for a few days.  I have new molding shaped and cut.  I cut the miters with the Hitachi.  I made an aux. fence.  I left the top part of the outside flat.  There is about 1/4" there.  So, I have pretty good reference surfaces between the bottom and the outside face.  I shaped the bottom part of the curve before cutting.  The miters off the saw aren't terrible, but it seems there was enough flex in the blade that they aren't perfectly square.  That or the the wood wasn't perfectly flat, etc.  Anyway, with the flat left on the outisde, I am able to trim these in the miter trimmer fairly well.  I did a dry run after trimming a couple of surfaces last night and things are looking much better.  I still need to do some fitting, but hopefully, things will go well.  The picture frame clamp in the photo above works pretty well. 

I'm using liquid hide glue.  The bottle is over a year old, but it still seems to work fine.  It doesn seem to setup fast.  I did several tests with the glue on scraps and it holds really well.  I may see if a local wood store has any in stock.  Hard to find stuff like that local. 

Oh, I noticed that my pieces bowed a little after I ripped them off the boards.  That might account for a little of the mis-fitting.  I made a fence that is fairly short so that the other end of the work piece can bow and not affect the cut. 

Thanks for all the help.  I really hate I messed up round one.  The wood had better curl than the current batch.  I may still use it for some other project.  No use in wasting it.

Tony
 
Well, I had a lot of issues with this project and I'm still not very happy with the results.  I read that Phil Lowe is teaching  a class on a similar table.  I'd love to take that now that I've been through it and know what questions to ask.  The top molding gave me fits and the final straw was when I glued it on (after finishing), one corner came apart.  It was a hairline crack, so I filled it and gave it the wife test - she couldn't find it.  First time using curly maple - lots of tear out and some scratches that I didn't notice until it was kind of too late to fix.  This table design is based on Glenn Huey's table in Popular Woodworking, Lonnie Bird's table in American Woodworker (I think) and his bandsaw book, Norm Vandall's table in his Queen Anne book, and other articles on specific techniques, and such.  I came up with my own twist and did my leg patterns mostly based on Lonnie Bird's article.  And thanks to all of you who answered my questions.  I need to build a few more of these to build a good one!  For some reason, I had a hard time with the finishing on this one too.  I rarely have problems finishing.  Not sure what happened there.  By far though, the top molding and the knee to post/skirt joint/line were where I had the most problems.  Trying to get a nice clean and crisp line all the way around at the top of the skirt/knees was difficult.  Mine is not perfect, but close enough that your eye doesn't really notice.  Also, when I added a glaze, that joint becomes a little fuzzy and less noticeable.  The wood is really pretty and I like the form of these tables.  Very graceful.  I learned quite a bit too.  These were the first spoon feet I turned myself.  I took a class with Phil Lowe a few years ago and built the lowboy, but I let him turn the feet because I'm not a confident turner and I didn't want to mess up my whole project.  I knew I could practice that technique back home.  anyway, that went OK.  I was nervous hacking on those expensive leg blanks.  I made a prototype out of poplar to refine the pattern anyway, so I practiced on that.  My little Jet mini lathe did surprisingly well.  I decided to turn after I had cut the leg out.  Anyway, sorry to babble...


Attachments

  • DSC_2126 (Small).JPG
    DSC_2126 (Small).JPG
    46.5 KB · Views: 92
  • DSC_2128 (Small).JPG
    DSC_2128 (Small).JPG
    40.1 KB · Views: 93
The other difficulty I ran into on this project was fitting the skirts in.  Getting a nice joint between the skirts and the knees was pretty tough.  Important to keep everything square as possible.  I got them close, but still had some areas that didn't close up real well. 
 
aweleonard,

The table looks AWESOME!  Great Job!!  Miters are hard to make perfect and will give any craftsmen frustration.  What I usually do is cut 3 pieces exactly to width and one wider then I need.  What I do is fit the two side pieces and one end piece that are the same width.  Then there is that extra piece that is a little wider, I usually cut this piece a little short and plane the end grain to fit.  There may be a little to scrape in the profile to blend in, yet it works every time.


Again GREAT JOB!  I love the color as well

Fred
 
Back
Top