Neat little hanging bookcase

zdillinger

Well-known member
I just wanted to share my latest project-in-progress, especially since I'm planning to show it at the SAPFM event at the DIA in March.

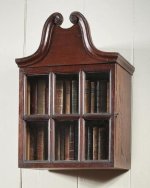
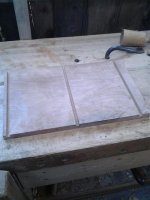
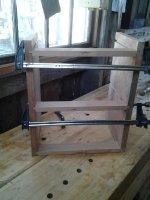
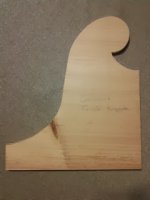
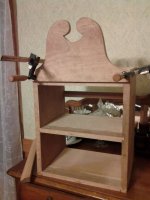
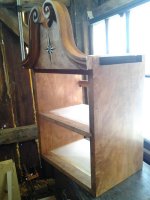
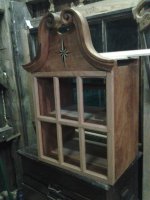
I found this little beauty in Antiques and Fine Art magazine.  I've not made a ton of progress on it, but I at least have the case glued together and am now working on the over-the-top gooseneck facade. Just finished the template last night.

Anyway, just thought I'd share. I can post more pics of my progress if there is interest.

Zach
 

Attachments

  • gooseneck cabinet.JPG
    gooseneck cabinet.JPG
    28.2 KB · Views: 85
  • 2.jpg
    2.jpg
    52.9 KB · Views: 47
  • 6.jpg
    6.jpg
    61.7 KB · Views: 46
  • 7.jpg
    7.jpg
    12.6 KB · Views: 34
Here is an updated pic. I have installed a pine top and finished rough shaping the facade. I need to remove a little more material in the curve just below the left-hand volute base and I need to square up some places, but that won't be done until I get the moldings in place. I also need to rough-smooth the back of the facade.

Once I cut the final molding side returns, I will carve the gooseneck moldings and then make the sash door. This is a neat little project which I am aiming to finish by the end of the year.

Please excuse the quality of the photo. Late nights, camera phones and old houses (i.e. little overhead light) cast everything into shadow and make the joinery look like crap!

Thanks for looking!

Zach


Attachments

  • sapfm.jpg
    sapfm.jpg
    97.5 KB · Views: 54
Zach,

The piece looks great.  It is a very nice small project with a few technical challenges, which is great.  Look forward to seeing more of the process.  Thank you for sharing for there are many of us who can and will benefit from such a post.

Cheers,

FR
 
Here is the piece so far. I've carved the gooseneck moldings and glued the facade in place. I also chose to inlay a compass rose.... which isn't on the original piece but I thought that it needed a little something there. Next up is the sash door (already under way).


Attachments

  • gooseneck.jpg
    gooseneck.jpg
    52.7 KB · Views: 53
It is indeed a charming little piece, and has a number of features that make it a good project for those of us learning, and for one with limited space.

I have seen what I would call the tops of corner cabinets mounted on the wall, but I  am not familiar with this particular cabinet; does it have historical roots, or is it more in the manner of period furniture ?

Thanks for posting.

Karl
 
klkirkman said:
"It is indeed a charming little piece, and has a number of features that make it a good project for those of us learning, and for one with limited space.

I have seen what I would call the tops of corner cabinets mounted on the wall, but I  am not familiar with this particular cabinet; does it have historical roots, or is it more in the manner of period furniture ?

Thanks for posting.

Karl"

Hi Karl,

I found the original in Antiques and Fine Art magazine. According to the dealer, it is c.1790 New England piece, originally done in spanish cedar. It is a very odd little piece and I've never seen another one like it. There has been speculation that it was simply the top half of a tall case clock that had been repurposed, but I suppose we will never know for sure. I made mine out of cherry and added the compass rose inlay, just to do something about the large open space in the middle and to accentuate the verticality of the facade.

I really enjoy making things that don't look like what everyone else is making. The Golden Ratio / perfect proportions / machine precision is all well and good, but I think we are misrepresenting the actual furniture of the period if we ignore pieces like this little cabinet and the actual way things were made. Pieces like this obviously existed and I think they are more than worthy of reproduction / study / attention.

I spent an hour and a half making the sash door last night. I need to fiddle with a couple of spots before gluing it up, but I thought you all might like to see my progress.

I have a Sketchup file (admittedly it is rudimentary) but I would be happy to share it with anyone who sends me an email requesting the same.
 

Attachments

  • sash door.jpg
    sash door.jpg
    76.5 KB · Views: 60
Zach,

I agree with you that little gems like this need to be more appreciated. I too enjoy making things that other people don't make.  The way I look at it, anyone can make a box, but not everyone can decorate a box.  There is so much furniture out there, and I feel people should consider making some of these uncommon pieces.  I personally love William and Mary & Jacobean style furniture, and of course federal. 

I seen this piece in Antique Magazine and thought it was amazing piece.  The piece has a ton to offer, and looks like a ton of fun.  I need to make pieces like this, for I kind of get sick of just repairing furniture after a while.  Great Job, and I look forward to seeing progress.

Thanks for sharing.

FR   
 
The variety is really nice. Most people I know who enjoy building "brown furniture" as it is called by some in the trade, have one of almost everything after awhile, and while the classic pieces are beautiful, how many times do you want to build the same thing over and over.

That makes the appearance of something new and different a very welcome occurrence.

Karl
 
  Zach,

    You said that you carved the gooseneck.  Can you explain a bit more about how you did that?  Did you use a shaper or router also?

  Where did you get the compass rose.  That was a good idea, IMO - it really works well with this piece.

  Lastly, I assume you used rail and stile bits on a router table for the sash door?

          --Bill
 
bbrown said:
  Zach,

    You said that you carved the gooseneck.  Can you explain a bit more about how you did that?  Did you use a shaper or router also?

  Where did you get the compass rose.  That was a good idea, IMO - it really works well with this piece.

   Lastly, I assume you used rail and stile bits on a router table for the sash door?

          --Bill

Bill, all of my work is done entirely by hand using period correct tools and techniques. So no routers or shapers are used.

I wrote a description on how to make a gooseneck molding by hand. It is on my blog. Not sure if it is appropriate to link to it here. Short version is that I used the return molding as a template, then created rabbets with a paring chisel before carving the round portions with a #8 Addis gouge.

My sash door is also done by hand. Short story is that I use a moving fillister to define the glazing rabbet and to create a fillet for the molding which is later rounded off with a Gabriel hollow plane. The mortise and tenons are cut before finalizing the molding ( this protects the molding from damage). I then cope the tenon shoulders to fit over the molding on the mortised pieces. If you wish I can take some photos of of how to do this by hand.

The compass rose is my own design. I simply drew it on a board using a compass and straightedge, then used a plane iron like a guillotine to make the individual pieces from holly and dyed holly veneers. These are then taped together using veneer tape before installation.

I hope this is clear. If not feel free to email or call me and I will do my best to answer any questions.

Zach

 
I have been following Zach's blog for a while and I agree with bbrown, no power tools ... impressive. beautiful work.
 
I appreciate your kind words. I enjoy making things that are virtually identical to pieces made 200 or more years ago.

Anyway, since I have been given permission to do so, you will find my carving article at http://eatoncountywoodworker.blogspot.com/2013/12/we-dont-need-no-steenking-overarm.html

Thanks,

Zach
 
I started by rubbing in a little BLO, then sealed that with a couple of coats of blonde shellac. After that, I used a dark brown glaze to even out any color differential in the cherry as well as color the pine top to more closely resemble the cherry. Then, I put on five coats of blonde shellac. Finally, I rubbed out the shellac with 0000 steel wool and dark brown paste wax, leaving a small amount of wax in the sash moldings and in the volutes. The wax was then rubbed down with linen cloth, providing a final glossy (but not too shiny) finish.

 
Looks a lot more refined than the example you had to work from, very nice - except for one little thing: the compass rose is colored so that it almost escapes the shelves to declare itself, too much contrast (to my eyes, of course) with the wood in the main body. Perhaps if the blace were a dark brown or an oxblood that would coordinate better?

Pam
 
Back
Top