Lowboy Top Overhang

rchampagne

Well-known member
Hi all, first an introduction.  I am a hobbyist woodworker who is trying to fill up my 18th century house in Conn. with period reproductions.  I've made a few period style pieces, including a scaled down Queen Anne dresser that we use as a changing table/dresser for our young son, a Jacobean style bed, a set of bannister back chairs, etc.  I had wanted to make a lowboy for a long while but hadn't seen any plans that I was into. 

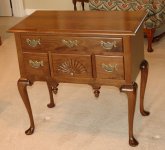
I have scaled pieces from photos before but I found that the pieces I made were a bit off proportionally, and it was difficult to get a good idea of some of the details, such as moldings, carvings, etc.  So I held off on the lowboy until I saw Phil Lowe's article in FWW.  I based my piece on those plans, which look a lot like the Boston lowboy featured in Greene's book.  However, the plan does not show if the top overhangs the back of the piece. 

Not having access to an original, and having not found a good side view of a similar piece, I am wondering if the top should overhang the back of the case at all, and if so, should it be equal to the front overhang?  If it does overhang the back then I'm guessing the back edge of the top should be molded just as the other three sides are. 
Thanks for looking, any help you guys can give would be greatly appreciated. 
Rob Champagne
 
Rob,
Welcome to SAPFM.  I'm fairly new here myself, and have been persuing this hobby in much the same manner as you.  As it is, I have been trying to finish a QA dressing table that I started last fall, this winter hasn't been very cooperative.

This piece of furniture is one of my favorites and I have studied photos of many examples.  The answer to your question is "Yes and no."  These pieces were designed to sit against a wall as evidenced by the secondary wood used on the backs.  Some designs have the top overhanging the back enough to cover the knees of the rear legs - 1" to 1-3/8".  Obviously that would allow the top to sit tight against the wall without the rear knees interfering.

On Philip Lowe's example, the top is 18" wide while the case is 17-1/2" wide so his obviously is flush with the back. 

Like I said, you'll see them both ways.

Because these pieces were designed to sit against a wall, the back edge of the top is not molded, only the three show sides.

Have you seen Norman Vandal's book "Queen Anne Furniture"?

Regards,
Chuck
 
Chuck,
Thanks for the reply.  Your comments are helpful.  On other case pieces I have built the back is all flush, as with bracket feet.  As you noted, this piece won't sit right up against the wall due to the knees of the legs.  I have been following Phil Lowe's plans for the most part, so I will probably make the top flush with the back on this one.  I didn't like the fan he used on it so I carved a recessed fan, as in the piece in Greene's book. 

No, I haven't had a chance to pick up Vandal's book.  I have seen it referenced here a number of times and have meant to check it out.  Are used copies available?

I know what you mean about the winter not being cooperative.  Somehow my business (real estate appraisal) has picked up significantly and the time I have for furniture making has been somewhat diminished. On top of that the shop has been very cold, and I've had trouble getting my big jointer running in these temperatures.  I guess its never too cold to cut dovetails though.  Thanks again,
Rob
 
A always leave the top overhang the back 1/4 - 1/2".  If the top shrinks from the back forwards you don't want the top edges of the case exposed.  Some lowboys will have as much as a 1" overhang on the back.  There is no right or wrong for this overhang.

Dennis Bork
Antiquity Period Designs, Ltd.
 
I built that same piece (I took the class at Phil's a couple of summers ago).  I can't recall what the drawing we did in class showed, but I'll look.  I think I made my overhang the same in front and back.  One thing to conisder too is your baseboard thickness.  Between the foot/knee extension and the baseboard thickness, I think my top is pretty much flush to the wall (if that is what you want).  Our piece was just a little different than the one in the article.  I did a fan that is curved in cross section.  I had taken a carving class with Phil at Highland Hardware and that's what we learned.  We didn't do a fan in the lowboy class (ran out of time), but he demo'd a fan (can't recall if it was flat or not).  The curved own was much more challenging for me a a rookie, but I do like the look better. 

Tony
 
Thanks Tony and Dennis, and congratulations Dennis on the Cartouche.  I figured there might be a bunch of other folks working on the same project.  Regarding the top edge profile, from photos of antiques I've seen, a simple thumbnail is appropriate.  This is what Phile Lowe has on his piece in the magazine.  What do you all put on your QA pieces? 
Rob
 
I pulled out the print we did in class last night for reference.  The way this worked was Phil did the drawing while we stood around in a huddle and had some input.  That gave us the experience of producing the drawing and having some input, but we got a drawing produced very quikly.  Anyway, this drawing shows the overhang at 1" front and back and 1 1/2" on the sides.  The knees were about 1" out from the posts. 

I "cheated" on the edge and used a thumbnail router bit.  I like the profile I got, but  I went a little too deep with it. 

Good luck with your lowboy.  This was a big project for me at my level and I really enjoyed making it.  Its not perfect by any stretch, but as the months go by, I forget all the mistakes!  There was a conversation here a while back on the knee blocks.  I glued mine to the sides and the legs and I have one that moved with the side.  Its not much, but I can feel it. 

Tony


Attachments

  • lowboy small.jpg
    lowboy small.jpg
    101.6 KB · Views: 113
Tony,
Nice job with the lowboy and thanks for the picture.  What did you do for a finish?  I think I picked out the same brasses.  Are they from Horton?  I will be shaping the top tonight, maybe working on the knee blocks.  I read that thread prior so I glued only to the leg.  We'll see how it goes. 

This is an enjoyable project for me as well.  I hadn't made cabriole legs before, which is something I had been wanting to do for a while.  I had a big piece of 12/4 tiger maple lying around, so I got a couple of tiger maple boards when the article in FWW came out and started on this.  I'll post some pictures if I ever get done with it. 
Rob
 
I was in the class that the article lowboy was based on and it has an overhang front and back. Phill has given this class more then once and each time he draws a new version. It's possible that other versions are different.
 
Sorry for the delay.  I just now saw your reply.  Yes, I do believe I got my brasses from Horton.  They are really nice.  And their prices are very reasonable.

As for the finish, I had a few areas of sapwood, so I stained those with VanDyke crystal stain (the stuff made from walnut hulls and mixed with water - got mine from Lockwood).  I did the entire piece with a lighter mix to even out things after I hit the sap area.  To warm it up, I used a honey amber glaze made of honey amber TransTint and a gel poly.  I know it is sacrilege to use poly here, but it works well for me and is very durable.  It came out darker than I wanted, but I like the color. 

I've been buying tiger maple in preparation for building a tea table.  I'm anxious to get started on that.  I've got several designs that I'm referencing, but the version that Lonnie Bird did for one of the wood rags several years ago is the main reference. 

I noticed that there were a few differences in the version that we did in our class and the version in the article.  Nothing major. 

Tony
 
Rob- Tops will usually overhang about 5/8ths if they overhang at all. I suspect they were 3/4 when new. The overhang enables you to put a piece flush to the wall, jumping over the baseboard or chair rail.-Al Breed
 
Back
Top