Lolling Chair Construction

awleonard

Well-known member
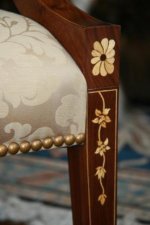
Sorry to be a pest with all the questions!  I bought some makore over the weekend to sue on these chairs.  It looks a lot like mahogany and I think it will work out nicely.

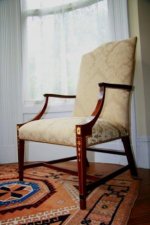
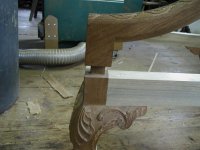
Most of the construction of these chairs appears to be straightforward.  I have a couple of quastions about the arms and arm posts.  I see that the arm post lands ont he leg and the side rail.  Is there a tenon on top of the leg only, or do you somehow attach the support to the rail as well (other than glue)?  It is face to face, so glue would be pretty strong I assume.  Also, the one plan I have seen shows the arm at an angle (ie not horizontal), so that presents all sorts of "funny" joints between the arm, post, and the back frame.  If the arm is fitted flush to the post, that joint is pretty important.  I was wondering what a good approach would be to make sure that joint is nice.  I wondered about cuttign the angle on the post top first and fitting the arm to it, then using that to mark the back frame where the arm will attach.  Any tips will be appreciated. 

Also, any plan references would be appreciated.  I have a copy of Norm's plans and I see that Phil Lowe sells a plan (but at $105, I'm hesitant!).  I have several good pictures to work from in various books and from Google.  I normally build chairs for our house a little smaller than normal.  I'm 5'4 on a good day and my wife is 5' on a good day!  And the area where these chairs are slated to go is a little cramped, so shaving an inch here and there will help. 

Thanks,

Tony
 
Tony- 0f course,  there are many ways to do it, but I think the easiest is to lap the arm stump to the rail and turn a pin on top of it that fits into a hole on the bottom of the arm. Leave the joint fat and scribe the rear leg- arm joint, sliding the stump closer to the rear post as you get the scribe right. With this method you can move the arm side to side as you figure out the cope and also slide it along the rail as you go. I glue and screw the stump to the rail as well as the arm to the rear leg. I don't tenon into the rear leg because I'm afraid it will weaken it. I do tenon arms into the rear leg on bannister backs and maple QA chairs, but not in mahogany ones. Finish the stump-arm joint when evrything's glued up.
You can get fancy and dovetail the stump to the rail, but it's more work and probably not stronger.-Al
 
Thanks!  I'll have to noodle this for a while.  I've seen a lot of variation in the design of these chairs.  Enough that it gives me some confidence to do whatever feels right design wise.  I like the idea of the round tenon giving another degree of freedom when fitting.  I'm trying to think this thing through before attacking like I usually do and then get in trouble.  Thanks for the help. 

I've been looking  a lot at the front legs on these chairs.  A lot of them look too heavy/bulky.  I also noticed on one or two that the front plane of the leg is angled back a little. I think I like that look better than jsut straight up and down.  Combined with the taper on two sides, I think it looks a bit more graceful.  I'm thinking about the arms too.  I've noticed a few that extend out past the post, but most don't.  I can see where covering the post to arm joint would hide sloppy joinery (which is my trademark!).  I also wonder about that sharp corner where the arm ends and lines up with the front face of the arm post.  That doesn't look comfy.  Funny how much thought goes into something so simple...!


Tony
 
Which chair on Phils site are you making?  The heppelwhite chair or the one below it with the cab. legs?

 
Tony- The arms I was thinking of spring up from the side rails, not in a swooping curve starting at the front. Hope I didn't lead you astray.
I don't think any front legs will angle back. On the contrary, you see legs raking forward every once in a while. With the taper on the inside and back only, the illusion is that they splay out, although they usually don't- the outside corner is perp. to the floor-Al
 
CBWW - the chair I would like to build is like the Hepplewhite chair at Phil's site.  I have found several pictures in my various books.  A lot of people refer to it as a Martha Washington chair. 

Allan, this chair is the type with the big swooping curved arm support that starts from the front leg.

Thanks,

Tony
 
My 2 cents-

I would draw everything, side and plan view in full scale.  Buy Phils drawing.  ALter it to fit your size.  I would put a tenon on the top of the leg that goes into the arm post.  I would also either do a dowel or floating tenon that goes from the top of the rail up into the arm post for more strength.  The vertical post should be tenoned into the horizontal part of the arm.  When you draw your vertical post leave a "flat"that is perpendicular to the floor, or angled, on the top of the arm on the back side to facilitate laying out your joinery. fare it away when done.  Through tenon the horizontal part of the arm into the back frame.  Leave reference flats on the horizontal part of the arm on the back end to lay these joints out.  I would not reccomend angling the legs.  Taper the inside faces. 

www.cherrybrookwoodworks.com
 
I bought plans from Phil and made the chair. It produced a chair that is very light in appearance, and it is sized perfectly for someone who is between 5 and 6 feet tall. It seems to fit in anywhere. Its also very comfortable.

Phils plans are excellent, but there were a few tricky points. They were well worth the cost. If you go that route, I will be happy to share with you what I learned, and where the plans might not be clear (a consequence of any chair shown in plan/front/side views).

Attached are a couple of pics of my chair.

JB
 

Attachments

  • IMG_1012_lowres.jpg
    IMG_1012_lowres.jpg
    21.2 KB · Views: 61
  • IMG_1016_lowres.jpg
    IMG_1016_lowres.jpg
    17.5 KB · Views: 56
This is a picture of an earlier style chair but the same principle. Straight tenon angled mortise. Hope it might help.
I do think that a mortise and tenon approach would be the most stable and true to form.
 

Attachments

  • Leg and Arm.JPG
    Leg and Arm.JPG
    110 KB · Views: 73
Wow, nice chair JB and Jeff (wish I could carve like that!).  Thanks for all the help.  GUess I'll start noodling this on paper (well, CAD actually).  Thanks very much for the help and I'll be back with more as I get going with this.

Side note:  I'm "working from home" today as we are in the middle of a winter storm here in Memphis.  The snow is really coming down.  But first we had a nice layer of ice.  Not too cold though.  Not often we get snow like this.  Fortunately, I can stay put for a few days until things clear up and it is nice and warmy in the shop.

Tony
 
New question...I'm working on plans.  One chair I looked at shows the back angle at 18° to the seat.  That seams a bit much to me.  Most of the chairs I measured look to be around 10-15°.  What have you used? 

Thanks,
Tony
 
Ok, believe it or not, I'm stuck at home because of snow again!  We got around 5" in Memphis.  So, in addition to the angle of the back to the seat, I have another question...how wide is the back on most of them and are they tapered (trapezoidal)?  One plan I am looking at shows the back around 19 3/4 wide at the bottom and tapering out to about 23" wide at the top.

Thanks,

Tony
 
Actually, I added wrong.  The bottom of the backrest I am looking at is 21 3/4 and it does taper on each side.  That and the 18° back to seat angle still look odd to my eye.  But I have never built one of these nor seen a period piece in person.  I'm looking at all my books and it is hard to tell.

Thanks,

Tony
 
Back
Top