John Townsend secretary

wallysandcrab

Well-known member
I'm going to be building the desk made by John Townsend, as shown in M. Hecksher's excellent book.  Does anyone know of any drawings available?  The desk and bookcase are simple, not blockfront.  This appeals to me, as I'm not in need of the fancy one, on which I'm kind of burned out.  I've got a good handle on the bonnet geometry and construction, and the upper case seems to present few challenges beyond that.  I've not built this type of desk before.  A number of questions come to mind, but a prominent one would be about the little triangle that sticks out on the front edge of the case sides.  Traditionally, would this be glued on, or cut from the case side?  I could keep going, but let's start with that.

Thanks in advance.

Johnny D.
 
Johnny,
You might try Al Breed.  He's got some plans on his site, but I don't think he has what you are looking for listed.  But he may have built a similar piece. 
Rob
 
The piece in question is in John Townsend, Newport Cabinetmaker by Morrison Hecksher.  Catalog number 29er, pages 134, 135. 

I very nearly prefer this piece of furniture to any other.  I suspect all of us here engage in furniture criticism to some extent, though quietly.  I know I do, and I've enjoyed doing it for many years.  The Sack books have had a very deep impact on how I look at stuff. The simple prospect of trying to decide what's good and why can keep a guy like me entertained for years; especially the "why is it good?" part.  The particular secretary in question is to me the perfect form in every way: elegant, graceful, serene, perfectly proportioned, yet also almost starkly serious.  In basic form it is the same as the blockfront secretaries, which are embellishments of this basic, yet perfectly evolved and thought out concept.  I do not deprecate the blockfronts in any way; they are acknowledgedly the towering masterpieces of American furniture.  I honestly go back and forth.  We all know that the shell type blockfront secretaries are muuuuuuch harder to execute. 

I think the closed bonnet with the secondary pediment board that closes the two round openings really changes the feel of the piece (and all such Newport pieces) as compared with those examples without the closure.  My own inclination is to instinctively prefer the open type.  But I really respect the closed one in all ways.  It just feels more serious or looming, where the open one has a lightness and uplifting sense to it.  Serious and looming is not necessarily bad.  I think that in his time John Townsend was considered a deeply serious man.  Stern also, I bet.  What a craftsman though!  No electric nuttin, daylight only.  I figure they had tons of custom tools, but where'd they get them?  The delicate perfect detailing and design of the little rosettes within the shells is really something to behold.  When you look at these pieces up close, and I've had occasion to see only a few, the crispness of the carving and fineness of detail is really humbling.

Interestingly they seem to have been kinda clannish in some interior construction approaches, especially, if you ask me, their drawer bottoms.  Often you see drawer bottoms using incredibly wide pieces of chestnut nailed to the bottom of the drawer sides, always split.  This represents not only a choice between using a 35 inch wide board versus a 19 inch wide board, but also condemns at least the bottom to quick failure.  It's almost as if superwide chestnut sawn to the perfect thickness grew on trees back then.

Please chime in

JD

 
What if I were to modify the design of the piece to include quarter columns?  Who thinks that would look better?  Any pitfalls there?  Presumably the upper section only would have the quarter columns, as my quick perusal of the books doesn?t show any desk units with quarter columns.  Anybody ever build a desk unit with quarter columns?

Take for instance the quarter columns found in a documented Townsend highboy or chest on chest.  These are not overly difficult to make, yet they require a very fine touch. They?re closely architectural but very much stretched lengthwise in respect to classical column proportions.  This stretching works perfectly on these pieces, whereas it would look ridiculous in a building.  My guess is that a Newport clock case column is less stretched than the drawercase counterpart, but I don?t know.  Anybody know anything about this?.

In my mind the quarter column detail adds a very pleasing, softening aspect to drawercase work. The extra cost and work to include it in a case piece is worth every penny and drop of sweat.  

The base is an Attic type while the capital is pretty classical Ionic.  The proportioning and detailing of each of these elements is very well done and very finely turned.  The diameter of the column matches perfectly to the separately turned base and capital parts.  There is very little detectable evidence of tool marks of any kind on the exterior surfaces of all of John Townsends work, and this applies to the quarter column turnings.  None of the turning appears to have been sanded, none of the details are blurred.  Fortunately for us, most of the pieces seem to have escaped serious damage during inevitable refinishings over 250 years.  You can, still today, see this.  The column part of the feature is perfectly fluted, five flutes usually.  They are dead straight, with the intervening flat spots (not truly flat, I?m referring to the uncarved part) left the same width across the hole ?carving??.  The last flat part where the column joins the case is half of the interflute ??.shmarg.  It?s a sure bet that the column fluting was done by means of a jig guided scraper.  The work would be held in a jig and the scraper would be mounted in a separate custom made wooden hand tool.  How do you guys do it?  Do you flute them before or after separation of the paper joint?  Does the jig hold a round turning or a quarter column?  

Free hand carving something to this level seems impossible to me.  I tried it once, and quickly it became clear that I?d underappreciated the challenge.  It?s not a part of the ornamentation that jumps out at you as being high level.

Attempting to carve them to final finish only with carving tools is tougher than you might guess.  Small errors in lines close together are easy to spot;  Townsend?s work shows no such deviations.  It?s tough to keep closely spaced straight parallel lines truly straight and parallel only with carving tools.  For no good reason, I tend to consider straightening the flute carving with files (like a chain saw file) as a cheat and dead end.   If I was goin? down that road again though, I?d plan to use a chain saw file in advance.  Helps when you know where you?re going.  In either I approach, I?d have to finish up with fine sandpaper wrapped around a dowel.  I wonder if Townsend did.

I?m also convinced that we now do quarter columns they same way they did: paper-gluing up four prepared pieces of stock, each sized close to the desired finish radius.  Their lathes were slow, nothing like even close to what we?d consider slow on our machines today.  Yet all the books suggest that sandpaper was only little available, and grindpaper (100 grit range) was unknown.  I don?t know.  I do know that when I turn a quarter column and I want a long skinny piece of wood to a consistent diameter,  I have to use a center support and even though I turn down to carefully gauged diameters, and clean out between, doing the fine finish only with lathe tools isn?t something I?m capable of achieving.  It would require years of daily practice for me to get that good, and to me the lathe is largely an acessory, not a centerpiece of my shop activities.  To really get it right, I use grindpaper and sandpaper on a long stick to get it as consistent as possible.   Yet I don?t think Townsend did that, but who knows?  Who spends time thinking about this stuff anyway?

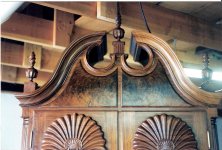
The pieces are not stop fluted, yet this is perfectly acceptable and in no wise to be considered cheap work.  In architectural work or in house joinery work, such a thing is to be considered strictly Gevoightescheisse.  In closing I?ll note that the one place I can think of offhandedlly where John Townsend did stop fluting is in the finial plinths on big case furniture.  These are a little bit rough in a couple spots, but I?m glad because it makes him humanoid.  I?ve likewise found that hand carving the stop flute termination and getting it geometrical and clean is tough.  Nawsty grain changes and all that sort of thing you know.

Pip Pip, cheero, toodle-oo, up , up and away!
 
Johnnny- Sounds like you're in the right frame of mind to do this project. I've done all the stuff you're wondering about, some of it most recently in a Townsend highboy.
The thing to know about Townsend is that he was a really precise engineer- draftsman type. There is nothing that he didn't think through and plan- I don't think he left anything to chance. His B&C feet are easier to carve than Goddard's, but more successful, in an art Deco sort of way.
I can tell you how to do all that pediment stuff so it comes out, etc. Call me at the shop 603-749-6231.-Al
 
Al:

Thanks for your kind and generous offer.  Perhaps I will sometime call, but I'd have to articulate the questions to minimize your time.  I actually have the upper case under control, having been able to measure one up close and personal and gave it a right good fondling while I was at it!  As you know better than I, the upper sections of this type by JT are really consistent, though some might think them a bit squat in the bonnet compared to others.  I can dig 'em just like they are.  I twaddle about open vs. closed, even though no open JT example is known that I can think of.  I think maybe Jeff Greene does a hypothetical version of a tall JT type case piece.  A full front to back open veneered cylinder would be my ideal, but I don't know if I have the minerals for that.  I can't imagine how I'd execute that.

What do you think about quarter columns on this piece?

JD
 
To me the supremacy of tallcase Newport furniture largely lies in their perfect proportion and in the perfection of their solution to the crested bonnet, and less to the highly acclaimed swelld front shell feature, which is rightly considered magnificent.  This is probably a minority opinion, but I have fun with it.

If I'm gonna bust my butt for a year or more to build another piece like this, the success of proportioning becomes really important to me and my mind strays well off into it.

One of the unsung elements of the bonnet's success is the small astragal moulding what lines the pediment opening and the way it is integrated into the mouldings that it intersects at either termination.  The curved cope that blends this into the gooseneck is truly inspired.  It's so good, it's rarely remarked upon.  When everything blends together properly no one part stands out among the whole, and the value and difficulty of creating/inventing the individual elements that really make the bonnet sort of escapes casual scrutiny.

On the lower end it intersects the base mould of the central plinth, which is of like profile, but they intersect practically at right angles.  The joint is made by notch miter.  Another perfect solution.

I've done some intersting playing around with the geometry of a JT bonnet and have concluded that the layout was governed by certain, simple geometric principles.  The height is a third of the case width, measured from the bottom of the level crown to the top of the gooseneck.  The next thing to decide is the location and diameter of the "tunnel".  After that everything else layout wise falls into place without guessing.  Thus I fancy that if I was stranded on a desert island with a fully equipped shop full of priceless mahogany and provacative wall calendars but without drawings, I could still recreate the proportions of the piece.

I also really admire the solution to the front doors on the bookcase with the outside stiles extended beyond the visual door edge and hinged behind right on the edge.  This approach leads to two short bits of end grain exposure, but it's really elegant.  The sliding candleshelf is a nice touch and not to much extra work to incorporate.
 
I'm looking at the pediment board and considering how it's relationship to the carcase differs from the usual highboy type approach where it dovetails into the side of the case or the quarter column extender piece.  In this instance it looks like it is applied to the face of the bookcase carcase without joinery.  I wonder if he made the carcase top board stick out proud of the sides a bit to go into a horizontal rebate in the pediment board.

JD
 
JD- Carcase is just a box, nothing sticks out. The solution to the curved molding intersecting with the cornice is a curved mitre- I freehanded it, if you can believe it, and it came out nice. I turned the circular molding on the lathe. I'm going to go look at my pics and the book and give you my advice on quarter columns. Notice that the lower edge of the pediment board dovetail is parallel with the pediment molding angle...I told you he left nothing unanalysed!-Al      I'll post  blog on this tonight on my site and try to include everything I can think of.
 
Al:

The photos seem to indicate that the pediment board is not joined to the carcase in the same way that it is in a highboy.

On the intersection of the two mouldings forming a curved miter:  I free-hand it also, as I've been able to devise no tool guided means of transferring the layout onto the moulded curved surfaces.  I do it by drawing the intersection full scale by means of multiple closely spaced lines in addition to the corner lines, the intersections of the many lines form the desired curve.  Then I put pencils marks on the two mouldings by eye, referring to the drawing.  After that it's carve carefully.   I recall a jig I saw in a George Colling's handrailing book using something he might have called a "falling compass", but I haven't tried it.

Here's another one for you:

In terms of assembly sequence, you probably install the veneered cylinder before the ring mould, wouldn't you?

By the way, if I, the FNG, might be so bold as to presume to speak for myself and some of the others of us here, I'd like to offer my note of appreciation for the amount of communication time you obviously put in for all us here.

JD
 
JD- I posted some stuff late last night on my blog. I don't put the veneer inside the hole til the ring mold is in. I glued some backing blocks to the back of the board and just wet the veneer and fit it in and glued it.
I have some more process photos that I'll put up when I find them-Al
 
I have enjoyed reading these bits. Stuck years back on these same questions I guess my ideas were different. I joined the molding under the central plinth by coping that ring molding to lay on top of the plinth mold. I never considered  veneer in the ring holes; instead I just used solid pieces of ring shaped wood. This ended up giving a nice solid surface to attach the dustboard. I have built 5 of these bonnets, always this same way(1 desk, 2 highboys, 2 chest-on-chest). I think the look is still the same. Here I will try and attach a close-up of the area from the chest-on- Ihave placed in the member gallery.
The only way I could ever see to joint the gooseneck mold to riing mold is the curved miter(carved-whittled-chew to fit). I did  see a photo wallysandcrab posted that shows what looks to be the ring mold slightly overlaying the gooseneck-I have seen other photos like this but never really grasped that jont.
 

Attachments

  • DSC_0233.JPG
    DSC_0233.JPG
    81.8 KB · Views: 102
Mike:

I've posted some camera shots of a Newport bonnet top in a thread entitled "Newport chest on chest".  They show what I'm describing pretty well.  I remember a long time ago when I wanted to build the chest on chest, and all I had was one photo, closeups, and never had seen one.  I was really lost as to how some things in the bonnet were done, so I went to see one up close and measure it.  The photos are from that trip.  I've done that bonnet twice now.
Perhaps some of you heard the giant forehead slap when I read Al's post on how to do the veneered cylinder.  I made this much more difficult for myself that apparently needed.  At one early point, I was trying to turn both the cylinder and the ring moulding in one piece.  That didn't get me very far.  I later settled on making a wood ring and veneering it, and then installing it.  So much simpler to cut some blocks shaped to the required curve, install them, and then simply put the veneer over top.  The veneer needs to be thin enough not to show the edge I suppose.
If you look closely at the pictures you can see that the ring mould is terminated before the gooseneck mould begins its return, by a slanted sort of miter.  My take on this slanted joint is that they did it this way to keep the ring mould tight against the curved miter.

JD
 
JD, I have seen other photos of that same gooseneck/ring joint, so they did that on some others, too.
I did make a newport desk one time with an open bonnet- I know the original was not like this- I can't really recall why I changed it. I made this for some folks so maybe they preferred the open bonnet.
 

Attachments

  • openbonnet.jpg
    openbonnet.jpg
    155.1 KB · Views: 147
Mike:
That' real nice.  I love the open bonnet.  I said this earlier somewhere, but wouldn't it be nice to have full depth cylinders in there, going front to back?    Looking at your bonnet, I'd say it'd doable.  I might try it someday.

Regards

JD
 
Mike- Nice! But a lot of work.....Generally the open ones have a box behind the front that goes back to the backboard. I think they knew it would be a grunt to do all that curved work-Al
 
JD,
I'm not sure anyone could tell there would be full cylinders inside there. I'm about 5'11 and I usually figure the case looks best when the short part of the case is about 6 feet tall- that may sound like an over simplification- but I think that bonnet about one to one and a half foot or so taller than eye-height is one of the things that makes the effect pleasing(notice I don't seem to care if someone is a different height). Also, looking at photographs of this 2 shell desk in books, I did not particularly like it. In person, the shells are right at (my)eye-height and it mades for a very striking piece.
I do have some mass. type bonnets with small full cylinders extending back the whole way/that little cylinder(about 7/8- 1 inch or so dia) just below the central terminus of the goosneck mold. I have no idea if the originals really had that cylinder returning all the way back- this is just the way I was taught. Don't know if I have any photos of those bonnets on this computer-might have to take a picture.
Mike
 
Back
Top