Inlays

Several questions:
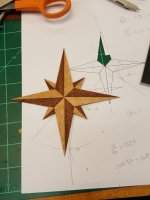
1) I would like to attempt to make shaded fan inlays. I believe I understand the general method to make them. I am going to apply them to a curved door which I would also like to veneer. Should I veneer the door first and then cut out for the inlay or cut the veneer and put the inlay into the veneer and then apply as one unit using veneer tape for example to hold it together?
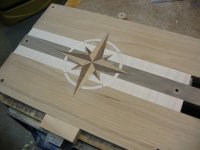
2) If I don't want to use a router, what is the general technique for cutting the substrate (in this case solid wood) to receive an inlay? Do I cut the outer edge of the inlay simultaneously with the substrate and then use a very flat gouge to remove the wood for the inlay?
 
Well, I just got done making a few fans as an exercise. I would encourage you to do this as well before you get ready to put it into your door. There is quite a technique to get it just right.
If you are going to veneer the whole surface of the door, then it might make sense to add the fan as a packet into your door veneer if possible. If it is physically impossible to add the fan as marquetry, then add a backer to your fan and inlay it into your door.. This also is quite a task and requires practice, so make sure you know the process and feel good with it before cutting into your finished door.
The method I would use is to lightly score around the outline of the fan with an cacti knife. Then, remove the fan and carefully trace the outline again and again until it is fairly deep, say about 1/16th or so. Now it is time to remove the material. I use a laminate trimmer with a 1/8" bit to hog out 90% of the material. Then I move to a Dremel with a 1/16" bit and remove as much as I can without hitting the score mark. When this is done, clean up the rest with chisels, xacto knife, or small gouge.
If you need more guidance, there are plenty of videos on you tube. Also, feel free to email me.
 
So, for something more complicated like a compass rose that is being inlaid into solid wood and too hard to hold in place, I have seen some different ideas about how to hold it while tracing with a knife.  I tried experimenting with small dots of hide and white glue.  The hide was too strong and the white was almost too strong too.  I just saw a mention of rubber cement.  Any ideas?

Thanks,

Tony
 
Tony, I have had good luck securing the inlay to the substrate with hide glue. Just 2 small drops of fresh glue will hold it securely to score around.
I also had success with a good double back tape. Not all are created equal. Make sure the thin tape you use is aggressive.
 
So, how did you remove the inlay after tracing?  The sample I did with hide glue stuck very well!

Thanks,

Tony
 
Tony, All I do is to place my knife under the inlay and pop it up. Anything narrow and thin will work. Even a putty knife
ground to a thin edge would work great for freeing up your inlay.
 
Ok.  I tried that, but the veneer split.  Might try the rubber cement.  At least that can be loosened with solvent that won't affect the veneer tape. Maybe a smaller dab of glue? 

Tony
 
The hide glue should be just the smallest droplet you can possibly put on the inlay. Press down firmly until it sets.
If you use too much glue, it is difficult to separate.
 
I'm using liquid hide glue, but I wondered about using heat to loosen it.  I'll have to be careful to stay away from the veneer tape holding the inlay together.  I'm going to try and play around with it this weekend.

Tony
 
As long as your liquid hide glue is less than 1 year old it should be ok. Don't try heat or water to loosen it, just pry it up. Practice on some small pieces. Your drops should be about 1/16 " in diameter, no bigger.
 
Thanks.  I messed around a little over the weekend.  One thing I noticed was that if I didn't allow the glue to set overnight - maybe 30m to an hour - things stayed put, but came up well.  I'm still nervous about ruining my star.  Practicing tracing with an Xacto too.  That is tedious and dangerous!  Have to keep telling myself we are scratching - not trying to cut through 3/4" of wood!  ha!  Oh, well, gotta just dive in at some point.  

This is a practice run.  I'm going to try and set it in a wooden mouse pad (just in case it actually works) that I glued up out of scraps of cherry, maple, and walnut.  

Tony
 

Attachments

  • compass rose star veneer.jpg
    compass rose star veneer.jpg
    142.1 KB · Views: 13
Tony, your right about that. Your first score around the star should be very light. Plus, it should be with a NEW blade. Just trace the outline. All you want to do is to lightly score the outline with no pressure at all. Do this 3 times and you will have an outline that cn be scored with some pressure. Then remove the star and continue to score it more heavily. For putting veneer into veneer, I have had plenty of success with simply taping the piece in place, and scoring the outline. I only glue my piece down if I am going to inlay into solid wood, which requires much more scoring. Hope this helps to clarify.
 
Well, I got it done.   Learned a few things.  I noticed there are some gaps.  I think my scratched lines grew outward as I deepened them.  I played around last night and found that my lines expanded as I deepened them.  Seems like If I angled the knife, I could force the growth to the inside of the inlay excavation.  Not thrilled with this, but it was an intended learning experience anyway.  I also figured out that I went way too deep when I excavated the outline with a chisel!  My veneer is ~0.020".  My clamping method wasn't great either.  I may setup some veneer clamps in a fame or even use the vac press. 

This practice piece will be used as a mouse pad.  I am practicing for a small bedside table I am planning to build.  I have always liked the compass rose image and thought it would be fun to add to the top of the table.  The table design is not traditional by any stretch and I will be using my CNC router to make some of the parts.  There, I said it. 

Thanks for the help.

Tony
 

Attachments

  • IMG_4574 (Small).JPG
    IMG_4574 (Small).JPG
    67.8 KB · Views: 11
When I do inlays I Use a drop of Hot hide to hold the piece in place, then trace around with an exacto. I then pop the piece off and do an angled cut in the waste area to clear out the waste along the edge. Similar to what I do when carving, then I go back along the edge, and trace around, do the angled cut.

I've found this gets a much cleaner line. But I've yet to see a piece with gaps here and there when you look close enough. I guess that's a plus to my eyesight going. ::)
 
Ha!  I found that during the tracing, it all went much better with my new 2.5X glasses and LOTS of light!  So, I have learned several things via this exercise! 

Also need to make a tool to excavate those corners.  I got them cleared out, but it was not a controlled depth.  Hate to grind a $30 cutter for the Lie Nielsen router plane for this one operation.  Heck, even a bent and shaped/sharpened butter knife should work.

Tony
 
Buy one of the mini lee valley routers, and grind it's blade.

http://www.leevalley.com/us/wood/page.aspx?p=67814&cat=1,41182
 
Lie Neilson does make a small cutter for their plane that works wonderfully for cleaning up the edges and corners. That and a scalple should do the trick.
 
Yeah, I was looking at the Lie-Nielsen.  I have their  small router.  Also like the depth stop they sell for it.   

What happened in the corners was as I excavated around the outline, the corners sort of came out and all that was left was a tiny sliver.  As I removed the sliver though, it would tend to chip out rather than be sliced out at a controlled depth. 

I think I figured out enough to move on with the final piece.  It will be a hair bigger.  I hesitate to share the design here because it is nowhere near a period design.   Funny, this whole operation started as a need for a nightstand.  I designed up something very traditional with some nice pineapple mini columns for the top and some nice crotch mahogany for the doors, etc.  But when I realized that the space I had to work in was so small, I couldn't fit my original design in. From that, i decided I just needed a small table that could be used elsewhere later and that is where this design came from.  Not a nightstand, but a small table to be used as a bedside table (somewhere to place the SAPFM journal before I drift off to sleep!). 

This is the prototype....


Attachments

  • IMG_4578 (Small).JPG
    IMG_4578 (Small).JPG
    84.6 KB · Views: 19
Back
Top