How was it done?

Making some tombstone doors and was curious as to how the dado was cut into the top arch.  I imagine some type of curved dado plane was used, or perhaps a modified "old womans tooth."  Any ideas?

I find myself garvitating more towards hand tools.

Thanks

Joe
 
It is pretty easy to do with hand tools.  Use a marking gage or mortising gage to define the boundries of the groove.  You might start excavating with V-tool, but you use a bench chisel to dig out most of the material - using the back side of the bevel down to follow the curve.

If the top stile has an ovolo you can easily carve this whith gouges,  I back bent comes in pretty handy.

Tom Meiller 
 
Tom uses a "bench chisel".  I have used a "mortise chisel". The groove along the tomstone is essentially a long shallow mortise.

Howard Steier
 
Though I haven't tried using one for this particular application, I wonder if a "handrailers' quirk router" might not be worth experimenting with? My inclination would be to define both boundaries of the groove with a narrow cutter (ca. 1/16", e.g.) to finished depth (ca. 1/4"?), then remove the remaining central waste with a chisel of appropriate width.

I'm going to attach (I hope) a photo of a handrailers' quirk router I made and used while doing curved handrail work. Had some trepidation about its effectiveness (and there is a bit of a learning curve as it requires more wrist action than most tools), but found it quite efficient for narrow and relatively shallow (1/4" or less) "quirks" or grooves. Unfortunately that tool was made as a shop tool, so didn't come with me when I moved on. "One of these days" I'm going to replace it.

Among the advantages of these tools is that the cutter can be reversed, to accommodate the grain direction, and remain aligned if the fence is left set. Quite helpful for curved work. Also, the blade can be set to the required depth and it simply quits cutting when the compassed sole contacts the surface of the material. The blade, having a "V-shaped" leading cutter, allows for waste removal by the following "raking" cutter in a controlled and efficient manner.

(Am going to send a follow-up message with another photo to show some of the construction of the quirk router. File sizes are too large to accommodate in a single message.)

Don McConnell
Eureka Springs, AR
 

Attachments

  • qrouter.jpg
    qrouter.jpg
    89.2 KB · Views: 61
Hi again,

Attached is the photo showing the separate parts of the quirk router. Be happy to answer any questions I can.

Don McConnell
Eureka Springs, AR
 

Attachments

  • qrouter-2.jpg
    qrouter-2.jpg
    118 KB · Views: 73
Joe,

I apologize upfront that this response is probably more in that just "git 'er dun" category and is no way as interesting as the other responses you have received.  However in FWW #154 there is an article by Lonnie Bird about constructing tombstone doors.  Nothing too fancy as I recall - first power tools and then a shaping and clean up with hand tools.

Kent
 
Kent,

The responses have inclined toward hand tool solutions because that is what Joe was asking about. At least, that's how I understood it.

But, there is something of a practical and safety issue involved. If one does this work with power tools with rotating blades, routers or spindle shapers for example, one is faced with a couple of unpleasant choices - due to the inevitable and radical grain reversal along the curvature. Either one does half of each cut radically against the grain, risking significant blow-out, or one does a part of each cut as a climb cut. Now, I know that climb cuts *can* be done with hand-held routers, etc. (and, yes, I've done it), but I would never want to take on the liability of suggesting that someone else do so. 

Don McConnell
Eureka Springs, AR
 
Don,

I intended neither harm nor criticism with my previous post.  I read the post as simply "How was it done?" While the author's preference for hand tools was stated, I recalled the FWW article and thought that perspective might prove useful to those who read the Forum. 

I very much appreciate the hand tool approach to the creation of period furniture pieces (other stuff too!) but have noted that many seem to use power tools first and refine or finish their work using hand tools.  Apparently like you when I see how people accomplish things with power tools, I am often significantly encouraged to do it another way.

Since reading your post earlier today, I have been looking for more information about the tool you mentioned: the handrailers' quirk router.  Can you suggest any sources?

Kent
 
Thanks all, your comments are much appreciated.

The reason I was looking for a hand tool solution was that I just had a minor blow out problem with some cherry using the shaper table (I used a Stanley 48 to cut the dado's on the straight pieces). 

Joe
 
Kent, et al:

The only source I'm aware of regarding the handrailers' quirk router is George Ellis' _Modern Practical Stairbuilding and Handrailing_. In a chapter entitled, "Apparatus and Tools Used in Stair Construction and Handrailing," he illustrates an adjustable quirk router of which he writes:

                                            *****************

    "The Adjustable Quirk Router (Figs. 10 and 11 [see attachment] ...) is, in its specialised form, a home-made tool. There are varieties, both in wood and iron, to be met with in the tool shops, but the former are intended for ordinary woodworkers' use, and do not exactly meet handrailers' requirements, whilst the latter, though stronger than wood, do not, at least in the author's opinion, work so sweetly as the home-made article.

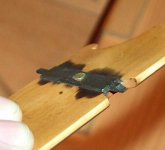
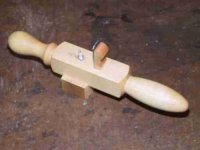
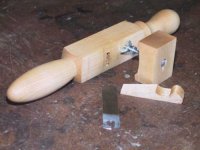
    The form shown is somewhat elaborate; many workmen are satisfied with simply a square stick with the rough edges filed off and a wood screw driven through the fence. Certainly a good workman will accomplish wonders with makeshift tools, but, other things being equal, the better the tool the better the work, and the author always had a penchant for making his own tools, so he offers his own design for those who care to follow it. The quirk cutter, which is a piece of [hardened and] tempered steel about 3 ins. long and 3/4 in. wide, of various thicknesses, is shown in the two views, Fig. 12. The ordinary shop-made article is always flat or straight across the face, but cutters work much easier if slightly curved in section, which can be done by softening the cutter in a gas jet, then bending it in a steel vice between two hardwood blocks to the required curvature, afterwards re-tempering it - a little job that any blacksmith will do. The author did his own, but the description of the process would be rather lengthy. The stock is 1 1/2 in. square, about 12 ins. long, with small handles turned at the ends; the cutter fits tightly in the mortise, which must be quite upright and is wedged as shown. The sliding fence, lips over the stock, is reversible; one side is rounded slightly, the other straight. It is fixed in any desired position with a thumb-screw. An ordinary "plough-stop" screw answers the purpose. A small slotted plate is sunk in the top side, in which the screw works; the amount of adjustment is about an inch, as shown by the dotted lines. The underside of the stock should be slightly rounded, because the tool must have a rocking motion when worked, because the V part of the cutter, which is in advance of the chisel edge, has to be scored-in before the cut is made. "

                                            ********************

It will be seen that I followed his design fairly closely - and I was not disappointed. I didn't put the slight relief curvature in the cross-section of the blade, and think it might be a good idea for deeper cuts. Though not essential, in my experience.  For the cutter, I used a piece cut from an older non-carbide tipped circular saw blade, and it served quite well.

I'm tempted to add more details, but think it may be better to see what questions, if any, arise.

Don McConnell
Eureka Springs, AR
 

Attachments

  • qrouter-4.gif
    qrouter-4.gif
    58.8 KB · Views: 48
Hi All,

Just wanted to share my experience with Don McConnell/Geo. Ellis's quirk router.  I made this tool a few years ago, after the first time I saw Don's version.  Didn't have a lathe, so I just sawed and shaved hand grips into the ends of the main block.

This is a very effective tool, and more flexible than it may appear (more on this below).  You can buy the tooling online--there is a guy in Scotland (Inchmartine Tools) who sells sets of 3 cutters in likely sizes for about $35.  Here's something that I didn't 'get' until I used the tool--the key to the tool is the radius on the bottom of the stock.  This radius gives the tool a smooth 'rolling' action on flat surfaces, and I believe would make the tool work really well for this tombstone routing application. 

Flexibility.  The same tool can be used as a stringing router, in cases where you want to plough a groove whose width is different from the quirk tooling that is on offer.  For example, I ground a stringing cutter a hair less than 1/16" wide onto the end of a sabre saw blade, and made a skinny little wooden shim/carrier for it (so the cutter would fit the slot), and it worked well.

Not arguing with the chisel folks--they may have the best way of all--but Don's quirk router is very effective and useful.

Wiley


Wiley,

It's very gratifying to hear of your success in making and using this versatile, but little understood, tool.

Thanks for the mention of the commercially available blades. I'd forgotten about them. For anyone interested, they are at:

http://www.toolbazaar.co.uk/

Click on the "Spares Sales" and the Preston quirk router cutters are the second item. Unfortunately, there is no information regarding the thickness of the cutters, but am assuming they will work in the Ellis type adjustable quirk router since Wiley has had success with them. I'd obtain them first, though, then build the router around them.

Regarding the handles - even though I have a lathe available, when I make another quirk router, I think I'll probably make octagonal handles. Mostly, because I'm very partial to octagonal handles, but, also because I enjoy working with chisels/spokeshaves/planes/etc. at my spoke/handle-maker's "fiddle" more than turning with a lathe. Incidentally, one of my co-workers pointed out that the two different styles of handles shown in Ellis' drawing may have been intended to show two options rather than both be used on one tool. He may be right, but maybe no one will realize that if I keep my mouth shut.

Think I would upgrade the fence hardware somewhat, if I could only find someone capable of making nice brass thumbscrews.  :) Though, to be honest, the common hardware I used previously worked just fine.

Don McConnell
Eureka Springs, AR

 
I started to ask about the two different handles shapes, but decided it may have been an intended design to make the direction easily distinguishable when reaching for the tool?

Tony
 
The antique tool website referenced above usually has quirk routers for sale as well as the replacement blades. Woodjoy tools (www.woodjoytools.com) has a wooden version.

I'm not sure of the practicality of using this sort of tool to form a 1/4" wide groove that's 1/4" to 3/8"  deep. I believe the widest blade is 1/8". This would require an initial groove with subsequent widening and I suspect it would be difficult to keep the blade on track for the widening. Quirk routers were used to embellish stair rails, chair seats and to cut grooves for inlay.

Has anyone out there actually used this type of tool for making grooves wider than the cutter?

Howard Steier
 
Why couldn't a person make one with a 1/4" cutter? Use a 1/4" square cutter from a metal working lathe. As to the shaper, couldn't the groove be run on one side and then the cutter flipped over and run in the opposite direction so you wouldn't need to climb cut? I got to wondering how difficult it would be to lock the shaper spindle and move the piece passed the stationary cutter to scrape out the groove. That would depend on how many were being made as to feasability.
Mike
 
Howard,

I do understand your skepticism. And, as I made clear in my initial message, I have not used the adjustable quirk router for the specific task of running a groove in a curved rail piece. Which is precisely why I suggested it as an experiment.

The difficulty of widening the groove would be avoided, I believe, by the approach I suggested of  using a 1/16" blade to work both boundaries/limits of the groove, leaving a strip of waste material in the center. Approximately 1/8" wide if a 1/4" groove. Then I would remove the waste with a chisel slightly narrower than 1/4". Except for the small area where the grain direction reverses, removing the waste down to the level established by the quirk router should be a very straightforward process.

Despite my proposing it as an experiment, however, I have a good deal of confidence that this approach has some merit. Partially based on my experience with the handrailers' quirk router in other applications, and partially based on the fact that roughly analogous tools were used by coachmakers to run grooves to take panels in various curved elements of their work.

Taking a look at Salaman's _Dictionary of Tools_, we find both the jigging router and the pistol router with adjustable fences and described as being used to run grooves to take panels. The pistol router is described as having 3/16" or 1/4" cutters. Additionally, he also shows the grooving router, sometimes offered in pairs, which came with 1/8", 3/16" or 1/4" irons. In all three of these routers, the cutters look like one-half of the cutters we've already discussed. In other words, the V half of the iron is gone, leaving only the hooked chisel half.

If one was going to do a lot of curved door work, then it might be worth looking into one of these just-mentioned tools. On the other hand, if only doing it occasionally, the handrailers' quirked router, used as already proposed, would probably serve nearly as well - and has the advantage of being useful for other applications.

Don McConnell
Eureka Springs, AR
 
Don,

I made a similar tool fashioned after one that Mack Headley was using at a Williamburg conference (see picture below).  It was basically the hook mounted to a piece of wood so you could control it.  I my problem with this tool was that I could not take a lite enough cut.  The blade keep wanting to dive into the wood and thus stopping the cut. 

I have been intrigued by this topic and plan to make a quirk router (someday).  The v-notch on the front of the blade acts as a nicker (OK, that was obvious), but I also see it as something that can counteract the diving action of the hook blade.  If the hook tries to dive, you can roll the router to drive the nickers into the wood and thus raising the hook.  The quirk blade is a really neat design. 

Thanks all,
David
 

Attachments

  • Mack Headley's small router - blade.jpg
    Mack Headley's small router - blade.jpg
    32.8 KB · Views: 34
In my experience, there's no magic bullet. It's just careful and tedious work with a mortice chisel of the appropriate size. I think this work was relegated to the apprentice who was loudly reprimanded when he "blew out" the side of the mortice or groove of the upper curved rail.
 
Back
Top