You are using an out of date browser. It may not display this or other websites correctly.
You should upgrade or use an alternative browser.
You should upgrade or use an alternative browser.
Highboy question
- Thread starter rchampagne
- Start date
rchampagne
Well-known member
John, that was my plan--make the molding 1/8" proud of the pediment board.
Rob
Rob
wallysandcrab
Well-known member
Chobbs66:
Standby to standy. Endeavoring to perservere on data transmission.
Over
Standby to standy. Endeavoring to perservere on data transmission.
Over
Rob- Use pine planed as thin as you can; less than an eighth, more like 1/16. Get it to fit in the rabbet, then take it out and wet the side you want to be convex and let it sit for a while, maybe re-wet it once; this will bend it around a bit and make it soft. Then nail it in the rabbet on one end (the front) and into the top of the rear pediment board in the back. I used copper tacks for the last one I did.Plane the edge so it's straight before you install it so the next piece can butt up to it. Put some glue on the edge of the next piece(s). It will crack when it gets really dry. I usually glue a piece of linen or light canvas to the top and color it with a reddish-brown shellac paint. Or just glue strips of material on over the cracks or seams in the pieces.-Al
wallysandcrab
Well-known member
wallysandcrab
Well-known member
wallysandcrab
Well-known member
wallysandcrab
Well-known member
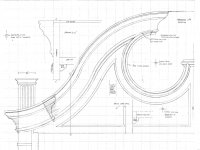
page 4 of 4: Measured drawings, Newport chest on chest
wallysandcrab
Well-known member
page 4 won't fit!
We are soooo close. I have the file for Page 4 of 4, newport chest on chest. This sheet shows the bonnet elevation in detail. My file size is a few K too large and I can't compress it because I don't have anything to do it with. It only needs the tiniest wee bit of compression and it will go up.
Can someone please volunteer to take this file via email and do what it takes?
Thanks in advance,
JD
JD.
Thanks for posting the drawings, I look forward to poring over them. I would be willing to resize your file if you still need it. Email [email protected] .
Thanks again. Cal
Thanks for posting the drawings, I look forward to poring over them. I would be willing to resize your file if you still need it. Email [email protected] .
Thanks again. Cal
wallysandcrab
Well-known member
Thanks for doing this, Cal. In looking at these drawings and comparing them to photos I notice that the crown mould is not drawn exactly correctly. I'm too lazy to fix it in the drawing. These drawings were prepared as part of the deal for getting to measure the piece, and I used them to build one. I did a straight vertical cross section of the gooseneck. Don't let that fool you. I should have inflected the section line. I have no training in drawing.
I want one of you guys to start building this piece. Right away, please... if you don't mind. It's a big project, costs quite a bit of money, and will learn you a lot. You also get more storage in this than about any other piece of colonial furniture. Every one of us should have one of these in his house.
JD
rchampagne
Well-known member
FWIW,
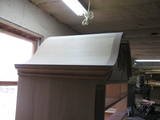
I got the roof done on the highboy last week. It was really not too difficult. I had a piece of 4/4 pine that was clear for the length I needed and 26" wide. I had to rip it to a more manageable width (I think about 12-13"), then I resawed thin pieces on my bandsaw. I cut them about 3/16" thick, then planed them on a bench hook with a 1/16" lip. I found that a thickness of 1/16" or so worked well. Then I wet one side down with a splash of water and let it sit for a few minutes. Depending upon the orientation of the growth rings, the piece started to curl pretty soon. Using the curl to my advantage, I nailed the pieces along the curved top with no issue. I used four pieces, I think, with seams laid down along front to back stretchers between the back board of the pediment and the secondary wood back of the piece. I put some glue down on the stretchers, then sanded them flush when everything was done and dry. I'm including a picture of the finished roof. Hope this is helpful to anybody hoping to do this in the future. Thanks again everybody for the advise.
Rob
Attachments
Share: