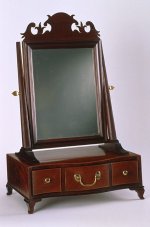
I am making a dressing glass patterned after the one in the Chipstone Collection (shown below). I am looking for some suggestions on how to mount the mirror supports to the base cabinet. On the original it looks like screws were use and I would like to improve on the design.
You are using an out of date browser. It may not display this or other websites correctly.
You should upgrade or use an alternative browser.
You should upgrade or use an alternative browser.
Dressing glass
- Thread starter jogrand
- Start date
Antiquity
Well-known member
I made several designs similar to this one. I screwed it thru the bottom of the top of the drawer box. In order to reach in with a screw driver I drill holes in the bottom of the box just large enough for the screw driver to fit thru. Of course you must have a long screw driver.
Dennis Bork
Antiquity Period Designs, Ltd.
Dennis Bork
Antiquity Period Designs, Ltd.
John McAlister
Well-known member
John, I have the same Lynch plans that Tony Joyce mentions. Lynch shows the mortise in the top to be straight in at 90 degrees with the upright tilted back 11 degrees. I recall that I thought it would be easier(for me) to tilt the mortise rather than the tenon!
I also thought it'd be easier to mount the mirror posts before gluing the base up so I could drive a wedge into the post from the underside of the top, to lock up that joint.
I'm out of town (and away from my computer) until after the Mid-Year but
I'd be glad to lend you these plans. Contact me off Forum with a mailing address and phone number if you're interested. John McAlister
Jeff L Headley
Well-known member
I have worked on a few period ones(not the one's pictured) and they have had thru tenons with wedges driven thru the tenon from the underside. Some were behind the drawers others had the drawer back notched for the tenons. The posts were removable. Now these were similar but from different regions.
Tom M
Well-known member
We did a similar Boston Bombe dressing mirror (MMA # 204) with the posts held in with wedged tenons in Gene Landon's class at Olde Mill last year. It didn't seem all that difficult to glue/wedge the posts in after the box was assembled. Gene used two thin wedges along the long edges of the tenon such that the wedge force was acting against the grain of the top. It was important to make sure that tapping the wedges in didn't unseat the tenon shoulder.
Gentlemen, thank you for the information on the glass, it really makes me feel good that I belong to such a good and helpful organization. Because I am half way there I have decided to pull the drawers and drill through the bottom all away up to the top. If I would have been thinking farther ahead than the bottom case I would have known what I would have done in this situation. I think that I would have liked to tendon it into the top and wedged it solid but it was too late and the top is a single board so I am too chicken to mess it up by cutting holes into it. Thanks again, John
Jeff Saylor
Well-known member
John,
I made one recently off of a picture and had the same dilemma. Not having a clue as to how they were done in the past, I simply mortised the posts into the bases for them and then doweled (3/8") the bases to the top of the case. Worked for me.
I made one recently off of a picture and had the same dilemma. Not having a clue as to how they were done in the past, I simply mortised the posts into the bases for them and then doweled (3/8") the bases to the top of the case. Worked for me.
Jeff L Headley
Well-known member
John, Am I unaware or what? I didn't realize you wanted to attach the molded bases of the posts to the top of the box and not the post themselves until discussing this with Steve Hamilton. Just scrape off the finish and glue the bases on the top. We will all be dead and gone before they come off. Let your grandkids take care of it then. Tell them to use screws. And no I didn't know it was you.(for everyone else you had to be there). As with us all, I should be more careful with my postings. Best regards, Jeff
John McAlister
Well-known member
John, Jeff, et al. Obviously I was off base in what the question was, too! I looked again (too late) at the picture with the first posting and its clear now!! John McAlister
John, Jeff, I’m sorry that I was not very articulate in my question, next time I will do better. I am getting excited on the progress of this “little project” and I thank you all for the help. Jeff, I just consider my self extremely fortunate to be just down the road from you and my girl is glad that for some reason I find myself taking trash to the dump more often. John

R
rococojo
Guest
hi john,
I have modifiyed many dressing table, Drawer bases,and its free standing mirror,(and made a few ) by drilling 2, (4 in total) holes to attach each side of base, of the mirror to the drawer base top, then used a dumpy screwdriver to drive home the 4 screws from inside the drawer way, this makes a more "secret" fixing, my dumpy has a 1/4" hole drilled through its handle,to fit a 4" nail, this give more tork to the screws.
rococojo
R
rococojo
Guest
John asked?
All: I would like to improve on the design.,
Nice advice, Dennis? you could always claim,the US woodworms (Joke) are larger that any where else in the world,(Holes in the base).
Joseph hemingway (rococojo)
40 Years In business 1968-2008
All: I would like to improve on the design.,
Nice advice, Dennis? you could always claim,the US woodworms (Joke) are larger that any where else in the world,(Holes in the base).
Joseph hemingway (rococojo)
40 Years In business 1968-2008
R
rococojo
Guest
In a past post on this subject, I gave my (secret) way of securing, a freestanding mirror, onto a dressing table top, drawer base. 12 other ways was suggested by other sapfm, but they all avoided, John Grandestaff's question.
Q, On the original it looks like screws were use and I would like to improve on the design. .
If I may I would like to explain my method, as I think other members on sapfm could benefit.
First I would centralise the freestanding mirror onto the top of the drawer base, taking
Measurements for the 4 Fixing holes, then after removing the mirror, make out on the drawer base, and then I would drill the 4 holes (from the top) I would then clean away to bare wood an ½” strip between the screw holes, and short away past, to take the fixing glue, Then placing the mirror back in its position,
I would with a brad (or if too long?) a 1½ nail, mark the 4 holes.
Then I would take the mirror base, and drill 4 pilot holes for the screws, screw the screws home? And remove them.
Glue the base of the mirror, then place it onto the drawer base in the correct position,
With the hand inside the base, start the 4 fixing screws, with a dumpy screwdriver, from inside the drawer base, drive the screws home, for the final twitch, I would put
A 4” nail though the pre made hole in its handle and twitch the 4 screws further.
Then replace the drawer in its place.
Hope this info helps.
Joseph Hemingway (rococojo)
FREDDY ROMAN
Well-known member
For the supports I will cut a dovetail shape on the front and two sides, then bore the mortises that will also receive a wedge in the back. Make sure to stay shy from your scribe lines on three sides that will receive the dovetail shape. Now this mortise will receive a wedge in the back that just simply gets tapped in and may or may not be glued in. All of this needs to be determined with full scale drawing. I will then make up and use a ramp block cut to the correct angle/ratio and pare to the scribe lines. What this does is give you great strength and prevents the posts over time become sloppy. You don't have to glue the wedges in and that may be good for disassembly. I hope this helps.
Freddy Roman
Freddy Roman
Share: