Cockbead question

abrown

Active member
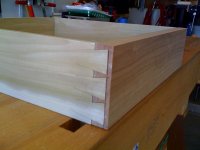
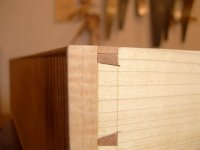
I'm working on a pair of lamp stands and had planned on veneering and cockbeading the drawer fronts. I got ahead of myself when I cut the dovetails; you can see from the photo that my half pin left very little material (about 5/32") to rabbet for the cockbeading. Is this too thin to safely attempt? I intended to run a full-width bead at the top and bottom and 1/2 width cockbeads down the sides using stopped miters at the corners. I've managed to plane the cockbead down to about 3/32".

I may just redo the drawer with beefier DTs, but I'm curious to know how some of you have handled cockbeading drawer fronts, and what you've observed on period pieces.
Thanks,
Allan
 

Attachments

  • lampstand drawer.jpg
    lampstand drawer.jpg
    107.1 KB · Views: 104
I would say your assumption is correct: There's not enough meat there to begin adding cockbeading to. However, once you re-make the drawers, your cockbeading methodology sounds perfect.
 
I don't know. You may run into a problem if you try to make a rabbet in the top or bottom edge of that drawer front, but you may not. You will basically rabbet away almost the entire half pin, however, the rest of the joint will provide plenty of structural integrity so the strength of the joint shouldn't really be an issue. If you are careful, you can probably get away with it as the cockbeading will replace everything you plane away. You have nothing to lose but time. If it breaks, then you can make another drawer front. I'd at least try it before scraping the entire thing.
 
Thanks Jack/Robert,
I've waffled a bit on how to proceed, but as long as I may be making another drawer front, I'll go ahead with this one (after all, it's already largely fitted) just to see what will happen. I would think the cockbeading itself should add enough strength to compensate for weakend/obliterated pins on all four corners -- at least in the near term. But what about in another 200 years? I'm thinking that surely someone has come across this same problem in an earlier piece. Maybe all the 18th C shops just shucked the bad part and started over -- but after seeing the toolbox with reversed DT and nails, I've gotta believe someone gave it a try.
 
Allan- You haven't done anything wrong. On a large number of cockbeaded draws on early work, the cockbead eats away some of the dovetail, sometimes most of it; I'm remembering some work from Portsmouth, NH in the Rundlett-May house that I looked at once. The cockbead is usually pretty thin anyway, maybe an eighth to 5/32nds, so even if your sides are only 5/16, which I doubt, it's not going to affect the strength of the draw unless you're storing lead clock weights in it. I usually glue the draw together and rabbet the front later with a plane or dado blade.-Al
 
I don't know if its period correct or not, but it will surely work. I have never tried making full strips on the top/bottom of the drawer, but rather rabbeting the entire glued together box equally all the way around, usually about 7/16 to 3/8 in depth, with an 1/8 inch full(I think that number between 1/8 and 3/16 looks best) cockbead. Even my kitchen cabinets are dovetailed and cockbeaded this way, and if my spouse can't destroy them, I am sure they will last another 150 years.
As I think about it, I kind of think it might be more likely to last this way then if one made a full strip top and bottom. I don't really know though, as I have never made a full strip top and bottom. It just seems possible that there would be more chance for failure with a full strip.
 
Al & Mike -
My drawer sides are 3/8" and the front is 3/4". I'm leaning to Mike's thought about running an equal-width cockbead all the way around -- would use 3/8" wide bead, about 3/32" thick (the drawer dimensions are 14" x 3-1/2" so I think the thinner bead will work fine). Too, the same width all around would avoid stop mitering, but the downside is having a joint line on the drawer top. BTW Al, I keep noticing you use the term "draw" instead of "drawer". When I say it, it sounds like I have a Texas accent! Is that how they were referred to back in the day?

 
I don't think it will fail like that. I really have no issue with the joint line to the drawer top, either. I sort of think the bead on drawer as being a little bit lower on the refinement scale(if there is such a thing) as compared to the bead on frame, so I can't imagine the old guys being concerned about a joint line there.
Its a long grain joint that really won't be noticeable if you have a piece off the same board. In any event, it won't ruin the piece(they look good with curly maple on cherry drawers, I still would not worry about that top edge, even if I was using some other species). Maybe I am not particular enough. What makes the biggest impact to me is the lumber you have chosen for your drawer fronts, and the subtle shadow created by the cockbead.
 
Allan- Old documents often call them "draws", because you draw them out, I guess. At the speed I type that saves me a few minutes every year......

Cockbeads on the case are nice, and it took me a while to realize this, but they cast a shadow at the top of the draw that hides the space at the top between the draw and the blade- handy when you leave space for expansion-Al
 
I think an 1/8" is large for beading. I guess you will see larger beading on earlier federal pieces but many refined pieces will have a finer beading. Or at least a finer bead is pleasing to my eye. What ever thats worth. Also I have grown up with it called cog beading.
 
Jeff- You're probably right about the beading being smaller on draws. I've done most of mine on Boston and Newport cases where it tends to be a little bigger. I'll go measure my applied bead on the Langley Boardman draw and get back to you. I do remember repairing a lot of skinny beads on draws on that fine Fed. stuff-Al
 
Mike- I think of bead on draw as a protection for veneered draw fronts. In this capacity you see beaded edges on Wm and Mary highboy skirts, the earliest bead that comes to mind at the moment. The beaded cases occur maybe mid 18th c. onward, and I've seen beads on veneered Philly highboy draws of about 1755, but in NE they're mostly on the  cases, either scratched into the blades and case sides or added into a rabbet on the case sides as in the Newport stuff. I'm sure I'm missing other examples, but these are what come to mind-Al
 
albreed said:
Allan- Old documents often call them "draws", because you draw them out, I guess. At the speed I type that saves me a few minutes every year......

Al,

As you know, folks wrote phonetically in the 18th c.   It's not that they were stupid or couldn't spell.  It's that there was no standardized spelling for words.  So some folks today might interpret the spelling "draw" for drawer as the way they said drawer (with a dropped r.)  However, English accents have changed over the years.  It's very likely many Englishmen spoke with an accent that is today confined to the South West.  In that accent, "r"s are over pronounced.  So the word drawing is pronounced "drauring".  "Draw" may have been pronounced "draur".

Just for reference, this the accent Robbie Coltrane used for Hagrid in the Harry Potter movies.  The character Alice in Vicar of Dibley is from Cornwall and they have this accent as does Portsmouth.  This is where we get the "arrr matey" pirate speak.  Folks really do talk like that today.  It's not what they call a "posh" accent.  It's old fashioned and possibly low class, so actors from this region don't often use this accent except for comical characters.  It can also be difficult for Americans to understand.    It's sort of their version of a very heavy Southern accent.

So my guess would be "draw" and "drawer" rhymed for these folks (both with r's).  My guess is they weren't thinking about "drawing" out the drawer.  

Only reason I mention this (certainly not to correct you) is I know some guys do first person interpretations of period craftsmen.  Others read period documents.  My sense is that if you need a period woodworker's voice in your head (either for intepretation or to help understand the crazy 18th c spellings), I suggest you think of Hagrid or Alice or your favorite character from a pirate movie!

Otherwise, the trick to understand phonetic spellings requires a familairity of the accent the writer had.  We mustn't assume they pronounced words as we do.  (Let's see if this will lure in Megan Fitzpatrick).  I think Shakespeare rhymed "love" and "proove" in one of his sonnets. Not sure how either word was pronounced.

Cheers

Adam
 
I just fininshed up a reproduction of an empire piece, a small chest (possibly a dowrey chest) which had cock beading exactly as you describe. Full width across top and bottom, half width down the sides with stopped mitres. First I'd say that strength should not be an issue. You still should have plenty of joint surface to hold it together. The other thing that will become apparent if you go to the trouble to do this is how much more fiddling around it will take to get these to fit nicely. It becomes apparent why so many pieces had the beading scratched into the drawer fronts. The aplied beading does give a better contrast than a bead scratched into the surface.

George Walker
Note: I had a few posts about how I approached this on my Blog back in Feb
www.georgewalkerdesign.com
 

Attachments

  • DSCN2022.JPG
    DSCN2022.JPG
    16.7 KB · Views: 60
George- The other reason to put the bead on the blades is to create a shadow that will hide the gap at he top of the draws. When the bead's on the draw, the gap is visible above the bead-Al
 
Al, I have been working on a pair of desks simultaneously, One Boston, one Newport, both with bead on frames. Sort of a mental exercise, you might say.  I have made several of the Boston style before, where I get to dovetail my drawer blades into the chest and then later come back and cut the miters for my bead corners and cover with the front strip. Those were no big deal. I made the Newport ones extra difficult-like, with the bead already planted on the case ends, so I had to miter the cockbead(sharp chisel) and fit the dovetail at the same time. I realize I could have just put the vertical cockbead in a rabbet later, but I just wanted to see if I could do it this other way. Anyway I have those drawer rails all fit and just need some scraping.
Unfortunately, as I am doing this, I am thinking about bombe serpentine chests. I have seen folks working their bead on these type chests after dovetailing the rails in. I am wondering if the cockbead is mitered in the corners of these types of chests? Or are the corners just what I would call a "mason's miter"? I tend to believe they have to have been really mitered to look correct. I mean on really good work, the type that is still around after a few huindred years. Maybe the miter is already on the drawer rail before the bead is worked.
 
Mike- It's definitely easier to put in the added bead last.
On the Bombe the bead is cut into the case sides and the blades are beaded and the mitred to it. Tricky on the second blade because it angles out. I cut the mitre on the blades and then mark the case from it, that way you know they'll meet clean.
There are Boston cases with exposed d-tails, and at least one Newport one with cover strips, but it's rare-Al
 
Thinking about the bombe rails, has made me wonder if I have not been doing something else that is not to my favor. I take a piece of flatsawn mahogany, turn it on edge and glue it to quartered piece of secondary wood for my rails. That way, the face of the rails is a nice sparkly looking quarter of mahogany. But maybe that makes the bead more fragile. Especially thinking about the serpentine shape, maybe a flatsawn face would be a lot easier to work.
 
Mike- I always take the blades out of the same plank as the fronts from right next to the front so that the grain is the same. I don't know if it's any less fragile, but it gives a great flow to the grain on the front of the case-Al
 
Back
Top