Cleaning up Cabriole Leg/Knee Intersection

awleonard

Well-known member
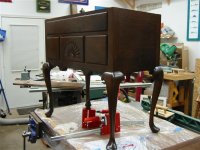
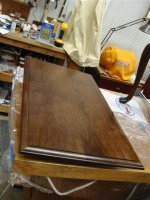
I'm currently working on a lowboy I started in a class with Phil Lowe last summer (that'd be summer before last I guess! - I had other projects going).  The carcas is glued up and standing on its own.  I'm now working on the knee blocks.  Something I ran into that I have done before, but never got a real good feel for is finishing up the intersection between the post and the knee.  When you bandsaw, its hard to get them perfect and I think we cut these posts on the ts before we bandsawed the curves.  Anyway, any tips on cleaning up this area?  And while we are at it, these knees are the overlay type that rest on top of the apron - a first for me.  Any tips on those? 

Thanks for the help.  I looked in the gallery and saw some really nice dressing tables/lowboys that are inspiring and great reference. 

Tony - Memphis
 
I use a hand plane and scraper to clean up the post.

Dennis Bork
Antiquity Period Designs, Ltd.
 
If you stop cut your posts with the tablesaw you have a cresent left at the end.  A good wide sharp chisel will pare this down to the square post level and then hit it with a plane and scraper as Dennis stated.
 
While you have that sharp chisel in hand, you can clean up the bandsawn knee area with it- paring the surface smooth.  With the knee blocks, I glue them to the leg after rough bandsawing the curve profile and then as I carve the knee surface smooth I blend the knee block in at the same time.  Wetting the surface and then using a  card scraper  to finish off the surface will really smooth it out.
 
Thanks all.  I noticed in a couple of books that some folks define the intersection between the knee and post with a saw cut perp to the post right at the intersection.  In class, we bandsawed that whole area.  Makes it kind of tough to clean that up, but I'm getting there.  Tedious work.

Something I figfured out on my own...when tracing the knee onto the knee block stock, be careful.  If you press too hard with the pencil at an angle, you roll the edge of the knee over and that results in a valley when you glue the block on.  I'm having to pare down below that to get rid of it.  Another lesson....when shaping the block before you attach it, be real careful on the corner that mates to the leg.  If you tear up some of that grain, it will leave little gaps at the joint.  I may attach a sacrificial piece to that area before shaping it next time to preserve that crisp corner.


Live and learn!   

Thanks for the help.  The knees are looking "ok."  Next big challenge is blind dovetailing the drawers. 

One other question - how best to shape the tumbnail on the edge of the top?  I saw an article in the latest FWW that gives some ideas.  Thought about a router bit.  Just wondering what works well. 

Tony
 
Awleonard,

On the lowboy I finished up this winter I did the thumbnail by hand but I didn't have a thumbnail molding plane on hand so I made it by first cutting the 90 deg edge with a rabbet plane.  After I got it down to the proper depth I wanted, I rounded off the edge close to a profile I cut out with a piece of aluminum.  I used a scracth stock I made to bring it down to the desired profile.  The mitered corners in the front I carved.
 
I realize this reply is probably too late to help the original poster, but i thought I'd archive a response in the hope it might help someone in the future;

In Fine Woodworking issue #191, June 1997. Dan Faia does an excellent job of explaining how to clean up this transition in his article "Porringer-Top Tea Table".

I recently attempted cabriole legs on a footstool, and was surprised to learn that shaping the knee area cleanly was the trickiest part of the whole job.
 
Thanks, I'll download that article today.  This project is almost finished.  I applied th elast coat of finish over the weekend.  But I still need have much to learn.  Its frustrating that you find a lot of your shortcomings when you apply the finish.  I found a few areas that I missed or that I just didn't get quite cleaned up.  A few file marks here and there, etc.  Most folks won't notice, but they jump at me. 

Ran into some finishing issues too.  The wood we got in class had a lot of sapwood in it.  I used Van Dyke crystals as a stain to even things up (worked pretty well too - thanks Phil!).  I had wet the piece down and sanded the nubs, but after the stain, the walnut was rough as a cob.  I got most of it out, but some areas (especially on th elegs) are still rough.  I wasn't happy with the color, so I added some amber dye to my finish to add some warmth.  That helped a lot.  The pictures make it look red, but its really not that red in person.  I have cheap lights in the shop. 

Tony
 

Attachments

  • IMG_3403 (Small).JPG
    IMG_3403 (Small).JPG
    57.8 KB · Views: 78
Here is the top.  I did luck out there.  The two pieces I was given in class had a bit of sapwood and I really didn't want to try and hide that in the top, so I added a small piece and put it in the back.  The two pieces from class are really nice and have a fair amount of curl in them. 

I had asked about the thunbnal edge....I ended up using a router bit.  I feel like I went too deep, but I like the look ok. 
 

Attachments

  • IMG_3407 (Small).JPG
    IMG_3407 (Small).JPG
    38.3 KB · Views: 72
Wow - looks great! At least from the photos, the knee area appears very clean. You must be proud.

BTW: Would you please share the "Van Dyke crystals" trick for finishing? Finding all heartwood Walnut isn't always possible/practical.

Thx!

JB
 
Back
Top