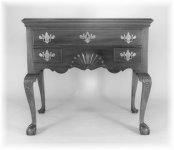
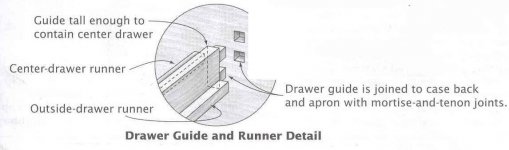
I'm still not sure what the connection is between the vertical drawer (what would you call that? it's not a divider or a blade or runner) piece and the front of the apron. The joint Jo showed was the back. I usually see that as a thru tenon there. In front, that could be small tenons like Jo's picture, or it could be a sliding dovetail or....?
And the center runner is just plain freaky. Most pieces I see (philly pieces) have a runner glued to that vertical piece (on both sides and at different heights for the two different depth drawers that are adjacent to one another) or nailed up from underneath when the drawers are of similar size. And his outboard runners stop short of the back? I don't know if that was a replacement. Usually, the outboard runners go back to the back leg and are nailed or slide into some notch sawn into the back leg. It definitely looks like there is something missing at the back leg. Tho maybe the back legs served as a sort of drawer stop?
Looking at image 212, it looks like that center runner may be a Newport thing? Anyone? And notice the mysterious connections to the front. Looks like half laps and nails to me. The Townsend piece may well be the same. Hard to tell. Philly pieces are different. I always think that Goddard-Townsend were so fastidious.
Where are those folks who give me such grief about 4-squaring lumber being 18th c trade practice? Look at the bottom of the top. Looks like he only flattened where the top sat on the case. The center appears to show evidence of a curved plane iron working very close to cross grain. If I wrote an article about making joints in a piece like this with nails and glue blocks, I'd get hate mail. Yet here it is on a fine piece from one of the most sought after makers. Somebody ought to tell the Kenos they've been had. This furniture just isn't that nice.
Adam
P.S. I'm kidding I really like it. I have a Philly version of this on my to do list.