A Build along Virginia table

Jeff L Headley

Well-known member
I have been contemplating a build along project with pictures and answers to questions. I have found an interesting table made in Virginia which could be a fun and simple project (mostly for me). I would like to discuss how I would go about building this table today. Keeping in mind I need to build this table true to period design and construction  joinery but TRY to earn a living today but not be corrupted  completely by modern machinery. What my intentions are  is to show how to use modern machines as apprentices would have performed the more menial tasks and stay true to form. I would like to do this by answer and question with the answer to the first question being the legs are 1 1/2"square.
 

Attachments

  • Virginia side table with hidden drawer.JPG
    Virginia side table with hidden drawer.JPG
    156.2 KB · Views: 137
Jeff, that is a charming little table. Appreciate the idea to share the process as you build it. Thanks for sharing so much info with us.  A friend of mine signed up for your chippendale chest class and he is really looking forward to it.
John
 
I do hope this could be an interesting project although only time will tell. I have to say you can't always believe all you read. In my first posting I stated that the legs were 1 1/2" square. The legs are actually 1 1/4" square not 1 1/2". I was amazed they were that small.
I am treating this project as if I am building this table today, today being Jan 4th 09 in Virginia. Temperature is in the mid 30's. Things are pretty dry here in the lower Shenandoah valley. The seasons will effect construction.
We keep our rough lumber in a building, up off the ground, out back with no climate control. I have to bring the rough lumber in to our work shop to let it acclimate itself to our working conditions and hopefully it's finial living conditions. This will take a few days. The table height is 26 7/8" with a 7/8" top.
 
The rough lumber I brought in yesterday the 5th of Jan not the 4th as (again take all you read with a grain of salt) previously stated, is getting acclimated to my shop. I have brought in enough of a pile of lumber, I hope, to build this project. The material I am using for the legs will have to come out of 8/4 lumber. 6/4 would be a better choice but you have to work with what you have. Since I am using 8/4 I cut off enough for four legs. I am able to get the four legs out of one piece of 8/4 if I cut the rough pieces in 1 1/2" wide pieces. I will cut off the first piece an 1 1/2" wide and see how it reacts to being cut off. If it goes wild and twists or moves to and extreme, then I need to reconsider my choice of lumber. If it stays straight and doesn't move much then I will continue to cut off the other three squares.
The pieces didn't move  to much so I will cut them to 1 1/2" square and wait until tomorrow. Please realize this is not the only piece I am building while all of this is going on.
 
Nothing happened with the table today. Had to go look at a prospective order. The four legs didn't look like they moved much upon our return. My next step will be to cut the legs down to 1 1/4". I will do that by taking a little off of all four surfaces. 
 
Hi Jeff,

I think this is a very interesting idea and intend to follow your progress and observations as you move forward. In the meantime, I have a couple of questions and a thought, or two, which I hope will be of some general interest.

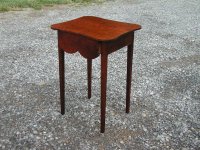
What, if anything, do you know about the origins of this little table, in terms of when and where it was made? My impression is that it would likely be considered a "vernacular" piece, so I'm assuming it was likely not made in one of the design/fashion centers and *may* be somewhat later than we might otherwise think. I presume you intend to pass along construction features, but I would also be interested in your observations concerning the level of workmanship, appropriateness of construction details, etc. Possibly fleshed out with detail photos if that wouldn't be too much trouble.

I hope this would be of some general interest, as I feel that such information really helps flesh out our ideas concerning milieu from which these pieces emerged.

Several years ago I helped a friend do some very minor repairs on a fairly plain vernacular cherry chest of drawers which, style-wise, would have been characterized as "empire." Not really to my taste, but executed in a neat and workmanlike manner, with hand-cut dovetails and above average construction details. Further, the non-show surfaces all exhibited tool marks which clearly indicated that even the stock preparation had been done using hand tools. When we got all the drawers out and had the piece turned on its back, we discovered that it was signed and dated along with the location, down to the street, of its origin. It was from the mid-1850's and was from a small town in the still largely agrarian Ohio county I grew up in. It was later than I might have expected, was better made than I might have expected (given the location of its origin) and exhibited more complete hand tool usage than I might have expected (given its date of origin). Truly reminded me that we really do have to be careful about our generalizations, especially when considering any specific piece of antique furniture.

I hope others would also be interested, but I would be very interested in any information/observations you might be able to pass along concerning this table.

Don McConnell
Eureka Springs, AR
 
Don, First of all thanks for taking an interest in this. I have no problem with any of your points. I am going by the family it came from and their recollections of its origin. The original table was walnut. It had the proper secondary woods, white pine, yellow pine, and poplar. It had the proper nails and wear for it's time estimate. It's construction is right for the area. I was not there when it was built and I can only rely on my observations, for what that's worth. Now with that said I no longer have the table. I have made this table before and my pictures are from the reproduction.
My actual idea though was to discuss the process I would go through to build this piece today using period joints. I will use modern machines. I realize stating that is going to turn off many. I will use my machines to size my lumber but then hand plane and hand fit all joints and surfaces. I need to build this piece as quickly as I can without sacrificing joinery so I can hopefully eat.
 
Jeff,
That eating thing always gets in the way doesn't it. It is even worse when the kids want to eat too! My question is simpler than Don's, I can't find that shed where you store the lumber, could you be more specific as to its location? :>)
Mike
 
Mike, We keep our lumber out back. You know, close enough to keep an eye on but far enough away as to be inconspicuous. I hope that answers your question. I know it doesn't but someday I hope you will stop by so we can show you.
OK, back to the table.
I cut the legs down to 1 1/4" and squared one end. They can be squared on one end by what method  you choose. It goes without saying the method you choose to square one end, you might use to square the other end. I chose to use a table saw. Rather than letting my legs move as to cause me problems, not to say they did. I have found it prudent to cut the taper on the legs and to cut the mortises all on the same day. That way if the legs decide to move then  it will be nothing I will have to worry about. The table skirt is 4" wide. I will start the taper 4 1/2" to 4 3/4" down from the top of the leg. This will give a slight flat before starting the taper below the skirt. The bottom of the leg goes down to 13/16". There are many ways to cut this taper, hand saw, band saw, hand plane or!  table saw. If I would decide to use a table saw I would grab a scrap of wood that is longer than the leg by an inch or two and maybe 3" wide or there abouts. I would then set my saw to cut my scrap parallel from the jointed or hand planed surface and leaving the saw set. Mark down 4 3/4" from top of the leg on the inside surface. I will then mark 13/16" in from the outside edge, on the bottom of the leg. Lay the leg on the table sawed board that I cut leaving an inch or so top and bottom of the sawed board and mark the sawed board around the leg to both points. I will then go to my band saw an saw out between the lines. The only place the leg needs to rest is in the top corner and the bottom corner of the sawed board. Then cradling the leg in the sawed board with clamps to hold secure. I will saw the leg with the bottom first. Watch out for the tapered remanent it quite often will get pulled back into the saw and then thrown at you face. I have found that it is prudent to have help to pull that piece away as it is separated from the leg avoiding it getting thrown in your direction. Less aggressive removal of wood could be a safer option. This is a process which should not be tried alone the first few time and wear protection. This is not the place to catch anything. After the saw I will remove  all machine marks on all of the legs. This time I decided to use a mortising attachment on a drill press to cut my 5/16" mortises which will be 3/8" from outside the edge of the leg. I measure down 5/8"from the top of the leg before starting the mortise which runs 4" down, no shoulder on the bottom or center. The mortise is 7/8" deep.
 
I got carried away. I have had you build a table with no drawer. This table does have a hidden drawer, but I didn't mean it literally. Please excuse my neglegiance in mentioning the front legs should not be mortised like the side and back. Since the drawer front covers the top and bottom rail. I need to treat the mortise differently. I always take all my measurements from the front. In this case I will measure from the back side of the front left and front right leg to start a mortise for the bottom front rail. The top and bottom rail are 5/8" thick. Measuring from the back side of the front leg out towards the front 5/16" I will start my 5/16" mortise. I will do the same thing for the top rail but the top rail will get a dovetail instead of a mortise and tenon joint.
 
Fine points:
The bottom of the legs should have a shy 1/8" bevel as not to chip when slid across the floor.
Regardless of whether I use a mortiser or do them by hand I will use a mortising gauge to lay out my mortises.
A good question for discussion is the mortise is 3 3/8" long should there be a center piece in the center of the mortise structurally? There was none on the original.
 
Well I would like to know is that did you cut all of the material to rough length and width first?  Or are you just working on the legs?  Are the legs tapered on all 4 sides or on 3 sides or _________.  Do you cut the mortises before you do anything to the leg?  How did you layout the mortises?  What is your process?

Thanks,

Freddy
 
Freddy. Yes, I have brought all the material I think I will need  for this project into our shop. Sometimes I will cut some pieces close to size leaving them large all the way around and long so they can do their moving hopefully before I get them to their final size and square.
Back to the legs. First I decide what my two best surfaces will be for the outside face of the legs. I have also found it prudent to hold the legs where they will be on the ground and oriented towards each other and look at the grain characteristics and the way the light will hit it.  I will plane one surface and square the others from it before tapering or mortising. The legs are tapered on the two inside surfaces. They could be mortised either before or after tapering. I mortised them before I cut the taper. A full square is easier to deal with but if it was tapered before the mortising there would be no question which side should be mortised. Once I determine my two outside surfaces I will mark my legs for my mortises with a tenoning gauge. Even if I would do them by hand or with a machine I would still mark them. A pencil line will not do.
I would like to reply to an earlier comment you posted about trying to survive today. People love little tables. They go anywhere and they can be picked up and carried away(the tables) without a great cost to you or them (people). We do a few shows to try to get our pieces seen. I can't tell you how many times small table sales have kept our heads above water. But also sometimes that can't be counted on either. 
I will rough out the material for the side and back skirts and the front rails. The fianl size of the side skirts will be 4" X 12 9/16"(including tenons) X 13/16". A 4"board will not shrink and swell much I should be more concerned over cupping and warping over it's length. I will rough out the side to 4 1/4" X 13" X 15/16" with all sides surfaced. I will lean them up against my bench letting air get around all sides. If they remained dead stacked they would warp away from each other. The back skirt is the same width and thicikness but the length is 14 9/16"  (including tenons) The top and bottom front rails are out of secondary wood and their measurements are 1 5/16" x 14 1/2" x 9/16" (including tenons)
 
I have had a few other orders which require my attention for the next few days. I will get back to this table as soon as I am able.
 
So I am curious to know if it is easier for you to make more than one table at a time?  I would think that with your experience Jeff, that you would be able to make more than one without spending a lot more extra time.  Now, do you bother laying out every mortise or do simply lay one mortise out and set stop blocks on the mortiser?  Do you usually take all of your tenons and shoulders off the saw or ______?  So I am curious to know how is business? 
 
Freddy, Yes Again. On small tables like these. I would be better off making several. I like pairs in case a customer would like one for each side of their bed, hopefully. So the question is how many. My answer would be what woods do I have to make pairs. I have walnut, cherry, and curly maple, don't tell anyone, but we do still have mahogany, but this table would not have been made in our area out of mahogany. Then the next question is how many pairs. We are, not a factory. One pair of each is what I have decided upon.
 

Attachments

  • Build along 3.JPG
    Build along 3.JPG
    158.7 KB · Views: 44
So now the next step is cutting the rails, and I am wondering what your process is.  How I was taught at Phil's (The Furniture Institute of Mass) is to  rough cut everything a 1/2" wider and 1" longer than the actually finish dimension. Let the material sit for a couple days and then mill to the proper finish dimension.  Yet I think this can be very wasteful at times if you count all of these little pieces you cut off.  Now are these rails going to flush with the legs?


Thanks,
Fred
 
Fred, I agree with all you said. Actually I would go through my scrap pile first but if I find nothing that will work I will start with a long board 8'-16' for the rails (skirt).  My first step would be to cut off one end until all the checks, if any, are gone. If the check is more similar to a split, by that I mean if the seperation goes from nothing to an 1/8" open within a few inches then it will probably continue in the future, so I will leave an inch or two extra off of the first cut. After the first cut I will measure out my pieces I need. I agree with Phil on playing room, but I'm also cheap and agree with you on wood conservation, especially at todays prices. Once I have made my first cut I can figure what length I have to work with. You will be suprised how often the piece you pick will be 1/4" to short or maybe I have unfriendly wood nymphs. I let that determine my waste. I also look at the condition of the wood is it flat is it cupped is it warped. It will probably continue doing what it has previously done. The rails are only 4" so they shouldn't move much. My tenons are 13/16" long. I have needed to seperate my pieces from the full length by a saw cut I would prefer at least a 1/4' to 1/2" extra on lenght and width. My rails are 13/16" thick but my rough lumber is a full 4/4" I will surface one side if it is thicker you could surface both sides then let it sit inside leaned against my bench so I can knock them all down when I walk by but actually to let air get around all sides. I have no sholders between the leg and rails. The shoulders on both the rail and leg is 3/8"
 

Attachments

  • Build along 2.JPG
    Build along 2.JPG
    159.2 KB · Views: 24
Just curious Jeff do you try to usually get all of the material from the same board so there isn't any color or grain matching issues.

Fred
 
Fred. With these tables I am interested in the tops being out of the same board (or boards if flitch cut), the original being two glued up boards.  Then the legs being out of complementary, sometimes you work with the 8/4 you have, and then the side rails out of something similar. It would be nice if the back was out of what the sides were out of. Here is another question, I am building these tables for sale with no order. Do I want finished backs, so they can go out in a room or secondary backs so they go up against a wall.  Why waste the wood. The back is 14 9/16"( with 13/16" long tenons included on both ends) X 4" X 13/16".  I don't want to miss a sale. I will use primary wood for the back, as on the original, and plan on finishing it. As soon as I build these tables with a secondary back someone will want it to go out in the middle of the room. That's my luck. I will start to look for what will be the top and drawer front.
 
Back
Top