securing table topw

johnah5

Active member
Hi guys, I am braining the attachment of a table top to its base.  I have noticed in many articles that tops are attached using pocket screws.  Is this a period method?

Also, I noticed that there are pocket screws in the end rails and the long side.  Isn't this going to cause the top to be secured in a way that it can not move?

Thanks
John Hoffman
 
Hi John,

I'm not sure how far back in time pocket screwing goes, but it has been around for quite some time. But, you are correct that rigidly affixing a table top to long-grain rails all-round with procket screws creates a cross-grain situation which you may wish to avoid.

For that reason, the use of "buttons" to attach table tops to rails is another practice which has been around for quite some time. I've attached a small gif, taken from Charles Hayward's _Cabinet Making for Beginners_, c. 1971, which illustrates the use of these buttons. It also illustrates the use of pocket screws in a situation where you may wish to rigidly affix one edge of a table top.

In brief, when making wooden buttons, a rabbet/rebate is worked across the end of a wide board, creating the lip which will enter a groove on the inside of the rail. The entire end is cross-cut off, including the full-thickness area through which the screw will go, then successive widths are ripped off to create individual buttons. Needless to say, the thickness of the button, as well as the lip, need to be coordinated with the groove, and its placement on the inside of the rail so that the table top can be snugged down to the top edge of the rail. A little nicety is to slightly cant the top edge of the button so that the end farthest from the lip bears against the table top first. (I could explain this in a little more detail if there is any interest.)

There are metal versions of these buttons commercially available, today, though they aren't period and don't work as well as properly made wooden buttons, in my opinion.

Don McConnell
Eureka Springs, AR
 

Attachments

  • Hwyrd.gif
    Hwyrd.gif
    63.2 KB · Views: 35
Caution: do not run a rabbet/rebate along the entire length of the apron as shown in the photo.  This creates a weak area along the top of the apron along it's entire length.  I did this once to a small table.  When I picked up the table by the top the base broke loose due to it's weight.  Instead chop a mortice for each button. 

Dennis Bork
Antiquity Period Designs, Ltd.
 
Hi Dennis,

Based on your experience, I understand how you might come to feel this way. And, I have used individual mortises to take buttons, myself, but mostly when I forgot to run the groove before assembling the table base - meaning that I could no longer easily run the plough plane along the rails. 

But, I think a blanket admonishment not to run grooves is something of an over-reaction. This, because some identifiable factors may have contributed to your experience, and taking them into account while making the table should obviate most/all of them.

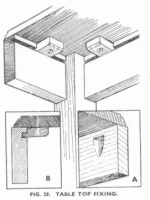
For one thing, overtightening of the buttons could unnecessarily stress the rail, setting up this kind of failure. This can be avoided by driving the screw just enough to bring the top in contact with the top edge of the rail, easily accomplished if properly sized to the specific application. Any tighter accomplishes nothing and could tend to restrict the cross-grain movement one is attempting to allow for.

For another, the buttons need to be deep/thick enough that the groove can be some distance from the top edge of the rail to minimize the weakening effect.  I don't have hard data on this, but would want to make sure the groove is at least 5/16" from the edge of the rail. In fact, I've tended to "err" in the other direction by using 7/8" stock for the button with a lip to enter a 1/4" groove. This leaves more than 1/2" of material above the groove, which tends to have a good bit of strength.

One can calculate the potential movement of the table top and plough a groove no deeper than necessary, in order to maintain as much strength as possible. If the rails are so thin that even a shallow groove would be problematic, then individual mortised may well be necessary. Though, I guess my inclination in this circumstance might be to think of some other way to affix the table top.

Additionally, more buttons rather than fewer, properly tightened, should tend to spread out any localized stress on the rail.

Finally, I've always been taught that one should never pick up a table, or any type of case work, by its top. Not that I've always followed that advice, but I've ignored it knowing that I'm putting the work at unnecessary risk. Though, having said this, I suspect the failure you experienced was likely due to pre-existing factors.

Don McConnell
Eureka Springs, AR
 
Not to play the devil's advocate here, but I've worked on more period pieces than I can remember and I have never seen buttons in use in a period piece. Pocket screws work well as long as there is allowance made in the holes for wood movement and the screws aren't cranked down real tight. More often than not, depending on where the piece was made, you'll see tops held down with rub blocks all the way around with no allowance made for movement. Of course most of these pieces have cracked tops and or plenty of missing glue blocks. Just my two cents.

Craig
 
If you stay a ways back from the legs on the long grain aprons and put your pocket screws in the center of the cross grain aprons the along the grain aprons should flex enough on there own to prevent cracking a top.
Mike
 
Unlike Craig, I have none of the hands on experience gained from the repair of period furniture.  What little knowledge I have about period pieces has been derived from visiting museums and from reading the many books and articles on the subject. 

That written, I have no idea what so ever what the usual practice for attaching table tops to aprons might have been. However, I do recall seeing photos of at least one important piece that utilized buttons and glue blocks to secure the table top to the apron.  That piece is a Goddard Tea table that sold at auction at Sotheby's three or more years ago.  I have a number of scanned photos from the auction catalog featuring the Goddard table including views of the bottom of the table.  With any luck, a copy of one of the photos featuring the glue blocks and buttons appears below.  I would be happy to send additional photos to anyone interested by email.

Kent Ryan
 

Attachments

  • tableunderside1.jpg
    tableunderside1.jpg
    132.1 KB · Views: 63
Somewat like Craig, I've had the privelege of examining a number of pieces of colonial-era furniture (though not nearly as many as Craig), and I've not seen the use of buttons to secure tops, either.  However, I've just finished examining a neighbor's collection of southern "empire" furniture made in the 1820's - 1830's, and I did find a few pieces where the tops were attached in that manner.  I wonder if the 18th-century use of glue blocks had more to do with the fact that hand-cut screws were expensive and not widely available?
 
Don,

Tightening down the screws has nothing to do with the base breaking away from the top.  It was the weight of the base that caused it to break away.  (It was my own table.)  I agree, always pick up a table by the apron, but when the dining table has a 10" overhang on the ends it is not possible to reach to the apron.  And you must assume the customers will always pick up the item the incorrect way.  Therefore, you must construct it fool proof.

Yes, buttons are not authentic while pocket screws are.  However, when I was an apprentice my boss said, "make the job so it does not come back for repairs!" 

I would rather use a button on a 42-48" wide dining table or a Goddard tea table than not.  If the top would crack using pocket screws (because there was not enough room for wood movement) do you think the customer would be happy?  How much more time and money would it cost me to repair the item?  What would the customer then think of my wood working skills?  Would they want to order more items?  With many of my customers living out-of-state, e.g., Florida and Honoulul, HI, it would be rather difficult and very expensive to repair a cracked top.

If you make a piece of furniture for a customer in your area and that customer then moves to a state with much different weather (higher humidity or dryer conditions) what will happen to the top if you do not allow for enough wood movement?

Use whatever method works for you.  By using buttons on certain pieces I have never had an item come back in 22 years because of a cracked top and they keep coming back for more.

Dennis Bork
Antiquity Period Designs, Ltd.

 
Kent -

Many, many thanks for the photos.  I'm not familiar with the "Ron Patton CD", though I've seen other references to it on the SAPFM site.  The photos he took are considerably more valuable to me than the professional photography in the catalog (although I would dearly love to get my hands on a copy of it!), because it shows details clearly from the point-source flash & shadows that pros work hard to eliminate with flash umbrellas and diffusers.

What I find particularly interesting is the "reversed" pattern of the grain on the leg.  Jeffrey Greene maintains that the grain on a rift-sawn blank should run from the back corner of the leg to the front, so that the grain lines going down the leg will follow the curvature;  if the grain lines on the blank (when viewed from the end) run from side to side, it results in a "bulls eye" pattern on the leg - which are clearly visible on the Goddard table.  Apparently, John Goddard had never read Jeffrey Greene's book. ;-)

Regarding Dennis' thoughts on "back for repairs" - I think he's right that most customers are interested in "what it looks like" rather than how it's constructed, and their expectations are based on modern furniture that is often made of stable, engineered sheet goods.  On the other hand, I try my best to convince individuals asking me to reproduce a piece on commission to allow me to construct a piece as it was originally, flaws and all. 

My logic is that while no one would confuse what I produce for a real antique (at least not someone with expertise in antique furniture), using modern (and visible) means of joinery, surface preparation and finishes instantly identifies it as a reproduction.  Personally, I get a fair amount of satisfaction from the double-takes I sometimes get from a piece when someone has to look very carefully to see that it's not 200+ years old.  That said, it'd be extraordinarily hard to base a profitable business on such notions...
 
Back
Top