Reproducing Aged Finish

FREDDY ROMAN

Well-known member
Hello All,

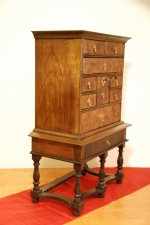
Over the years one thing seems to be common with all furniture makers, they love making furniture, but seem to hate finishing furniture.  For me I enjoy both, I don't know why but I just do.  For the last few years I have been working on trying to mimic that certain look that old furniture have.  Why?  Well I have been reproducing and repairing a lot of antique furniture.  What I love about antique furniture is that dead flat, no luster look, with some alligatoring.  Yes I know it takes practice, and yes I know people like to keep their secrets under their hat, but there are some who want to share.  So if you like to share you methods please do so and thank you.

My technique that I have been playing with:  Of late I been using shellac flat from Homesteadingfinishing.com, which works awesome.  Then between coats I have been applying talc powder with a ponce pad, and then adding more finish by brush, pad or spray.  Which in turn the item gets put in front of radiating heat to help create alligatoring, and layer separation.  The method works pretty good, but it is still missing something.  I also have on order some flat burnishing cream/wax and I will see what that gives me.

Some great examples of aged finish for some who don't know exactly what I'm talking about is the furniture from Anderson and Stauffer.  Check out their site and then you will understand.

Well thank you for your time and can't wait and see what people do to mimic that look we all love.

Cheers,

Fred
 
Freddy, Seeing as no one else is answering, I will offer some random thoughts on creating an aged finish. I am certainly no expert but I have been experimenting for a while.

I think the first problem in getting an accurate antique look is ageing and coloring the wood prior to the actual clear coat. The possibilities are stains, dyes and chemical ageing. They all have some advantages and some disadvantages. In my experience the big disadvantage of dyes and stains is that they reverse the grain pattern of lighter and softer woods. If the dye or stain is applied over sealed wood as a toner it is easily scratched through exposing raw unaged wood.

Earth pigment stains are light fast, dyes are not. I did an experiment with transtint dye, an acid metallized dye the most light fast. Under UV light it first turned darker then began to fade visibly in only 5 or 6 hours of exposure to a black light at about 6 inches. I don?t know how long it would take under normal exposure.

There are several chemical methods that seem to work using potassium dichromate, potassium permanganate, tannic acid, nitric acid and others.

Walnut and some other woods naturally fade as they age and can be bleached with a two part bleach.

In looking at the pieces you referred to, it appears to me that they may be using an oil glaze over the shellac and not sealing the glaze with more shellac maybe just wax in certain areas. The oil left on the surface would deaden the shine. Generally on old pieces the finish is deader and darker the closer you get to the ground. They usually have more than one sheen in different areas.

I have had some success pouncing castle earth on to fresh colored wax before buffing it out. Many times the glazed low areas are too dark.

For me it is easier to try to reproduce the finish on a particular piece than to make a universal old looking finish.

In the shop I have a couple of jars of different colored actual dirt that some times is rubbed into parts of a finish to get a match for a part.

For me there are at least 6 steps to a finish, aging, coloring, sealing, glazing, toning, clear coating, some steps done more than once.
 
OK, I will play.

A good friend of mine is a 2nd generation antique restoration specialist.  He has done work for museums as well as high end antique owners.

What he taught me is many people are looking for that "old" look of the darker, grim accumulated, waxed a hundred times piece.

While the surface quality is important in the true old look as Freddy is describing, getting the aged and depth of finish look of a new finish is sometimes tough.

What he taught me was using color techniques, layered finishes, glazing, blending your own pigment based stains.

He uses shellac as a way to "lock in" the finish up to a point.  Then proceeds with various other methods of adding color or pigments to get the look he wants.  He also uses lacquer to seal between various coats.

His is a process of about 15 steps.

It is not for everyone, and certainly not for purists.  But many customers want their new piece to look like a piece they have seen in the museum that is 250 years old. 

Just more food for thought.

Ken
 
It is true-for years I,like many  others, have tried to mimic the look of an antique finish.I have met with mixed success. Unfortuneately the most successful attempt that I had, the materials are no longer available.
This involved mixing Acrylic Laquer and furniture laquer and Acetone(otherwise it took on the properties of jello) and spraying over a laquer sealer coat. The cracking could be controlled by how heavy a coat was sprayed. It did have a pretty convincing look-for a "painted" piece.
I have very little success spraying laquer over shelaq.Sometimes I can achieve some aligatoring other times not.When it works the look is pretty convincing. There are to many variables with the shelaq.
I have also(only with Oak)done a simple laquer finish-stain,sealer,top coat- then washed it off with acetone-finish goes stain stays-and quickly over coated with a medimun coat of clear laquer.Then let it set up and second coat with laquer.This needs to be done at less than ideal temp and the laquer needs to be just dry enough to almost blush.Again the results are not always predictable.
I have heard that a wash coat of Rabbit hide glue intermediate in the process will create an aligatored effect-at some point I do want to try this approach.
Another method that I have used to repair old finishes that are aligatored-chairs for example-is the use of spray paint(cans) and a small butane torch. Spray on in no particular order flat black,red primer,flat brown,or some color close to what you are trying to mimic.As soon as you spray a coat ignite the solvent with the torch.Before the paint blisters or slightly depending on the look you are going for extinguish the flames-then repeat with a different color.Do this until there is adequate depth and let cool and dry overnight at least. Steel wool or burnish to blend the new and the old.
That's my .02 after 4 decades-I still search and experiment trying to isolate the variables-But as many who have tried we know that sometimes the results are not what we expect.
tom
 
For my spice chest, I used the following:

My recipe for the top carcase and the top part of the base was two coats of blonde shellac as a ?base? on the carcase, and then a dark-red walnut aniline dye, which was soaked in for about 30 seconds and then wiped off. This provides a nice red coloration, similar to the oxidation that walnut experiences over time. The shellac is to prevent the dye, and the subsequent steps, from penetrating too deeply into the wood so that it can be removed if a mistake is made. After the dye, I took black iron oxide pigment and made a very dark-tinted Kusmi seedlac. I brushed on two coats of that, and then let the piece dry for one hour. I then soaked a rag in Everclear and wiped most of it back off. Given that walnut is porous, a fair amount of the pigmented shellac was left in the pores, providing a grimy look to the grain. This grime is also difficult to wipe out of mouldings and corners, which is exactly where soot, grime and dirt would accumulate over three centuries.  Over this, I put on two more coats of blonde shellac to protect it. These coats were lightly rubbed out with rottenstone and linseed oil to polish them up a little, then the oil was left to dry on the surface. Buffing that back out provided the exact luster I was after.

On the veneered drawer fronts, the only finish is seven coats of blonde shellac. Each coat is rubbed out with #0000 steel wool before brushing on the next coat. After the final coat, buff with rottenstone and linseed oil.


Attachments

  • final left side (looks old) small.JPG
    final left side (looks old) small.JPG
    158.2 KB · Views: 85
It is great reading the ideas and methods to replicate old finishes.  My experince with repairing
antiques is limited only to what I purchased or received from family, so most of the furniture
keeps it's dings, unless really bad.  When I began making certain pieces of furniture that were
replica designs of the Piedmont and Mountain area of NC and Va (What MESDA calls BackCountry),
what stood out was the color of the Poplar, Pine and Walnut, and certain Maples.  So I had to
go back in time...to 1750-1850 in the BackCountry of NC.  Without going into the details of my
attempts to live this way of life for a time..I decided that the color was from Walnut Hulls.  I
studied for two years all the finishing books I could find..and only a few touched on this subject.
Most finishing books are aimed at taking chemicals developed since the 1860's to prepare finishes,
with the exception of Shellac and true Lacquer.  I found three sources that explained the process
of boiling Walnut Hulls, each using common additives, such as lye, and washing powder.

I have tried two methods...boiling green hulls, and boiling decaying wet hulls.  Both are messy,
and need alot of straining.  Once I get the dark color I am looking for, I add Calcium Carbonate(Arm
and Hammer Washing Soda).  I put my dark stain in pint canning jars, and water-bath can, just
like putting up tomatoes.  It keeps the stain from molding.  Once I open it up, I keep it in the
refrigerator.

I can adjust my color by adding water, or by heat evaporation...I can also let a jar completly evaporate
in a oven pan and use the remaining dried pigment mixed with boiled linseed oil and thinned with turpentine, to
make a non-water stain, or desolve the dried pigment in alcohol to a specific color and then add shellac for a
unique dark color as a sealer.

So far, I have been able to exactly replicate several pieces of furniture built in NC to the same color, and only
use a beeswax blended finish to get that soft dull ancient look.

It's a lot of work to make this stain/dye, and test colors and write down and catalog mixtures, but the results have been great!
 
Here is a picture of a Moravian Bible Box I made from walnut cut in 1924 and American Chestnut cut in 1904 and  stained with natural Walnut Hull dye and finished with Beeswax and Turpentine. The corner double quirks were made with a scraper formed from an old saw.  The interior is lined with Port Orford Cedar and the top lined with Marbleized Paper.  The bottom of the box has been stained with India Ink to replicate Ebony.
 
Mo, thought I'd mention that Garret-Wade http://www.garrettwade.com carries Van Dyke Crystals, which are made from boiled walnut husks. Stock number 99P61.34.  Might save you the time and trouble of boiling the shells yourself.  The box looks nice!
 
What a beautiful design and execution.  Is the lid a "floating" top in a frame?  Might you have plans you would be willing to share?  In any case, great work!

Dale
 
Thanks for reminding me about the Van Dyke Crystals.  I remember reading about them in another forum about two or three years ago, and probably would work as well.  I do remember reading something about the greenish tint in the crystals, but I have never used them..so cannot compare.  

What has attracted me to finishes of 18th and early 19th century is how they were made.  It is much like a study of how Rembrant and other famous painters made pigments.  For example, the soil around my house at a depth of 18" is the color of Yellow Ochre.  I did a study about 10 years ago of how to extract the pigment.  Now I have a quart jar of dried pigment powder of Yellow Ochre.  Many other colors are available in soil, and some of the beautiful Red Ochre Milk Paints are made this very way.

Without being a purist...making these things keeps the methods alive...and it creates great peace; working in the yard by a campfire cooking a stew and all the other things one can do to re-live a past.  It allows me the
opportunity to never retire...there's so many living history events that need this information shared.  

Now to go clean out the Chicken coop....instant fertilizer!
 
Dale, thank you!  The top is constructed from two pieces: the top layer was carved for the center mongramming area, and sloped by carving using a rabbet plane.  The second piece of the top is made as frame, which then allows the interior of the top to be recessed for adding a needle point, or marbleized paper or other.  The top is attached with Brusso hinges, the ones that have a stop at 95 degrees.

The body of the box is dovetailed and the corners modified to resemble a quirk.  This was done by hand.  I do not own a quirk handplane.  I got the idea for the corners from a book about John Makepeace in England.  One of the pieces in his book show a tall cabinet with this corner detail on every drawer, but I believe he used a Quirk Handplane.

The Base of my box is several pieces and has a recess underneath for a false bottom.  I never installed the false bottom, but was planning on using Earth Magnets arrayed in such a way that if you knew where push, you could open it.  I just finished the bottom with a India Ink stain....on walnut it is "poor man's Ebony".  Just lightly sand it with 400 grit to achieve the color of Ebony you desire and then seal.

I have no plans drawn, but I will get back with dimensions next week, and maybe draw it out in the next couple weeks.  I feel priviledged that you asked!
 
Mo, sounds like you ought to write an article on how you made the walnut stain, the creation of the yellow and red ochre pigments, the use of India ink and so on.  It would make a good article for one of the SAPFM quarterly newsletters. 

Another good topic would be the Back Country furniture that inspired you. 
 
Back
Top