Well?
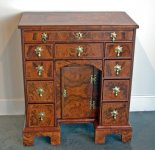
I finally finished the desk! As you may be able to tell from my previous posts I was sooooooo na?ve when I started this project! I was thinking ?Gee? I?d like to learn carcass construction, and besides, I need to learn how to cut dovetails better, so? I?ll make a desk! But I?d better make a small desk, since it would be easier than making a big one? ?. HA, HA, HA, HA, HA!!!!! Woodworkers don?t get any greener than that!
Well, to my credit, I decided to start by doing some research. Like everything else this turned out to be more difficult and time consuming than I had anticipated. I live in San Francisco which is a veritable wasteland of period furniture. I assure you - finding 300 year old furniture around here is not an easy task ? at least at first it wasn?t. I spent about two years haunting the local auction houses and antique stores looking for antique originals. I would peruse each auction preview hoping to find any Age of Walnut case pieces to study. There were some, but they were few and far between and small kneehole desks never showed up. More importantly however, I met people who did help me find what I was looking for through other sources. I mark this time as seminal in my period woodworking journey. I came across so many wonderful antiques that I could pick up and examine closely - chairs, chests, tables, highboys, you name it! I learned a great deal more from this direct examination than any amount of reading would ever have taught me. I not only learned how things were done, but more importantly, what not to do! The construction techniques and the repairs that don?t hold up well with time. I don?t think I can overestimate the value of this hands on direct examination. After a while I forgot about the desk. The whole thing took on a momentum of its own filling notebooks with details about joinery, wood selection, repairs, and literally many thousands of detailed photographs!
After becoming a minor (very minor) expert on English Age of Walnut furniture, I decided to return to the original goal of building my knee hole desk. By this time I realized that a ?small? desk wasn?t going to be any easier to build, and that such a desk was really not a good starting point for a beginner with a simple desire to learn carcass construction! It was going to be a stretch for me on many levels since I didn?t possess any of the requisite skills; hammer veneering, banding, carcass construction, drawer fitting, cross grain mouldings, to name a few. At this point it was clear that I should stop worrying about the dovetails ? they weren?t going to be the challenging part of building this desk!
I began by sifting through my notes and collecting pictures of the best examples. Many of these came from various on-line sources. One desk kept sticking out as more beautiful than the rest. At first I thought it was because it was made from a light colored burl wood (I believe it?s Ash burl) as opposed to the Walnut burl of the other examples. After a time I convinced myself that wasn?t the reason, and settled on the inset top as being the thing. But then I ran into a picture of a period example with the inset top that was made of Walnut, and it didn?t appeal to me at all! The reason this one desk remained special was a mystery until I started importing the pictures into Sketch-Up and reverse engineering the dimensions on a number of desks. Most of the other examples followed rules like the top drawer is 4? high, each successive drawer increases in height by the width of the divider, the width of the letter drawers is 10?, and so on. But this one desk had me stumped at first ? there was scarcely an ?even? dimension on the damn thing. Then it occurred to me to start using dividers instead of a measuring tape and - success! Most every proportion breaks down as simple whole number ratios. The top and sides even form golden rectangles ? George Walker would be proud! I believe this explains why this one desk stopped me dead in my tracks when I first saw it ? it is a perfect example of classical proportioning! That these rules affect the unconscious seems real to me in a first hand way now; I didn?t even have a notion of what Classical Proportioning meant until I started this project.
Armed with some well thought out, detailed drawings, a few maple burls, some Victorian era Doug Fir house construction beams salvaged from a neighbors remodel, and some quarter sawn white oak I felt ready for the challenge. A few days after Xmas 2009 I confidently dag into that pile of wood in my garage. The size of the cut list was amazing; I don?t think anyone can believe how much goes into building one of these little desks until they?ve done it themselves. After six months of working nights and weekends I had the desk mostly banged out, sans bracket feet. I had to take a break for a couple of months this summer, but work resumed in September and now it?s finished. I?ve attached a link to a web album showing the finished desk, the original period desk, and some construction photos.
http://picasaweb.google.com/114534187735626934521/KneeHoleDesk#5526799060198255202
I still consider myself pretty much a beginner/intermediate so any guidance/suggestions will be greatly appreciated. My ?do it differently next time? list is already quite large!
A heartfelt thanks to this group for providing so much guidance. I haven?t felt the need to post much because I usually find answers to my questions by perusing the old posts. But I think the thing I?ve found most helpful has been the ongoing inspiration I get from the amazing work that gets posted here!
JB
")