Philadelphia Highchest Pediment

FJDUFF

Active member
Hi,

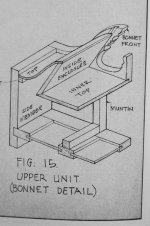
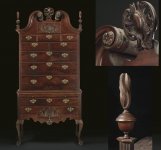
I am in the process of designing and constructing a Phila. Highchest with a full bonnet and I have a question.  On several pieces that I've studied, at the top of the gooseneck, the bonnet seems to have a full roll front to back.  I was wondering how that construction was accomplished?  Since the radius of the turn is very tight at the top, it doesn't seem likely that the makers were able to piece that form with thin wood as was done on other surfaces of the bonnet.  Any assistance or suggestions would be most appreciated.  If a photo of this detail would be helpful, I have several that i could post.

Thanks for your interest and help.

Frank Duff
Monkton, MD
 
Frank,

Could you share pictures of exactly what you are talking about? There are other ways of constructing these too... I've attached an image from Margon's American Furniture Treasures. I know this is not what you are describing but it is another option for you. Come to think of it... I'm not sure if it's regionally appropriate. Anyone else know?
 

Attachments

  • Margonbonnet-4.jpg
    Margonbonnet-4.jpg
    138 KB · Views: 130
Joshua,

I tried to post several photographs but was limited by the allowed file size of the attachments.  I will send them to you via email.

Thanks for your interest.
Frank Duff
 
Frank,

At first, I blew by your post, thinking to myself, "That sounds odd."  Then, after reading Joshua's response I did some checking.  I am not sure what your references are, and I would like to know.  In doing a very quick look at a few of my books, particularly Heckscher's book on the furniture at the Met, none of the Philadelphia highchests have a front to back roll.  What they do have is similar to the drawing that Joshua sent you.  The pediment is enclosed with thin boards along the outside until a point out of the line of sight is reached. Then they are attached to a vertical (the Margon drawing shows it angled) board running from front to back.  The scroll terminus of these highchests does not have a front to back roll.  On some large Philadelphia case pieces (include chest on chests and desk and bookcases) the pediment is not enclosed at all.  On the other hand, New England highchests with enclosed pediments often have a front to back molding that is a continuation of the cornice molding. PSP
 
Peter,

I appreciate your comment.  Thank you for taking an interest in my question.

The high chest that I am referring to is in the Williamsburg collection.  It is the Clifton-Carteret high chest, Ref Acq No . 1975-154.  It is a Philadelphia piece but appears to have been produced earlier than the two Allleck pieces illustrated in Sack's The New Fine Points of Furniture, pgs. 200, 201.  You can view a full image on the CW website. 

I will forward a picture of the bonnet detail to you via email.

Any comment or guidance as to how the maker constructed the bonnet would be appreciated. 

Frank Duff
 
Frank,

I do not know when or if you can go to Williamsburg to view the high chest, but, if you do, and can give the museum's staff sufficient advance notice, it might be possible to get someone to show you some of the details.  I would take note of whatever interior framing was used for the pediment drawer if they will take it out for you.  There is no information on this in the construction notes on the website.  As I said in my email, I think the roll is attached to a vertical board, like the New England enclosed bonnets.  I magnified your photo and would like to point out that it appears that the roll is covered in fabric.  This would make the finishing a lot less time-consuming.  PSP
 
This gives some idea of the piece.  Kittenger reproductions:

http://www.elmwoodfurniture.com/cw200.htm
http://americanainteriors.com/chests.html
 
Quarter sawn Pine or Poplar 1/8" wood (pun) be recommended. Expect cracks and splits. Pre drill nail holes. Kiss it and step away.
 
The Biddle-Drinker Family Chippendale Carved & Figured Mahogany High Chest of drawers.
Attributed to the shop of Henry Clifton & Thomas Carteret. The carving attributed to Nicholas Bernard, Circa 1760
 

Attachments

  • CliftonCarteret.jpg
    CliftonCarteret.jpg
    46.2 KB · Views: 106
Jeff,

Would you consider it cheating to make a series of saw kerfs in what will be the underside of the wood before rolling it ?

Karl
 
!/8" is to light from my previous post. Frank, Cut two pieces of cheap wood in the shape of your arch and see what works for your material. Please do consider quarter sawn material. Adding moisture to achieve the serpentine shape will come back to bite you. Not to say I have done that?
Karl, Once buried whose to say. Unless standing from the back.
 
Frank, Try clamping your hood cover to your serpentine shaped cheap wood pieces and let sit while you build your case. Unless you are faster than me this should give you ample time to consider your bonnet skin. Best wishes
 
I have had success on two occasions with 1/8" popular with artist's canvas contact adhesived (sp?) to the inside surface. They were nailed in place while misting with a spray bottle of water.

David Turner
Plymouth, MI.
 
Thanks to all who have replied to this post.  In particular, I appreciate the photographs posted.

Jeff,  I have a question on your second post.  When you suggest taking two pieces of cheap wood and forming up the shape of the arc, do you mean the entire hood cover from the top of the cornice to the top of the gooseneck or simply the "rolled" segment of it?  I was expecting to use two or more pieces of 1/8 or 3/16 quarter sawn poplar to make up the entire length of the hood cover, joining the elements together with some type of lap joint.  I was also expecting to independently form up the "rolled" segment and form a rabbit on the upper edge in order to "seat" the adjoining segment of the hood cover.  Is that segmenting of the hood cover not appropriate? 
 
I would just glue two or three quarter sawn pieces together 1/8" or 3/16th" and set them on the cheap wood serpentine pieces contoured to your serpentine arch previously mentioned just to form a call and let it sit until you need your bonnet skin. A simple straight edge glue joint is all that is needed. This will let you see how your material will handle the serpentine shape. Again if moisture is added please add time for your wood to dry before fastening. Fasten by nails only do not glue the skin down.
 
I built a high chest with a bonnet top a number of years ago (maybe 8), although not as elaborate as the one you are working on. I used poplar sawn to a heavy 1/8". I did not wet the wood, I did not glue it to the case. Using nails only (repro cut, from Tremont), it has split but not terribly so. It does not bother me as it is for my personal use, and is not visible unless you know what to look for.
 
I made a repro chest on chest ( pics in the gallery) with a gooseneck pediment.  I tried dry 3/16" quartersawn pine slowly clamped to cheap wood pieces with cauls.  They split.  Then I decided to use flatsawn material and moisture.  I oriented the growth rings to best follow the curve and glued up using simple butt joints.  Next, I encouraged warping by draping a damp dish towel over the area I wanted to warp.  Voila! In a few hours, I had an s shaped skin.  Clamped between cheap wood pattern pieces with cauls and let dry for about a week.  Done.
 
I had the great good fortune to view and study the pediment of the Clifton Carteret Highchest in the Colonial Williamsburg Collection.  I took a few close up pics which I will post. 

Here is what I found.  There was what appeared to be a turned wood dowel about 3-inches in diameter connecting the rear of the pediment board to the backboard at the top of the pediment board.  The backboard had been shaped to mirror the pediment board.  See the pics I've attached.  The wood that comprised the bonnet was very thin - i would estimate 1/8-inch.  The bonnet was made up of several slats that had separated over the years.  It was covered with brown paper which was in pretty good shape.  I can't say whether it was original.

Again, I want to thank all who contributed suggestions and comment.  I did put a 6-inch wide piece 3/16 -inch quarter sawn poplar into a caul and after a week it still is far from where it needs to be.  I plan to try some plain sawn poplar in another set of cauls this week. In any event, there will be a solution and I am anxious to get along with the project.

Frank Duff
 

Attachments

  • Rear view.jpg
    0 bytes · Views: 49
  • Front View.jpg
    Front View.jpg
    31.1 KB · Views: 48
Back
Top