You are using an out of date browser. It may not display this or other websites correctly.
You should upgrade or use an alternative browser.
You should upgrade or use an alternative browser.
New Port Shell
- Thread starter walter connolly
- Start date
Fran and Allan- I'd be happy to add my two cents worth in the shell carving dept if needed. I do have both concave and convex sequential castings available on my website.
Fran- You might consider having people carve the convex ones as separate pieces like the old ones so that they don't have to sweat chewing up the background. I don't mean to butt in to your project, but it's hard enough for people to carve them glued to a waste board. There's only one that I know of that's one piece- the one made in Providence at the John Brown house. It is spectacular.-Al
Fran- You might consider having people carve the convex ones as separate pieces like the old ones so that they don't have to sweat chewing up the background. I don't mean to butt in to your project, but it's hard enough for people to carve them glued to a waste board. There's only one that I know of that's one piece- the one made in Providence at the John Brown house. It is spectacular.-Al
Al- Everyone has the option to carve the shells separate. It's the way to go, really. I did two out of 8/4 and did a bit of background chewing, certainly. I like the extra challenge and it feeds my OCD. I worry about having the convex shell slip during the glue up, but obviously a couple of pins in the back would prevent this. Thank you very much for offering your two cents. If you wouldn't mind I think it would be great to hear from you primarily on basic variations the shells have taken on, perhaps spending a few words on the center carving.
A little preliminary from me: if you are going to carve the shells separately you will want to start of with a reasonably stable looking piece of 5/4 with a straight grain. Pattern grade is ideal. Start off with a board a heavy 5 feet long. The center 34-1/2 inches will be the fallfront with the concave shell carved into the center. The breadboard ends are going to be 13-5/16" in length X 2-1/4" in width. Either get a piece of lumber that gives you these breadboards from the length (now you need a piece 7-ish feet long) or in width which means you'll need a piece 16 or 17" wide. With the board in the rough draw a big fat chalk line diagonally across the face. This mark will orient everything for future reference. Drawing a big "L" and "R" on the ends that will become the convex shells isn't a bad idea. Dress the other face (without the chalk mark) flat. Just get the lumps off. Isn't necessary to have it perfect right now but get the wind out and start getting a feel for the general texture. rough cut the board into the main slab, the two pieces for the left and right shells, and the breadboards. Put the breadboard stock someplace you'll be sure to find them six months from now such us in the trunk of your car or next to the pile of scraps near the woodstove. Put the main piece on you bench and plane the chalk mark face flat. The finish dimensions will be 13-5/16 X 34-1/2". This length leaves enough for 1" stub tenons on each end. The shoulders will be 32-1/2" apart. These dimensions are for a 38-1/4" wide desk, by the way.
Now remark the orientation of the slab relative to the pieces for the left and right shells. None of this marking is even necessary if there are no grain features to your piece. Just keep in mind that if there happens to even a single line that exaggerates when you finish the thing and this mark shows up as a sort of "Zoro" across the fallfront, you are going to be very mad at yourself.
The finish width is 13-5/16. Leave the board as wide as you can to give you the psychological edge during the carving. There's no sense working to fine dimensions at this point when the finish outline can be created anytime. Mark the center of the length and width of the board. You can add a few lines parallel to these to the left right top bottom now as well. No dimensions, just equally spaced from the center marks. These are just a bunch of reference lines you can use later.
Flatten the back sides of the shell pieces.You can resaw these blocks to 3/4" if you are very, very brave. The final thickness of the shell will be around 11/16". Store these with the breadboard ends.
mikemcgrail
Well-known member
I did not know any were originally one piece-that was one coolly confident carver. I think Fran did carve his as one piece(hope I'm not wrong about that). I would never have the mental or intestinal fortitude to try. I think it would be hard enough to find a plank with enough ribbon to look interesting that could still be carved for the concave shell, then leave the convex shells carved from something with the same color, but friendlier texture.It still makes the most difficult shell to be carved from the more figured stock- I think there are kneeholes with highly ribboned blocking below shells carved in the not so highly figured- I kind of think a heavy ribbon or other spectacular grain might even possibly detract from the carving. Just my thoughts. I think the old guys were lumber lovers. To my eye, the lumber is as important to the whole composition as proportion and detail. I wish I had done a more proper survey of the photographed examples I have, this is just my feeling. I am guessing the applied shell is the only practical way to achieve the whole.
mikemcgrail
Well-known member
Fran,
OCD does sound better than most descriptions I have heard for those building 18th century furniture in what is now the 21st century.
OCD does sound better than most descriptions I have heard for those building 18th century furniture in what is now the 21st century.
Mike. The two I carved are solid. A note to all: the thickness needs to be 8/4 and I recommend an unfigured piece. Less likely to twist.
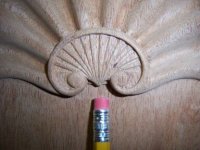
The main fear seems to be running into the background and as I say it may happen once in a while. If you are looking for a perfectly flat background don't carve the thing out of one piece. For myself I would consider cleaning out any glue or wax out of the insides of these gullets as taking the care not to plunge into the background. The carving around the center is enough to strike fear in the most hardened. Here the grain goes in every direction you can imagine.This is the brain surgery.
OCD-The panels for the upper doors of my secretary (L+R convex) are also one piece. The upper stile is free of the shell in front of it.
F
Fran,
Good god...what a project!! Ok...can you be a little more specific on the gouge sizes...I don't think I have all of those, and will need to order some Pfeil chisels...
Also, where do you get your mahogany? I found a source, but nothing quite that wide. Absent mahogany, what other hardwood would be acceptable?
Thanks,
Allan
Allan,
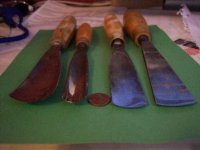
I like your question. I've always liked that sort of humor. I've had these things so long the size and brand are barely legible. I have always bought carving tools with the confidence of high roller at the craps table, always with the same result. I found my glasses and I'm looking at the gouge on the far left. It looks like it used to say SWISS MAsomething and I can make out a 7 stamped on the metal. The next one to the right is I think an Acorn, looks like a 16 was stamped onto it. It is curved along the length of it, like the first one, a 'swept' gouge? The next is straight with a 4 stamped on it. It's shallower than the first, nowhere near flat. The last is a fish tail gouge my father gave me in my boyish days. In order they are1-3/8", 3/4", 1-3/16", and 1-1/2". The first on the left will help you clean out the curve of the belly of the shell. I like it because the sweep lets you work it around the radius easily. The second is primarily used for the convex bed under the center shell. It's pretty much the right radius but I use another tool to clean out the corners. The next two are used for a couple of things. They rough out the basic curve of the shells profile and also are used trim outer edges of the first and last sections of the shell where the end at the bed below. The third is also good for the outline of the center of the shells.
I get my mahogany all over. I try not to drive too far but there is a place 30 miles away who always has some decent slabs of wide pattern grade SA Mahogany. You can glue this up if it's necessary but it shouldn't be. The above named source also has a whole bunch of old mahogany up to 50" wide but it's all 4/4. Irion will ship you what you need but I understand they have a minimum.
The originals were all mahogany. I don't see any harm in making one out of walnut or sapele but be careful about the grain. I came across something on the web that I wish I could get out of my mind. Somebody carved the shells out of cherry with a heavy winter grain. Not only was it poorly carved but the grain pattern contrasting with the carving gave me vertigo. If you carefully select the right piece of African Mahogany you'll be OK. Don't use bubinga. Your tools will never survive this. Don't use lacewood either, or oak or I'll hunt you down and kill you.
Fran
Hello all. I got an email from Mark that recommends I do not attempt to post zillions of photos on SAPFM forum. I'm pretty sure I have my email system set up to communicate with those who have expressed interest in this project, however I want to make sure everybody's in and I would like to ask Al, John M. and anyone else who would like to jump in to send me their email addresses in order to vet my methods. I don't plan on doing this twice and God only knows how this project will manifest itself years from now in this electronic age. Let's all get together and nail this thing down.
I hope to start on this next week. I will be carving the fallfront out of a single piece of 8/4 mahogany but anyone who wishes to do so can glue a piece of 7/8" material to a piece of scrap. A note on this. It takes only a few drops of glue to secure the piece. Titebond molding and trim glue or any PVA will do. Put the glue drops well in from the edges so any tear out won't show, and gouge a few sections of the scrap around the edges so you can jam a chisel or screwdriver underneath the finished work without marring the edge. Obviously the critical areas of the carving are where the shell meets the background. Once this is done the shell can be clamped to the background and the rest completed. However those who choose to use this method will have to be patient as my method employs a necessary diversion from this tactic.
A note on gluing finished carvings to a background. Obviously there is a concern that clamp marks are not acceptable. What you will need to do before you clamp the carving to the background is get a small can of bondo and cast a few clamping points with it. To do this you will need to cover the carving with saran wrap and place a few generous daubs of bondo on the carving. Before the bondo has set completely you will put a flat scrap of wood over the bondo and clamp the piece with a light pressure. This will allow you to use the same or similar piece of scrap wood to do the final glue up. This step will be revisited later.
A note on gluing finished carvings to a background. Obviously there is a concern that clamp marks are not acceptable. What you will need to do before you clamp the carving to the background is get a small can of bondo and cast a few clamping points with it. To do this you will need to cover the carving with saran wrap and place a few generous daubs of bondo on the carving. Before the bondo has set completely you will put a flat scrap of wood over the bondo and clamp the piece with a light pressure. This will allow you to use the same or similar piece of scrap wood to do the final glue up. This step will be revisited later.
Fran- I'll help you find the people with the oak shells.
I've found that dilute hide glue with paper right out to the edge is good to hold the shells because it grabs the fine edges at the perimeter where they're liable to disintegrate. Cut out a "donut" of brown paper so that there's only paper about an inch in from the edges- it's a lot easier to get off that way( I use an artist's palette knife)
I do have a list of tools needed to do the shells, which I'll post.
Mike is right about the grain of the wood distracting from the carving. You want something nice but not highly figured. Carving those diagonal lobes is difficult in boring wood and more so when the grain is running back and forth.-Al
mikemcgrail
Well-known member
Al,
I was wondering if the Brown desk was still the 38.5 or so wide at the case, or did they perhaps have to widen the whole case because of the towering height? I guess it does not really matter, but the photos of that desk make its proportion look perfect, even with those incredilbly long door panels. It might just be the angle of the photographs, however. I don't really think there would be much demand for a desk this size today. However, perhaps if this thread were combined with the "going pro" thread, there might be an overlooked niche market for 9 and a half feet tall desks in the NBA. You never know who might be the next lovers of american furniture. I have always found it fascinating who did appreciate it and who did not. I can never predict it.
Fran,
I wouild just be a little careful with the pattern grade lumber. That I have is from the 1980's, and they really did not allow any change of direction of grain at that time, I think it really keeps a piece from looking period. I must admit this is my area of ocd, but it is not called that locally here in kentucky. I made a large boston blockfront chest (that I photographed in the gallery) in 1989. In 1990, I remade an additional 11 drawers for it because I did not think the luimber I had chosen the first time looked "correct". I still have all exfra 11 drawers in the attic of my shop. The lumber does make or break a piece.
Fran,
I'm really excited about this project, and will try to keep up with the group. Between you and Mr. Breed, we'll be having a Master Class! It's unfortunate that the SAPFM forum isn't able to host many photos. A project like this strikes me as one that would have great interest for other members -- following along in real time or through the archive. And even though I feel like an Arkansas hog farmer at a spelling bee, I know this will be great fun.
You mysteriously avoided mentioning the name of the "above named source" for mahogany. LOL! Is that OCD kicking in? I'm still not finding what I'm looking for (and can't afford Irion's 150-200bf minimum). May opt for 15bf bundle of 5/4 from Hearne Hardwoods...or just punt and find a nice piece of Cherry or Walnut. My purpose in this is to learn to carve the shells, then incorporate that into other pieces, eventually working my way up to the fall-front desk...I should be ready for that about the time they refuse to renew my drivers license.
Allan
There are different case widths that seem to vary by proportion to height but I defer to Al on this.
Any thing with wood in it has its pitfalls but I recommend Pattern grade over say, a gigantic knot. The fallfront panel as described so far is flattened on the carving side. For those of you who will be taking the 'carve out of solid' approach, remember you are going to be taking a huge 3/4 inch notch out of the center for the concave carving. This might cause some movement. The back side of the panel is still rough at this point because the last thing we are going to is correct any wind the board may have developed since we started the carving back in 2009.
The 'above named source' is Forest Products in Greenfield MA.
Allan, If you want to carve the shells out of cherry that's fine. We are not put into this world for pleasure only. I would personally use walnut over cherry.
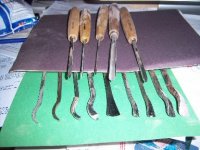
Here are some more of the tools I find useful. Basically if you have every size veiner from 1 to 11 or 12 mm your ahead of the game.I like the back bent gouges for the versatility they offer. The spooned veiners are something I can't live without and are real handy on the concave shell and the bitchy end of the shell where it meets the center. Al Breed will provide his list of tools which will be about as comprehensive as it gets. Also, take that 3/8" mortise chisel you never use and grind the corners off. Shape it into a nice radius that tends more to an oval than a 3/8" radius. You'll end up with something that looks more like a turning tool. You're gonna love what this baby will do for you. I don't use any parting tools. I don't know how. I own some but I just use them to keep the windows open in my shop. Maybe Al can shed some light on why these were ever made in the first place.
Tinkerty tonk
Fran
Tinkerty tonk
Fran
Attachments
Fran, Allan et al- Now you guys are going to make my cup of tea siting next o the keyboard get cold again. Tools......
Everyone has their own tool kit within certain limits for any given job. I tell my students this overly simple "secret" to carving: Look at the shape you want to create, find a tool with that shape, push it through the wood, and it will leave that shape.
We all have tools that we prop the window open with, and for this purpose I use spoon gouges. Not that they are not useful from time to time, such as the hollows in the lobes within the rosette, for instance, but I have managed to get along without them for the most part. If you're making spoons, well that's another story. My theory is really that whatever works for you is what you should use. "Economy of cuts" is really what your mantra should be. The fewer tools you use, the faster you'll carve.
Parting tools I use to lay out the fillets ( see the FWW article I wrote some years back) and do long runs such as the layout of acanthus leaves, as well as the dreaded wavy line around the perimeter of some shells. A parting( or V) tool ground back will enable you to run across the grain as well as along the diagonal fillets going in either direction- this last move due to some interesting geometry of the grind that's not important to explain here.
My second favorite tool for the same reasons is an 11-7 ground back in the same manner. This is universally useful in doing the hollow lobes of the shell. My elapsed time to carve a shell, and I reluctantly include this to emphasize the usefulness of a customized tool kit in these projects, is about 5 hrs. Economy of cuts.
I wouldn't carve a shell in cherry unless I had to due to hardness and grain, as well as tradition. Walnut would be OK, but you'll be using a mallet more, as you'd have to in cherry also.
I think the desk I made for the sect'y base was 41" wide. As Fran said, they vary. I have plans on my web site if you really want to make one of these things. The Brown model was too tall to look good. See others such as those at the Met, MFA Boston and Yale for better proportions. Don't try to squash the pediment to fit it into a smaller space, this will cause a lot of anguish and the results will be terrible- it's really tricky to change this element and still get good proportions. I had a student who was a rocket scientist and an architect and he couldn't make it look right. If you want to shorten the piece, take it out of the door height.-Al
Well there you go folks. If you are with us for this project you've got the perfect combination. Myself, the relative novice who frets over every slice, and the seasoned veteran who can take the edge off the thing for you.
I have mentioned before now how important I feel it is that you redraw the patterns I mailed out on paper. Start doing this asap. You will get a good sense of the form and perhaps find the little shortcomings and be able to correct them before the chips start flying. I have someone digging out a piece of mahogany for me and I will start getting the panel ready this week, probably Wednesday. If your having a hard time finding an appropriate piece of SA mahogany see if African mahogany is available.
I am unapologetically slow at carving these things so you'll have plenty of time to catch up.
Fran
Share: