Angled mortises vs angled tenons for chair construction

Jeff L Headley

Well-known member
I thought I might kick a bee's nest. We always angle our mortises so we have straight tenons with angled shoulders for our period chair construction. I have repaired many Victorian chairs with failed angled tennons to know not to use an angled tenon in period construction.
 
Jeff,

If I understand your description; by angling the mortises, you permit the wood grain in the tenon to be in line with the tenons direction; that makes a lot of sense to me. Otherwise you would be getting more or less cross grain in the tenon which I imagine would diminish its strength.

I guess I would be surprised if you did it the other way around.

No bees here.

Karl
 
Jeff,

    All of the 18th century  chairs that I have examined are done the way you are doing them, and it is how I do them.

Kirk
 
Rob, We have a number of angled cradles at different degrees we keep for setting a leg in a mortiser. We have also made an angled block to clamp on the side of a chair leg to cut them by hand if someone would want to do it that way. Pictured is the angled cradle for the mortiser.
 

Attachments

  • cradle.JPG
    cradle.JPG
    135.9 KB · Views: 143
Rob, We will use a wide board to get as many legs as we can out of a single board. Less waste. The remainder off of the last cut we will use as the support for the legs making sure the surface we will mortise is parallel with the mortisers table bed. I hope this makes sense.
 

Attachments

  • Leg on support over cradle.JPG
    Leg on support over cradle.JPG
    148.3 KB · Views: 117
Jeff,

The photo fo your mortiser looks all too fami,iar, and I am looking for some help as I think mine is the same brand.

To re-index the arm that you use to lower the cutters, one must slide the hub fitting along its shaft away from thge maching stand,and then return it by sliding oit back. With my machine this is a very unwieldy operation that  usually requires one to use two hands to accomplish it becasue if you try to use your actuating hand on the end of the machine arm, that cets up a sufficient bending moment to jam the slider from slipping easily

Do you have a trick to help with wirh this; I am far more used to my vertical mill that has a release button and can be done with one hand. By chance is anyone aware of a backfit substitute hub that is more user friendly ?


Karl
 
I have repaired many Victorian chairs with failed angled tennons to know not to use an angled tenon in period construction.

what size/thickness were the tenons?  What was the overall quality of the fit/tightness of the joint?  what wood?
 
First of all, my generalisation might not be fair, but with that said I have worked on many different Victorian chairs made out of many different woods. Pine overlaid with Mahogany, Oak overlaid with Mahogany, solid walnut, solid mahogany with most tenons between 5/16" and 3/8"in thickness. Sculpting of wood no matter what period should require a consideration of the grain. 
 
Jeff,
      Do you use a wedged mortise and tenon? If so, when the mortise goes through the rear of the leg is it in the center in the back or off center?
Thanks,
Dave
 
Many chairs made in our area did not have through tenons. The ones that were I have seen both ways, wedged and not wedged. When were the wedges I've seen introduced, originally or a later restoration might be a question. Just to kick another bee's nest. I am not much on pinned tenons. If your tenon needs a pin to hold it together then what does that say. Could it be the "Old Dog Rule". That is the way I was told to do it so you should also. Different periods used different construction techniques along with the different regional characteristics swirled in to keep period construction interesting for us yesterday and today. (Through tenons would require a secondary set up for the backside of the mortise as to prevent blowout. Where the tenon is exposed on the backside of the back leg depends on your layout.
 
Jeff,

I want to be sure I understand your point about using a pin to secure a tenon; you just may have disturbed a bee this time.

Certainly we all likely agree that a mortise and tenon joint has near zero strenght in tension; that is, with a force acting to withdraw the tenon.

I can imagine that in some circumstances where the user was or  is reluctant to use/trust adhesives or wedges, a pin might be a good solution - certainly they are widely used in timberframe construction even today when we arguably have the finest adhesives available that have existed at least until now to protect against withdrawal of the tenon, and wedges are not often used.

Once you accept the notion that a pin had utility at some point in historical time, it seems perfetly valid to simulate or even rely on using that solution today of we are trying to recreate the construction details of an old piece, even if it is only cosmetic and one glues the joint also.

Karl
 
Jeff,
    Thanks for the reply. Back to the angled tenon vs angled mortise issue.  I am no expert, but I find angled tenons in chair patterns from Ron Clarkson, Norman Vandal, Franklin Gottshall, Jeff Greene to name a few.  Do I misunderstand?
Dave
 
No, you dont misunderstand.  There is more than one way to assemble a chair and there is no right or wrong answer.  The angled tenon vs straight debate... you could argue it all day long.  To add fuel to the fire- on a chair where the side rail meets the back post, what about an angled tenon into a mortise that is perpendicular to the floor.  Im sure someone will argue/debate the proximity of the bottom of the mortise being to close to the outside face of the back post or one might say "they never did it that way" etc. 
 
As soon as you say that they only did it this way you will find one done the other way. I could add a few names to the list of prominent cabinetmaker that use angled tenons. With the hundreds of period chairs I have worked on I can count on one hand the amount of them with angled tenons. I think angled tenons were not used as much as most people think.
OK for pins! I am not saying I would not use a pin where one was originally used. And I completely understand the reasoning for the use of pins. I am just saying many were superfluous. I don't mean to demean any one's work this is just a friendly discussion.
 
I agree with your thoughts on the pins... WHy do it if the joint is tight but some people expect to see them on certain country(ish) pieces wether it was there to begin with or not.  I know the angled tenons are really not on "all" period chairs.  I do it out of a time/money and the way I was taught stand point.  I have made hundreds of chairs a certain way and it is hard to change that thought process.  It also comes down to a machine way for me as well.  When I am able to make 100% of all of the joinery on a set of chairs in a matter of two days or so and have them all exactly the same...

I think angled tenons are more difficult to do by hand but maybe easier by machine? 


OMG  I am so happy to read this discussion.  Ever since I decided to try my hand at chair making I have questioned this joint.  Why would you want a cross-grain tenon at the highest stressed joint?  Yet everything I read seemed to indicate that this was the only way it was ever done.  

Last summer I finally built my first chair and, wanting to staying true to the process, I angled these tenons. It is a very difficult joint to set up and cut correctly!  The whole time I'm thinking, this would be much easier and a better joint if I angled the mortise.

The through M/T that is so common on the Chippendale chairs also troubled me.  Personally I find it out of place on such an elegant piece.  But that's just me - I just don't understand the need.  Last summer I had a chance to see a set of Robert Walker's dining chairs when the wife & I visited the Shirley Plantation near Charles City, Va.  While everyone else was admiring the little dog heads he carved on the ends of the chair arms, I was looking at the back of the chair.  I didn't see any through M/T's.

I am happy and relieved to understand that there is an acceptable alternative to constructing this joint.

Finally a good night's sleep :)

P.S.
If you are ever in the area, the Charles City Tavern has awesome crabcakes!
   
 
Jeff,
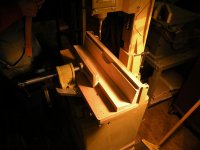
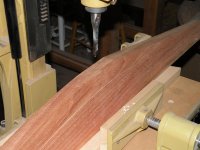
Thanks for posting pictures of the cradle set up for the mortiser.  I assume it is set up for a compound angle, as the rails are perpendicular to the ground, and the back legs cant outward at an angle.  Also, do you make two sets for each chair, as the bottom rails are a slightly different angle than the seat rails?  Do you flip the cradle when mortising the opposite leg, or just reset the mortiser?  I made three chippendale side chairs recently and decided it would be easier to cut angled tenons v. angled mortises, though the compund angle on the tenons were sort of a pain.  I like the idea of the mortiser jig, and am interested to hear more about your procedure. 
Thanks,
Rob
 
Rob, We have numerous cradles at different angles and keep them so we can use them again. I found one a few weeks ago my father made at 17 degrees. I wonder what that was for? They are not at a compound angle. We fit the tenon on the back leg to the top of the mortise, the mortises are parallel with the out side edge of the back legs then trim the bottom of the side rail face to fit the splay of the back legs then flow the surface into the rest of the side rails going out to nothing. You will see this method used on many period chairs. Yes the mortises for the stretchers are at a different angle. This is another reason to keep the angled cradles. We do this all the time so please let me know if this doesn't make sense. I will try to explain it better if needed.
 
One question Jeff--if you make the mortises parallel to the outside edge of your back leg, and the tenon for the rail is not angled, won't your rail be canted at the same angle as the leg?  Then when you get to the front of the chair, you have a canted rail intersecting with a perpendicular leg? 

When I made my chairs, I made the mortises in the back legs perpendicular, then feathered the edge of the rail from the back.  I used the cut off from the leg blank to support the leg on the mortiser, then made a "shim" that matched the angle of the cant of the back leg.  I put the shim between the leg and the mortiser and got the perpendicular mortise. 
Rob
 
Back
Top